Tuesday, August 30, 2011

30-Minute Shrimp and Saffon Rice with Fennel Salad

This dish was inspired by the cover of the September 2010 issue of Food & Wine.  I remember reading the magazine last August on the train up to Hyde Park and getting so hungry that I decided I had make the cover recipe that night. I bought the ingredients at the Grand Central Market as soon as we got off the train–shrimp, arugula mix, fennel, scallions, and saffron (the rest I had at home)–and rushed home to cook.


As it turned out, I sort of ignored the recipe. Written by a chef (Joshua Hopkins of
Abattoir, in Atlanta), the original recipe had some rather involved steps (like making shrimp stock) that in my hungry daze I wasn't up for tackling.  And there was no way I could wait an hour and 15 minutes to eat!  But I love shrimp, and I especially loved the idea of pairing them with creamy saffron rice and a light, summery salad.  So I decided to challenge myself: to make the meal (with a few little shortcuts!) in 30 minutes or less.

Shaving time off was easier than you might think: I bought the shrimp already cleaned (which saved a ton of time), skipped the homemade shrimp stock, sauteed the shrimp in my usual combo of olive oil, garlic, red pepper flakes, and thyme (instead of poaching), and finished cooking the parboiled rice in saffron, half-and-half (instead of cream), and chicken stock.  The salad took just minutes to make–after thinly slicing the fennel and scallions, I tossed them with a bit of arugula and frisee, lemon juice, and olive oil. And as an added heart-healthy bonus, I didn't use any butter at all. 

With apologies to Chef Hopkins for taking a few shortcuts, I must say the meal turned out to be delicious. I will definitely make this combination again and again...though probably the 30-minute way. (And if I'm ever in Atlanta, I'll make sure to pay my respects at Abattoir!)

30-MINUTE SHRIMP AND SAFFRON RICE WITH FENNEL SALAD

Serves 4

Saffron Rice
1 cup Arborio rice
1/2 cup half-and-half
Pinch of crumbled saffron threads
1 1/2 cups chicken broth
Salt and pepper to taste

Bring a large saucepan of water to a boil.  Add the rice and cook, stirring occasionally, about 15 minutes or until al dente. Strain and set aside.

In a medium saucepan, combine the half-and-half with the saffron and chicken broth and bring to a simmer.  Add the al dente rice and stir over medium heat until the rice becomes creamy, about 3 minutes. Remove from the heat; season with salt and pepper to taste.

Shrimp
1 to 2 tablespoons olive oil
2 garlic cloves, thinly sliced
1/4 teaspoon teaspoon red pepper flakes
16 large shrimp, peeled and deveined (with tails left on)
1 teaspoon chopped fresh thyme
1/4 cup dry white wine
Salt and pepper to taste

In a large saute pan, heat the olive oil over medium high heat. Add the garlic and red pepper flakes and cook for 2 minutes, or until the garlic is just beginning to brown.  Add the shrimp and thyme and cook, stirring constantly, until the shrimp are pink and beginning to curl, about 3 minutes. Add the wine and let simmer until it has nearly evaporated, another 1-2 minutes.  Remove from heat and season with salt and pepper.

Fennel Salad
1 small bulb fennel, thinly sliced
2 cups arugula, frisee, or mesclun blend
1 tablespoon fresh lemon juice
2 tablespoons olive oil
Salt and pepper to taste
1 scallion, thinly sliced

Toss the fennel and arugula with the olive oil and lemon juice; season with salt and pepper.

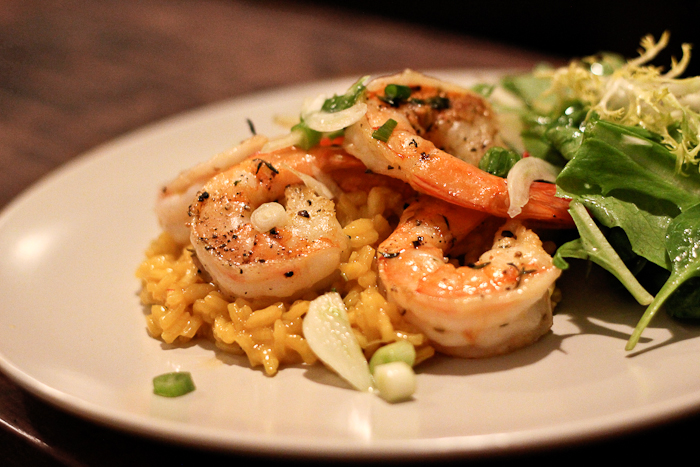
To serve: Mound some rice in the center of each plate.  Arrange 4 shrimp on top and some fennel salad on the side.  Garnish with the sliced scallion.

click for recipe & more…
Your two cents...

If you don't have a Google login, please select Name/URL from the "Comment as" list below

Saturday, August 27, 2011

Blueberry Streusel Coffee Cake


As much as I love a good dessert, I can usually take it or leave it at the end of a meal. Another glass of wine is dessert for me! But breakfast is an entirely different matter. First thing in the morning, I need something sweet with my coffee. Until I've satiated this craving, I can't even look at eggs, bacon, or anything savory. Usually toast and jam does the trick, but sometimes I get a hankering for something homemade...a muffin, a scone, or best of all, a warm piece of coffee cake.

There's nothing quite like a cinnamon-scented coffee cake (with plenty of crumbly topping) to get your morning off to a good start. Preferably one with blueberries and walnuts. With some sour cream to give it tang. And maybe a little lemon zest for good measure. (Well that's at least how I like it!)

I got a new bundt pan as a wedding gift, so I decided to use it to make a coffee cake for a brunch I was hosting. I love Barefoot Contessa's streusel-swirled sour cream coffee cake, but I really wanted to make one with blueberries and a bit of lemon zest. So I adapted her recipe a bit to add the aforementioned ingredients and the result was terrific. Post-brunch, I blissfully enjoyed a slice (or two) every morning (and afternoon) for a few days until I finally had to remove the cake from my sight (and into the trash) lest I polish the rest off! A dangerous prospect.

BLUEBERRY STREUSEL COFFEE CAKE

Serves 12

Cake
2 cups fresh blueberries
1 tablespoon flour
12 tablespoons (1 1/2 sticks) unsalted butter at room temperature
1 1/2 cups granulated sugar
3 large eggs at room temperature
1 1/4 cups sour cream
1 1/2 teaspoons vanilla
1 teaspoon grated lemon zest
2 1/4 cups all-purpose flour
1/4 cup cornstarch
2 teaspoons baking powder
1/2 teaspoon baking soda
1/2 teaspoon salt
2 cups blueberries (fresh not frozen)


Streusel
3/4 cup light brown sugar
1/2 cup all-purpose flour
1 1/2 teaspoons cinnamon
1/4 teaspoon salt
3 tablespoons unsalted butter, cut into pieces
3/4 cup chopped walnuts (optional)

Preheat the oven to 350 degrees. Butter and flour a 10-inch bundt (or tube) pan.

Toss the blueberries in one tablespoon of flour; set aside.

Cream the butter and sugar together in the bowl of a stand mixer or in a large bowl with a handheld mixer for 4 to 5 minutes, until pale yellow. Add the eggs one at a time, beating between each addition, then add the sour cream, vanilla, and lemon zest.

In a separate bowl sift together the remaining flour, cornstarch, baking powder, baking soda, and salt until combined. With the mixer on low, add the flour mixture gradually to the batter until just combined. Stir in the flour-coated blueberries gently with a spatula, scraping the sides to incorporate all the batter.

For the streusel, place the brown sugar, flour, cinnamon, salt, and butter in a bowl and pinch together with your fingers until it forms a crumble. Mix in the walnuts, if desired.

Evenly sprinkle about 3/4 cup streusel mixture over the bottom of the pan. Spoon half the batter into the pan over the streusel; smooth with a spatula. Sprinkle another 3/4 cup of streusel over the batter. Spoon the remaining batter into the pan, spreading it out with a spatula. (You may have leftover streusel--I did. Just put it in an airtight plastic container and keep in the refrigerator for future baking projects! It keeps for a week to 10 days.)

Bake for 60 to 70 minutes or until a cake tester comes out clean.

Let cool in the pan on a wire rack for at least 30 minutes. Using a long thin spatula, carefully remove the cake from the pan and place streusel-side up on a serving platter. Just be careful not to trip and drop the cake on the table, like I did. It will make quite a mess, but will still taste just as good :)

Enjoy!


click for recipe & more…

Add a comment!
Your two cents...

If you don't have a Google login, please select Name/URL from the "Comment as" list below

Thursday, August 25, 2011

Heirloom Tomatoes

Though I don't love the heat, August is one of my favorite months of the year. Why? For one reason:


HEIRLOOM TOMATOES!!!! At this time of year, the market is full of beautiful, extra-juicy tomatoes in all colors, shapes, and sizes–so ripe they are nearly bursting. It really makes it hard to eat tomatoes any other time of year when they taste so incredibly good right now. I love pureeing them with cucumber, onion, garlic and fresh herbs into a zippy gazpacho (more on that later), or simmering them slowly with garlic and onion into a fresh tomato sauce. But perhaps my favorite way to eat them is in a Caprese salad: simply sliced, layered with fresh buffalo mozzarella, torn basil, and a drizzle of olive oil and balsamic vinegar.

Last September, the day before my wedding, a couple of friends and I trekked over to the Farmer's Market (on foot!) and picked up several crates of gorgeous heirloom tomatoes that would later go into a Caprese salad for the wedding dinner. Though I could have just entrusted our caterer to buy the tomatoes, I was obsessed with the idea of having the freshest, funkiest tomatoes in all shapes and sizes. Otherwise, what's the point of an heirloom tomato salad? (Note: It was definitely worth the effort.)

My other favorite way to eat tomatoes is–as shown in the picture below-sandwiched between airy ciabatta (from Amy's Bread) and pressed on a panini grill.


This has got to be one of my all-time favorite sandwiches. I added a little prosciutto, pressed it for 3 to 4 minutes until the bread was crisp and the cheese oozy, and voila! A beautiful lunch that can only be enjoyed for a few more weeks. And while you're at it, you might as well pour a glass of rose since that, too, is fleeting...

Panini Done

HEIRLOOM TOMATO PANINI WITH PROSCIUTTO, MOZZARELLA, AND BASIL

Ciabatta bread
Good extra-virgin olive oil
Fresh buffalo (or cow's milk) mozzarella, thinly sliced
Heirloom tomatoes, thinly sliced
Torn basil
Thinly sliced prosciutto
Salt and pepper

I purposely did not include amounts because you can use your judgement on this. And who knows, you might just want to make one sandwich, but you also might have friends over and want to make four or five! So just look at the pictures above as a guide.

Heat your panini grill.

Slice the ciabatta bread in half and drizzle both sides with olive oil. Layer one half of the bread with mozzarella, tomatoes, torn basil, and prosciutto. I usually add a little salt and pepper on the tomatoes, plus another drizzle of olive oil, but feel free to season as you wish.

Place the top half of the bread on top of the sandwich and lightly brush both sides of bread with olive oil. Press the sandwich in the grill for 3 to 4 minutes, or until the bread is golden and the cheese begins to melt.

click for recipe & more…

Add a comment!
Your two cents...

If you don't have a Google login, please select Name/URL from the "Comment as" list below

Thursday, August 18, 2011

My new blender obsession...

I'm married to a non-cook. Which works out just fine, since I clearly love cooking. Though I'm not sure he had ever used them, Brandon did bring two appliances into the marriage: a panini-maker (which will get its own post eventually) and a blender. And not just any blender, but one of those high-powered, ice-crushing types, that can make everything from soups to smoothies to–my personal favorite–frozen margaritas. Up until last week, the poor machine was languishing on the counter, gathering dust, while its fellow electronic neighbors–the hot water pot and the toaster–got daily love. It just wasn't fair. And then, suddenly, everything changed.


Over the past week, I've started using the blender. A lot. This all came about as a result of the fact that Brandon can't drink for the rest of the summer (poor guy), so I decided to start getting creative with some non-alcoholic fruit drinks. (Some people call them mocktails, but I really hate that name.) I was inspired by an amazingly refreshing watermelon lime agua fresca I tried recently in Nashville at Mas Tacos. On a 100-degree day, it was quite frankly, the best thing I could imagine at that moment. Owner Teresa Mason shared her simple recipe with me, which was literally: blend watermelon and lime, add ice, let sit. Easy! I decided to go home and give it a try.

So off came the lid of the blender (along with a cloud of dust), and in went the watermelon chunks and the lime juice. And with the flip of a switch, I had a brilliantly red watermelon puree. I added some ice, but being too impatient to let it sit like a true agua fresca, I blended it again to crush the ice. It was delicious–sort of like a watermelon icee, with a twist of lime.

So that experiment led to more experiments. Like a fantastic yellow tomato gazpacho (recipe to come soon) and a frozen strawberry limeade with mint (pictured below). The strawberry limeade would actually make a killer cocktail with a little tequila or white rum, but in its present form, it is pretty close to perfect. The combo of strawberries, lime, and mint is not only gorgeous to behold, but the flavors–sweet, tart, and herbal–compliment each other beautifully. If you have a dusty blender, pull it out and give this a whirl (pun intended!)–it will only take five minutes, and you'll want to make it again and again.


STRAWBERRY LIMEADE WITH MINT

Serves 2

2 cups strawberries, hulled and halved
Juice of 2 limes
Juice of 1/2 orange
1 tablespoon sugar (you can omit or adjust to your taste)
1/4 cup chopped mint
A handful of ice

Blend until smooth.  Enjoy with a lime wedge on a swampy summer day.


click for recipe & more…

Add a comment!
Your two cents...

If you don't have a Google login, please select Name/URL from the "Comment as" list below

Wednesday, August 10, 2011

Grilled Skirt Steak Tacos with Corn Salsa


I love August, when the days are long and markets are bursting with fresh produce. As a kid, I looked forward to late summer when we could eat from my grandparents' garden: candy-sweet corn on the cob, steaming hot and dripping with butter, served with steamed squash, green beans, and a plate of ruby red sliced tomatoes. With vegetables this fresh, you don't even miss the meat.

Corn on the cob still holds a special place in my heart, and when I saw the 2-for-$1 special at Whole Foods the other day, I was inspired to make a grilled corn salsa to go with a smoky cumin-rubbed skirt steak. Skirt steak—the long, thin strip of meat that runs underneath a cow's belly—is one of the most flavorful cuts (in my opinion) and one of the best values. It's only $12.99 a pound and–after sitting in a marinade for half an hour—cooks in 8 minutes flat. This dish would be great on its own (perhaps on a bed of arugula), and even better wrapped in a warm tortilla with sliced avocados. I made this for my husband the other night and he declared it “the greatest thing I've ever made.” I'm not sure I fully agree, but I certainly appreciated the compliment! Try it out and let me know what you think...

GRILLED SKIRT STEAK TACOS

Serves 2

4 medium whole wheat (or white) tortillas
1 ripe avocado, sliced
Grilled Skirt Steak with Cumin Lime Rub (recipe below)
Grilled Corn Salsa (recipe below)

Heat the tortillas in a nonstick skillet over medium heat—about 1 minute per side. Arrange several avocado slices in the center of each tortilla and top with grilled skirt steak and corn salsa. Fold in half and serve warm or room temperature.


The finished product—the perfect summertime meal with a pitcher of margaritas!

GRILLED SKIRT STEAK WITH CUMIN LIME RUB

1 pound skirt steak, cut 4 pieces
1 tablespoon cumin
2 cloves garlic, finely chopped
Juice of 1/2 lime
3 tablespoons olive oil
Salt and pepper to taste

Place the skirt steak in a shallow (non-metal) baking dish. Sprinkle the meat with cumin and garlic, and drizzle with lime juice and two tablespoons of olive oil. Using your hands, rub the seasoning into the meat until evenly coating. Let sit for half an hour at room temperature (or up to two hours in the refrigerator).

Rub the remaining tablespoon of oil onto a grill pan and place over high heat until beginning to smoke. Season the steaks with salt and pepper. Grill the steaks for four minutes per side for medium rare. (I wouldn't recommend cooking skirt steak much longer or it will get tough.) The steaks should be rosy on the inside with a nice dark crust on the outside.

Let the steak sit for 5 to 10 minutes (preferably on a plate to catch the juices) then transfer to a cutting board. Cut the meat against the grain in thin slices and serve on a platter drizzled with the extra juices.

GRILLED CORN SALSA

2 ears corn (in the husk)
4 tablespoons olive oil
Salt and pepper to taste
1 to 2 cloves garlic, minced
1/2 pint grape tomatoes, sliced in half horizontally
1/2 red onion, chopped
1 cup cilantro, chopped
Juice of 1 lime

Heat a grill pan over high heat. Remove the corn from the husks and rub with 1 tablespoon olive oil, plus salt and pepper to taste. Grill the corn for 10 to 12 minutes or until the corn becomes tender and brown grill marks appear. (Alternately, you can grill the corn for 4 to 5 minutes and finish roasting the corn in a 400-degree oven.) Let cool.

Slice the corn kernels from the cob into a bowl. Add the tomatoes, garlic, onion, cilantro, lime juice, and the remaining 3 tablespoons of olive oil. Season with salt and pepper to taste. And—as I'm never a believer in following recipes to the "T"—feel free to add extra of any ingredient based on your taste. If you love lime or cilantro, add more. Too much lime? Add a little extra olive oil. Don't like cilantro? Substitute basil instead. If you want more or less garlic, add to suit your taste. Basically this recipe is a starting point for your own experimentation. Have fun!

click for recipe & more…
Your two cents...

If you don't have a Google login, please select Name/URL from the "Comment as" list below

Friday, August 5, 2011

Swiss Chard


Swiss chard is one of those "exotic" vegetables that I did not grow up with. Along with its leafy brethren kale, escarole, mustard greens, and broccoli rabe, chard was simply not on my radar until adulthood. My family ate plenty of veggies (mostly from my grandparents' gardens), but we stuck to the usual suspects of the 80's: green beans, corn, broccoli, peas, carrots, and of course, iceberg lettuce. And loads of fresh tomatoes in the summertime (but those are technically a fruit, so I digress).

But now that I've tried these dark, leafy greens, I can't get enough. I love seeing piles of greens in all colors of the rainbow stacked at the Farmer's Market or at Whole Foods. Not only are they beautiful to look at, they are easy to prepare and incredibly nutritious. Swiss chard (which actually originated in Sicily, F.Y.I.) has loads of cancer-fighting antioxidants and high amounts of vitamins A, C, E, and K. In fact, a one-cup serving of Swiss chard has only 35 calories, but contains 30% of your daily recommended vitamin C and 15% of your daily recommended fiber. Wow–that is definitely what you call a nutritionally dense food!

But nutrition aside, these greens actually taste good. Especially when sauteed with a little olive oil and garlic (a perfect match for grilled steak or pork chops). I love throwing chard into a soup or a pasta, or serving them simply steamed alongside grilled fish, with a squeeze of lemon and a drizzle of olive oil. Easy, delicious, and healthy–what more can you ask?

SIMPLE SAUTEED SWISS CHARD

Serves 2

1 bunch Swiss (or rainbow) chard, tough ends removed
1 tablespoon olive oil
3 cloves garlic, thinly sliced
Salt and pepper to taste

Rinse and dry the chard. Using a sharp paring knife, cut out the red stem from the leaves. You can save these or discard. If you choose to save them (they have sort of a rhubarb consistency), chop them into 1-inch pieces and set aside. Tear the leaves into roughly 2-inch pieces and place in a separate bowl.

Heat the olive oil over medium-high heat in a large heavy-bottomed skillet. Add the garlic and saute for 1-2 minutes or until fragrant and just beginning to brown. Add the stems (if using) and saute 2 minutes to soften. Add the leaves and saute for 2-3 minutes or until wilted and bright green. Season with salt and pepper to taste. Serve immediately.

click for recipe & more…

Add a comment!
Your two cents...

If you don't have a Google login, please select Name/URL from the "Comment as" list below

Monday, August 1, 2011

Linguine with Clams


As you read my blog, you'll be able to tell pretty quickly that I love seafood. Especially during the summertime, paired with a crisp, minerally white wine. It's amazing, though, how many people shy away from preparing seafood at home because they think it's a) too difficult or b) too expensive. Au contraire!

Linguine with clams, a summer standby, is so simple to prepare, and surprisingly inexpensive. I love the briny taste of littleneck clams, simmered in a garlicky white wine broth and tossed with linguine and chopped parsley. I like making this dish with cockles, the smaller, slightly sweeter cousins of the clam family. Plan on using about a pound for every two people.

The great thing about this dish (besides being amazingly delicious) is that nearly everything you need to make it, with the exception of the clams and maybe parsley, can be found in your pantry (linguine, garlic, red pepper flakes) or fridge (white wine, butter, lemon).

LINGUINE WITH CLAMS, WHITE WINE, AND GARLIC

Serves 2

8 ounces linguine
2 tablespoons olive oil
2 to 3 garlic cloves, thinly sliced
1/4 teaspoon dried red pepper flakes
1 pound littleneck clams or cockles, scrubbed and rinsed well
1/2 cup dry white wine
Juice of 1/2 lemon
2 tablespoons butter
Salt and pepper to taste
1/2 cup chopped fresh parsley
Freshly grated Parmesan (optional)

Bring a large pot of salted water to a boil. The idea is to cook the linguine while you are preparing the sauce–you want your pasta perfectly al dente (tender yet firm) and steaming hot when you combine it with the clams.

Add the pasta and cook for 8 to 9 minutes, or until al dente; drain.

Heat the olive oil in a deep saute pan over medium heat. Add the garlic and red pepper flakes and saute for 2 minutes until fragrant. Move the pan constantly–the garlic should begin to brown but take care it does not burn. Add the clams, wine, and lemon juice and increase heat to medium high. Cover and cook for 6 to 7 minutes, shaking the pan periodically, until all the clams have opened. (Discard any clams that have not opened.)

Add the hot pasta to the clams, along with the butter, salt, and pepper. Toss the pasta with the clams until it is evenly coated. Sprinkle the parsley over the pasta and toss one more time.
Serve with additional pasta and freshly grated Parmesan, if desired. (Many Italians consider it a cardinal sin to combine seafood with cheese, but I personally think a little Parmesan with this dish is delicious. I leave the decision to you!)

WINE SUGGESTION: The volcanic island of Ischia, off the Amalfi coast near Capri, produces smoky, minerally whites with bright citrus notes–perfect with seafood. The 2007 Casa d'Ambra Ischia Bianco ($15) is a match made in heaven for garlicky clams with linguine.

click for recipe & more…

Add a comment!
Your two cents...

If you don't have a Google login, please select Name/URL from the "Comment as" list below