Friday, January 27, 2012

Creamy Parmesan Polenta with Sausage Ragu


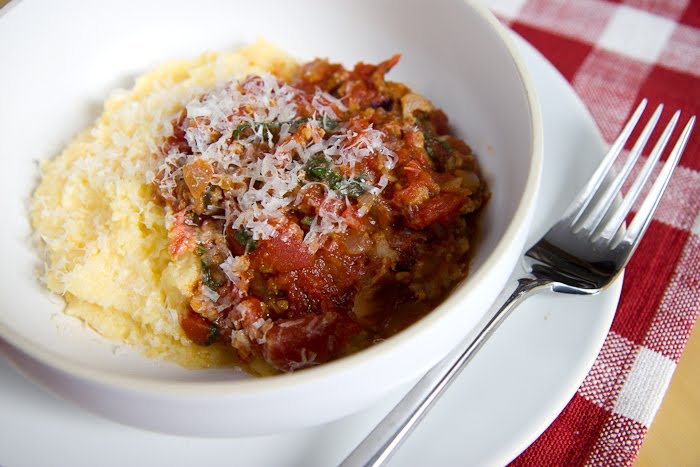
Polenta is one of those cozy, wintry foods that just spell pure comfort to me. Maybe it’s because they remind me of the grits of my childhood, or maybe it’s because they pair so easily with hearty sauces–like wild mushroom or braised rabbit–or a rustic sausage-and-tomato ragu. Polenta in restaurants can easily be a butter- and cheese-laden affair, but in its truest form, it’s just cornmeal, water, and salt. I like adding some Parmesan and extra-virgin olive oil, but you don’t need to overdo it, the flavor is great on its own.

I made this meal last weekend, on a particularly cold Saturday, and channeled the Italian grandmother I never had. Snug and warm in our cozy apartment, with the polenta and the sauce simmering away on the stovetop, and a glass of red wine in hand, everything seemed right with the world. When the cooking was done, I lit some candles, set the table, turned on some jazz, and enjoyed a night in with my man. On a winter's night, there's nowhere I'd rather be.

Oh, one last thing. This dish needs some green and it’s particularly good with either sauteed
Swiss Chard
or Broccoli Rabe with Pine Nuts and Golden Raisins. You can’t go wrong with either. This also makes a fabulous dinner party dish. Make the sauce the day before (the flavors will be even better), then make the polenta and greens just before the party. Your friends will swoon. Enjoy!

CREAMY PARMESAN POLENTA

Serves 4

4 cups water
1 teaspoon sea salt
1 cup polenta (not quick-cooking) or yellow corneal (5 ounces)
1 tablespoon extra virgin olive oil
1/3 cup grated Parmesan, plus extra for grating on top

Bring the water and salt to a boil in a medium saucepan. Once the mixture is boiling, slowing add the polenta in a steady stream, whisking constantly. Whisk for 2 minutes then reduce heat. Cover and simmer for about 30 minutes, whisking every 10 minutes or so. The mixture should be thick and creamy, sort of like grits (if you're from the South you know what I mean!). Remove from the heat and whisk in the olive oil and Parmesan. Taste and add a little salt if you need to. Serve immediately.

*If you have leftover polenta and try to reheat it the next day, you will notice that it is very stiff–almost congealed. You can either a) cut it into little wedges and fry them up for some delicious polenta fritters OR b) put the cold polenta in a pot and a little boiling water (start with 1/4 cup and add more if you need to). Whisk the mixture together over medium heat until it reaches the desired consistency.

SAUSAGE RAGU

Serves 4

2 all-natural fresh Italian sausages (I bought mine at the Whole Foods meat counter)
1 small red onion, diced
3 cloves garlic, minced
1 (28-ounce) can San Marzano whole peeled tomatoes
1 1/2 tablespoons Balsamic vinegar
1/4 cup finely chopped basil
Salt and pepper to taste

Remove the sausages from their casings (just make a slit on one end and sort of squeeze the meat out). Cook the sausage in a large pot over medium heat, breaking it up with a wooden spoon so it resembles ground beef. Cook for 10 minutes or so until cooked through and no pink remains. Remove the sausage from the pot with a slotted spoon onto a paper-toweled lined plate. Set aside. Pour out all but a tablespoon of sausage grease from the pot.

Add the onion to the pot and saute for 3 to 4 minutes, stirring frequently. Add the garlic, stirring for a minute or so until it is softened and fragrant (do not let brown). Add the tomatoes, crushing with the back of a spoon. (WARNING: this can be messy, as the tomatoes tend to squirt, so wear an apron! For a cleaner preparation, pour the tomatoes into a bowl in advance and crush the whole tomatoes with your hands. Then pour the mixture, liquid and all, into the pot.)

Let the mixture come to a boil; reduce the heat and let simmer, covered, for 20-25 minutes. Check periodically and if it seems dry, add some water.

Stir in the sausage,Balsamic vinegar, and basil and let cook for a minute or two over low heat. Remove from the heat, season with salt and pepper. This is delicious with polenta or any type of pasta.


click for recipe & more…

Add a comment!
Your two cents...

If you don't have a Google login, please select Name/URL from the "Comment as" list below

Sunday, January 22, 2012

Gluten-Free Blue Cornmeal Waffles

Hello friends! I know it's been awhile since I posted–this month has been a bit crazy juggling a month-long freelance job (with regular office hours!), writing assignments, and normal life stuff (like cooking for 50 for a friend's birthday). Last weekend I snuck away for a much-needed little getaway to Jamaica with my man (will post pictures soon...it was heavenly!). All of this has kept me a tad busy and I find myself having to choose between blogging and, say, showering. Sorry, my sense of hygiene won out this week...


This weekend we got our first snow in NYC (hooray!) and it's been so nice to stay inside and try out some recipe ideas I've been kicking around. It's been awhile since we've had a chill weekend at home with just B, me, and the kitties, so I decided to revive our Saturday brunch tradition and break out the waffle iron (which, for the record, has been one of our favorite wedding gifts). We have one of the round ones, the kind that makes thinner, slightly crisp waffles. I'm not huge on the thick Belgian waffles, but you could still make this recipe with a Belgian waffle-maker if you have one.

Last year, when some friends of ours were cleaning out their pantry before a move, they gave us some gluten-free blue cornmeal pancake and waffle mix. Even though we're not gluten-free, we tried it and loved it. Once it ran out, I wanted to try and recreate my own version from scratch. I found a recipe for
Blue Cornmeal Waffles on Food Network's website which I used a guide, though I substituted regular flour for gluten-free, since we are trying to eat less gluten right now. I also cut back on the sugar and butter, and added some cinnamon (a suggestion from my taste-tester husband).

The result was fantastic. I don't think I've ever seen B more excited about a breakfast before! We both loved the nutty flavor of the blue cornmeal, the buttermilk gave it a tangy taste and a tender consistency, and best of all, you would NEVER know these were gluten-free.

The great thing about this recipe is that it's SO adaptable. If you're not gluten-free, just use regular all-purpose flour in place of the gluten-free flour. If you don't have buttermilk, you can make your own by adding a teaspoon of white vinegar or lemon juice to 1 cup of regular milk. Let it sit for 5 minutes or so, until it curdles, and carry on with the recipe. If you want to make it dairy-free, just substitute a non-dairy milk (almond, rice, or soy) and use vegetable oil instead of the butter. I will say, this will change the taste and consistency some–the buttermilk really makes these waffles out of this world–but they're still good without. And last, if you want to make this totally vegan, follow the dairy-free instructions and use egg substitute for the eggs.

I am so thrilled to have a waffle recipe that is as delicious as it is healthy. (Sure, the side of bacon isn't the healthiest option, but we buy the farm-raised, nitrate-free version...all in moderation!) I love adding fresh berries and sliced bananas to these waffles and a drizzle of maple syrup (or honey). These are definitely a brunch keeper, snow-day or not.

GLUTEN-FREE BLUE CORNMEAL WAFFLES

Makes 6 waffles

3/4 cup organic blue cornmeal
3/4 cup gluten-free all-purpose flour
1/4 teaspoon baking powder
1/4 teaspoon baking soda
1/4 teaspoon salt
1/2 teaspoon cinnamon
1 tablespoon organic sugar
1 cup buttermilk
2 eggs
2 tablespoons melted butter, plus more for brushing griddle

Preheat your waffle maker.

Whisk together the dry ingredients in a medium bowl. Pour the buttermilk into a liquid measuring cup and add the eggs; whisk together until combined. Add the buttermilk mixture into the dry ingredients, along with the butter; whisk until smooth.

Brush your waffle maker with about a teaspoon of butter and add 1/3 cup of batter. Cook about 2 to 3 minutes or until lightly golden (I just wait until my waffle maker's green light comes on, signaling it's done). Serve with butter, maple syrup (or honey) and whatever topping strikes your fancy: berries, sliced bananas, toasted pecans...whatever you like!

If you have a cinnamon grinder (which you can buy in the spice section of the grocery store), grind some cinnamon on top just before eating-that makes it even better!

DAIRY-FREE VERSION: Substitute almond, rice, or soy milk for the buttermilk, and vegetable (or coconut) oil for the butter. If you want to make it totally vegan, use egg substitute in place of the eggs.


click for recipe & more…
Your two cents...

If you don't have a Google login, please select Name/URL from the "Comment as" list below

Saturday, January 14, 2012

Part II: Flatbread Pizzas with Broccoli Rabe Pesto


As you can tell, I’m still on a broccoli rabe kick. Though it’s available year-round, winter is when this bitter, leafy green vegetable tastes best–and when I crave it the most. Usually I just sauté it in some garlic and olive oil, but recently I decided to try making pesto out of it. I love fresh basil pesto in the summer–its bright green color, intense garlicky-herb-Parmesan flavor, and its versatility. You can put it on pizza, drizzle on a salad, stir into soup, or toss with pasta. But given basil’s not in season, I thought broccoli rabe would be a perfect substitute.

As long as you have a blender, food processor, or even an immersion blender, this recipe is a piece of cake. Blanch the rabe (quickly boil until bright green, plunge into ice water to stop the cooking) then throw it in a blender with the usual pesto ingredients: garlic, pine nuts, Parmesan, and olive oil. I added a few red pepper flakes and some fresh lemon juice for an added kick, and of course salt and pepper (which, I found you need to use quite a lot of). You can play around with this recipe if you like–try swapping the pine nuts for walnuts or pistachios, or adding more lemon or red pepper. Or you can make a vegan version by eliminating the Parmesan (though you'll have to play around with the proportions...I've heard you can add nutritional yeast as a substitute).

Once you have your pesto made (which only takes 15 minutes or so), you can keep it in the fridge to use in all sorts of dishes. Try dolloping it on crostini with Parmesan shavings for a rustic appetizer. Or you can make these fantastic flatbread pizzas (recipe below), topped with sausage and feta cheese.


Or, add the broccoli rabe pesto to your favorite pasta: boil the pasta according to the package instructions, drain, and save about 1/2 cup of the cooking water. Depending on how many people you are feeding, add 1/4 cup or so of the pesto to the pasta, along with some of the cooking water, and toss together–you'll have an instant sauce! I love adding in some sausage to the rabe pesto pasta or if I want a vegetarian dish, I'll just top with some freshly grated Parmesan, roasted grape tomatoes, and toasted pine nuts. Not only is this so easy and delicious, it's a great way to sneak some extra vegetables into your diet...which is always a good thing!

BROCCOLI RABE PESTO

Makes about 2 cups

1 bunch broccoli rabe, woody ends removed
2 garlic cloves, minced
1/2 cup pine nuts
1/2 cup ground Parmesan (feel free to use more if you like)
1/4 teaspoon red pepper flakes
Juice of 1/2 lemon
1/2 to 3/4 cup extra-virgin olive oil
Sea salt and freshly ground pepper to taste

Bring a large pot of salted water to boil. Prepare a large bowl of ice water and place it next to the pot.

Working in batches, boil the broccoli rabe for 3 to 4 minutes or until bright green and softened. Plunge instantly into the ice water to stop the cooking; drain and squeeze dry.

Roughly chop the rabe and add to a blender or food processor (if using an immersion blender, just put all ingredients in a large bowl). Add the garlic, pine nuts, Parmesan, red pepper flakes, and lemon juice and pulse several times to combine. With the motor running, slowly add the olive oil until it reaches the desired consistency. (It should be sort of like a thick sauce). Season generously with salt and pepper–I found I needed over 1 tsp of salt and about 1/2 tsp pepper. Just be sure to taste and adjust as you go.)

Use immediately or store in an airtight container in the refrigerator–it should last for 3 to 4 days.

FLATBREAD PIZZAS WITH BROCCOLI RABE PESTO, SAUSAGE, AND FETA

Makes 4

4 whole-wheat flatbreads (or naan breads)
Broccoli rabe pesto (recipe above)
2 nitrate-free sausages (either pre-cooked or raw, made from lamb, chicken, duck, or pork)
1/2 cup grape tomatoes, sliced in half (optional)
Crumbled feta (about 1/2 cup)
Olive oil for drizzling

Preheat the oven to 425°F.

Place the flatbreads on a baking sheet. Spread about 3 tablespoons of the pesto on each flatbread, leaving a 1/2-inch border on the edges.

If you are using pre-cooked sausage, slice it and arrange the pieces over the pesto. If you are using raw sausage, cook it for 7-8 minutes on the stove top and add the cooked sausage to the pizza. (If you are vegetarian, eliminate the sausage and substitute for grape tomatoes). Sprinkle each pizza with a couple tablespoons of crumbled feta.

Drizzle each pizza with a bit of olive oil and bake for 10 to 12 minutes or until the crust is brown and the cheese is beginning to melt. Let cool for a few minutes, then slice into pieces and serve.

I love serving this with a wintry salad of arugula, radicchio, endive, and thinly sliced fennel with a citrus vinaigrette.


click for recipe & more…
Your two cents...

If you don't have a Google login, please select Name/URL from the "Comment as" list below

Monday, January 9, 2012

Healthy Living: Broccoli Rabe Part I

Broccoli rabe is one of those vegetables I didn’t try until I was an adult. Actually, there were a long list of those vegetables: kale, Swiss chard, collard greens, cauliflower, fava beans, sugar snap peas, eggplant, red cabbage, fennel, radicchio, endive, arugula, butternut squash, zucchini, wild mushrooms, parsnips, bok choy, radishes...the list goes on and on. It's not like my family didn't eat vegetables growing up (we did!), it's just that we stuck with a steady all-American rotation of green beans, broccoli, peas, carrots, potatoes, yellow squash, corn, and maybe Brussels sprouts or asparagus on special occasions. I'm sure these were probably the vegetables most readily available at grocery stores in the 1980's and '90's, supplemented by whatever my grandparents happened to be growing in their gardens. As a child, I was pretty ambivalent about vegetables. I didn't hate them, but I certainly didn't love them. They were basically just an obstacle between me and dessert: if I ate the vegetable, I got the dessert. So more or less begrudgingly, I ate the vegetables.


Everything changed in my twenties. Whereas vegetables had previously been an annoyance or an afterthought, as I started cooking more, they gradually became the centerpiece of my diet. Living in France (in Paris, Provence, and Burgundy) over a period of several years definitely changed the way I viewed vegetables. I started shopping at the markets, buying my fresh produce daily instead of weekly–letting the seasons and the colors inspire me. In Provence, I made tians–colorful layered vegetable dishes with eggplants, potatoes, zucchini, tomatoes and fresh herbs (and lots of garlic and olive oil) and beautiful salads of baby greens with steamed haricots verts and heirloom tomatoes with hazelnut vinaigrette. I stuffed zucchini flowers with fresh goat cheese and made hearty winter soups with potatos and leeks.

I learned how to roast vegetables in Burgundy, transforming formerly bland items like cauliflower or sweet potatoes into deeply flavored, caramelized treats. I began experimenting with a host of vegetables I'd never tried before (see: list above) and soon enough, plants were crowding out the meat on my plate. It's not just the colors and flavors and variety of vegetables I've grown to appreciate–it's the way my 31-year old body feels after eating them that I especially love. I feel lighter, healthier, and more energized when I eat a mostly vegetable diet. (But don't worry, I'm not going totally vegan on you all...my husband would never allow that!)


Which brings me back to broccoli rabe. This dark leafy vegetable looks sort of like a lovechild between broccoli and kale, and has a distinctly bitter taste (which I happen to love). It's also packed with antioxidants like Vitamin A and C, and loaded with fiber, calcium, and potassium. I first tried broccoli rabe in Italy sautéed in garlic, olive oil, and a few red pepper flakes, finished with just a squeeze of lemon. So simple and so delicious. Back home I've cooked this dish so many times, though recently I made it Sicilian style, with toasted pine nuts and golden raisins. I love the contrast of the bitter greens with the sweet golden raisins and buttery toasted pine nuts. Sometimes I add a splash of Balsamic vinegar at the end for a little extra complexity. Though you can sauté broccoli rabe raw, I like to blanch it first (a quick boil followed by a dunk ice water) to cut down on its bitterness. Just make sure to drain it well and pat dry before throwing it in the sauté pan.

This broccoli rabe makes a delicious side dish for grilled sausage (or meatballs) with tomato sauce and polenta. For a lighter meal, it's fantastic with grilled salmon, or you can go entirely vegetarian and pair it with roasted squash (butternut, delicata, or spaghetti) and perhaps some farro with wild mushrooms.

Coming up next: Broccoli Rabe Pesto + two recipes

BROCCOLI RABE WITH PINE NUTS AND GOLDEN RAISINS

Serves 4

1 head broccoli rabe, tough ends removed
3 tablespoons pine nuts
2 tablespoons olive oil
1 clove garlic, minced
1/8 teaspoon red pepper flakes
3 tablespoons golden raisins
Sea salt and freshly ground pepper

Bring a pot of salted water to a boil. Prepare a large bowl of ice water and set it by the pot. Working in batches, boil the broccoli rabe for a minute or two until bright green. Using tongs, remove the rabe from the pot and place in the ice water to stop the cooking. Once all the rabe is cool, pour the rabe into a colander and set aside.

Toast the pine nuts in a small, nonstick saute pan over medium heat for 3 to 4 minutes, stirring constantly, or until evenly browned (it will smell like popcorn). Take care not to burn them–they cook quickly! Dump the pine nuts into a bowl to stop cooking.

In a large frying pan, heat the olive oil over medium-high heat. Add the garlic and red pepper flakes and cook for one minute or until fragrant (but not brown). Add the broccoli rabe and cook, stirring constantly, for 3 to 4 minutes or until tender-crisp. Add the raisins and the pine nuts and toss to combine. Season with salt and pepper to taste.

If you want, add a dash of Balsamic vinegar or a squeeze of lemon at the end. This is delicious with grilled salmon, pork tenderloin, or meatballs with tomato sauce. Definitely one of my favorite easy vegetable side dishes!


click for recipe & more…

Add a comment!
Your two cents...

If you don't have a Google login, please select Name/URL from the "Comment as" list below

Thursday, January 5, 2012

The Best Cold Remedy: Homemade Chicken Noodle Soup


After our whirlwind holiday travels, I've been excited to get back home and get back to work. I've had big plans for the blog–for healthy new recipes and tips to stick to your New Year's healthy eating goals–as well as all sorts of projects I want to do around the apartment, like clean out the closet, the pantry, the bathroom, and the file cabinet. (OK, in all honesty, Brandon's the one who usually initiates these organization projects, but I'm all for following his lead!) I have lists of stories to pitch, emails to send, books to start reading, and resolutions to begin, like more running and yoga. And then the cold hit.

The day after we got home (Monday), I woke up with a stuffy nose. Which turned into a sneezing, dripping, red-nosed, puffy-eyed head cold. Luckily it hasn't spread to my throat or chest, but it's left me feeling bad enough to pretty much stay in my PJ's, down zinc and vitamin C, chug water, and blow through boxes of tissues. And eat lots of grapefruit and blood oranges.

Though the blog has stayed a bit neglected (I haven't had the energy to cook plus photograph and write) and the clean-out projects have been left undone for the moment, I have been reading. And brainstorming and journaling. The cold has forced me to actually slow down for the first time in a long while, and pay attention to the parts of me–namely, my heart and my soul–that often get pushed into the background as more immediate concerns demand my attention.


It has been amazing to have time to reflect on 2011: on struggles and victories and things I learned, on goals–some reached and others left undone, on friendships deepened, on trips taken, on books read, on dinners shared. And most of all, on the Lord's goodness and faithfulness. Brandon and I took time this week to reflect on our first year of marriage (with all its joys and upheavals), and to talk about through our goals and dreams for 2012.

Though my head is still stuffy and my nose is still raw, I feel so inspired by all that 2012 holds. I feel like this is going to be a year of purpose, of healing, and of dreams fulfilled. And of course, lots more cooking and writing and yellow table dinner parties!

As much as I love getting my apartment cleaned out and re-organized at the beginning of the year, I've loved even more this quiet, reflective time. I haven't stopped cooking, but my cooking has been simple and cleaner–lots of veggies and soups and grains–and I've replaced wine (for the time being) with water and herbal tea and my new favorite drink Kombucha. As I mentioned in my last blog post, we're following a special Lyme diet full of vitamin- and mineral-filled anti-inflammatory foods (veggies, grains, fruits, lean proteins, healthy fats) and little to no sugar, dairy, or white carbohydrates. If it weren't for this cold, I'm sure I'd be feeling incredible by now...


Anyway, my real purpose in writing this blog post is that I wanted to share with you my favorite at-home cold remedy (besides citrus fruits and Kombucha): homemade chicken noodle soup. It is super-easy to make, and there is something so comforting about warm broth filled with veggies, noodles, and shredded chicken. I love adding spinach at the end for extra vitamins and color. I made this soup a few days ago, and have been eating it every day since.

Keep in mind that this soup is intended to be restorative, so it will only be as good as the quality of the ingredients you put in it. Meaning, buying broth or meat from mass-produced chickens (often pumped with hormones and antibiotics) is not going to help you get well. I recommend buying free-range organic chicken stock (or making your own) and roasting organic chicken breasts to shred and put in the soup.

Healthy or not, I would recommend easing into 2012. Take time to think, pray, journal, and reflect. And to make a pot of chicken noodle soup. You will thank yourself.

HOMEMADE CHICKEN NOODLE SOUP WITH SPINACH

Serves 6

2 to 3 tablespoons olive oil
2 carrots, peeled, halved and diced
2 ribs celery, halved and diced
1/2 yellow onion, diced
2 cloves garlic, minced
6 thyme sprigs, leaves removed (discard stems)
Sea salt and freshly ground pepper to taste
2 quarts chicken stock, homemade or store-bought (free-range, organic)
8 ounces dried wide egg noodles
1 1/2 cups shredded, cooked, organic chicken (can be white or dark meat, roasted, boiled, or store-bought rotisserie)
2 cups baby spinach leaves

Heat the olive oil in a large pot over medium heat. Saute the carrots, celery, onion, garlic, and thyme for 5 minutes or so until the vegetables are softened, but not brown. Season with salt and pepper.

Add the chicken stock and bring to a boil. Add the egg noodles; reduce heat to simmer and let cook for 5 minutes or until the noodles have softened a bit. Stir in the chicken and the spinach and simmer for a couple more minutes to cook through. Season generously with salt and pepper to taste.


click for recipe & more…

Add a comment!
Your two cents...

If you don't have a Google login, please select Name/URL from the "Comment as" list below