Monday, October 31, 2011

Lamb Tagine with Apricots, Figs, and Chickpeas

Yes, it's Halloween. And you're probably more concerned with throwing together a last-minute costume than planning what's for dinner. I, however, am thinking about what I want simmering in my Le Creuset on this chilly evening. Something warm, nourishing (to prevent candy-induced sugar crashes), and substantial enough to offer a plate to friends stopping by. And if possible, easy to assemble. A fragrant, savory-sweet lamb tagine seems just the thing.

Lamb Tagine

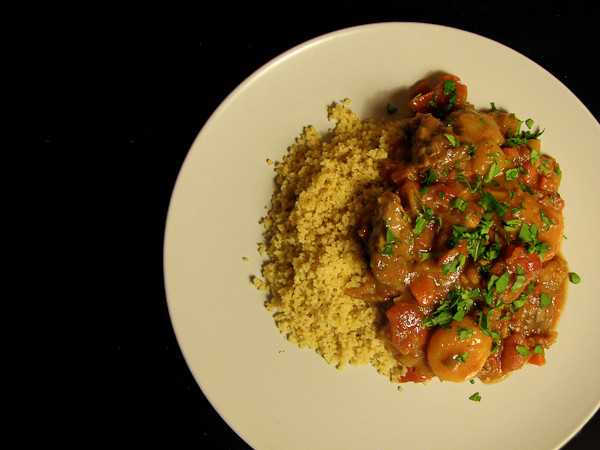
I sampled my first tagine years ago in Paris at a dimly lit Moroccan restaurant called Le Souk. Seated on pillows around low-lying tables, we dished fragrant stews from cone-shaped earthenware dishes (also called tagines) onto mounds of fluffy couscous. The seductive blend of spices (cinnamon, ginger, nutmeg, cumin, cardamom) and the unique blend of flavors (duck with fig, lamb with almonds and apricot, chicken with preserved lemon and green olives) were a revelation to my Westernized palate. I immediately wanted to recreate these sensual stews at home, and thus began a series of trial tagines and subsequently festive dinner parties.

I've since learned a few things about tagine-making and it turns out they might just be the perfect dinner party food. Why? One, they actually taste better a day or two after you make them, so you can make the whole thing in advance. Two, they feed a crowd–the recipe below easily feeds six (with leftovers) and doubled feeds 12. Three, they're cheap to make–one recipe costs about $20. As a rule, tagines combine cheaper cuts of meat (such as lamb shoulder or chicken thighs) with spices, nuts, and dried fruits, slowly cooking the mixture until the meat becomes fork-tender and a rich, aromatic sauce develops. Bright herb garnishes like fresh mint and cilantro add a dash of color and awaken the palate.

Should you choose to serve tagine for a dinner party–or an impromptu Halloween gathering–here's your game plan: Just before guests arrive, reheat your tagine over medium heat, make some couscous (5 minutes) and toss together a simple arugula salad with some thinly sliced red onion, oranges, and feta (10 minutes) in a citrus vinaigrette. Light a bunch of votive candles, pour some wine, and voila–simple entertaining at its best!

LAMB TAGINE WITH APRICOTS, FIGS, AND CHICKPEAS

Serves 6

2 tablespoons olive oil
1 1/2 pounds lamb shoulder (or lamb stew meat), cut into 1 1/2-inch chunks
Salt and pepper to taste
1 onion, chopped
1 large carrot, chopped
1 rib celery, chopped
2 teaspoons ground cumin
1 teaspoon ground cinnamon
1/2 teaspoon ground ginger
1/2 teaspoon ground nutmeg
1/2 teaspoon ground cloves
1/2 teaspoon ground allspice
1 14.5-ounce can diced tomatoes
2 to 3 cups chicken stock
1 15.5-ounce can chickpeas, drained
1 cup dried apricots
1 cup dried figs, halved
1/2 cup chopped fresh mint

Heat the oil in a heavy-bottomed Dutch oven over medium-high heat. Season the lamb with salt and pepper and add to the Dutch oven. Brown the lamb on all sides, about 5 minutes. Remove the lamb to a bowl; add the onion, carrot, celery and spices. Sauté the mixture until softened, about 5 to 7 minutes.

Add the tomatoes (and their juices) and 2 cups of chicken stock and bring to a boil. Reduce the heat and add the lamb back into the Dutch oven. Season with salt. Simmer the mixture for an hour, stirring occasionally, adding a bit more stock if the mixture becomes too dry.

Add the chickpeas, apricots, and figs and continue simmering for another hour, stirring occasionally, until the meat is fork-tender. Add additional stock as needed--you want plenty of the fragrant sauce! Taste the mixture and season with salt and a little pepper. Stir in the chopped mint before serving and garnish with additional mint if desired.

If serving the next day, let cool on the stovetop, then place in a tightly-sealed container and refrigerate until serving. Reheat gently in the Dutch oven over medium heat, adding water as needed and garnish with fresh mint.

Serve with couscous and a tossed salad, or steamed green beans with lemon and olive oil.


click for recipe & more…
Your two cents...

If you don't have a Google login, please select Name/URL from the "Comment as" list below

Friday, October 28, 2011

Week in Review (or Why I Love Fall in NYC)


This was one of those weeks where I was reminded why I love living in NYC. It's fall, the days are cooler, the leaves are changing, and the city is bursting with energy. Working in the food and travel industry, I get invited to some pretty cool events. Though I've never done a "Week in Review" post, I had too many delicious experiences this week not to share. One of these was the chance to taste real jasmine tea at
Megu
, made by pouring hot water of a dried jasmine flour. Amazing! They gave me a dried flower of my own so I could recreate the experience at home. (The picture–which I LOVE–was taken by the wonderfully talented Mr. Brandon Carl.)

Here are a few of the highlights:

Louis de Sacy tasting. This family-run Champagne house has been making incredible bubblies since 1633. Their Champagnes are crisp, dry, and elegant–and reasonably priced, to boot. My favorites: the Cuvée Nue (i.e. "Naked") which has no added sugar, and the salmon-colored Rosé Grand Cru. Great Christmas gift ideas!

Lunch at Megu. Hands down the best Japanese food I have ever tasted. Everything is imported from Japan and impeccably presented. Don't miss: sizzling kobe beef on a volcanic rock, tempura asparagus spears, insanely fresh sashimi, yuzu creme brulée, and the 21-layer green tea crepe cake (no joke).

Dinner at Le Bernadin with two-Michelin-star Chef Michel Sarran from Toulouse. The dinner was highlighting the Midi-Pyrenees region of France, and included some delicious lamb dishes and wonderful wines from the region, like Jurancon Sec (white) and an unusual red varietal called Negrette.

Lots of cooking! I made Roasted Eggplant Dip, Whole Wheat Chicken Pot Pies with Kale, and Roasted Butternut Squash Soup with Spiced Pears–and entered my favorite Nutella Shortbread Brownies in the Food52 Holiday Baking Contest!

Had the perfect rainy night dinner at home last night with my love: whole wheat spaghetti carbonara with sautéed kale (recipe to come).

And last, but not least, I've excited to see my family this weekend in Fredericksburg, Virginia! I've never been, but I will report back on any tasty discoveries I make.

Happy Halloween weekend everyone!!

Add a comment!
Your two cents...

If you don't have a Google login, please select Name/URL from the "Comment as" list below

Thursday, October 27, 2011

Smells Like Fall: Butternut Squash Soup with Spiced Pears

When the weather gets cool, I want soup. Daily. There's nothing more comforting and warming than a big, steaming bowl of homemade soup. With really good crusty bread. I mentioned in an earlier post that my husband Brandon sadly does not share my love of soups. But I keep making them. They feed a crowd, they make the apartment smell heavenly, and they provide me with lunches for a week every time I make them. And did I mention that they freeze well? I have so many favorites: Tuscan white bean, hearty lentil with kale, cumin black bean, old-fashioned chicken noodle, roasted tomato, French onion, split pea, and one of my all-time favorites: butternut squash. THIS is the soup that makes me feel like it's fall. And it's the perfect orange soup to whip up over Halloween weekend!


This recipe was inspired by an ultra velvety butternut squash soup I tried last week at a James Beard Foundation dinner prepared by an ultra-talented crew of seven chefs from St. John's, Newfoundland. I was recently in St. John's and was blown away by the culinary talent there, so I was especially excited to attend their event in NYC. The entire dinner was fantastic, with fabulous Newfoundland seafood like seared cod cheeks, bay scallop ceviche, snow crab beignets, and seared salmon with brandade. But it was the soup that I couldn't stop thinking about. Made by Chef Andrew Hodge, the bright orange purée was garnished with curried pears and spiced pecans. It was hands down the best butternut squash soup I had ever had. Of course I wanted the recipe, so I sent out a message on Twitter and within minutes, the JBF had sent me the recipe! Amazing what modern technology can do.

Despite the fact that I develop and write recipes, I have a problem following them. Every time I look at a someone else's recipe, even when I've tasted the end result and know how good it is, I always start thinking of ways to change it. This was no exception. Chef Hodge's recipe was impeccable, but there were still a few tweaks I wanted to make. For one, it had a cup of cream in it that I was determined to eliminate. I also wanted to roast the butternut squash rather than just boiling it. There were a few spices I wanted to add, and I decided to puree the pears into the soup. I also eliminated the pecans (though they were super-delicious). In the end, I completely changed the recipe but came up with a super-silky, ultra-flavorful soup, that looks, smells, and tastes like fall. Thank you Chef Hodge for your inspiration!

ROASTED BUTTERNUT SQUASH SOUP WITH SPICED PEARS

Serves 4 to 6

1 pound butternut squash, peeled, seeded, and cut into 1-inch cubes
1/2 yellow onion, peeled and sliced
1 carrot, peeled and cut into small cubes
2 tablespoons olive oil
Salt and pepper to taste
6 thyme sprigs, divided
2 garlic cloves, minced
2 tablespoons brown sugar
1/2 teaspoon ground ginger
1 teaspoon ground cinnamon
1 teaspoon ground nutmeg
1/2 teaspoon ground coriander
4 cups vegetable (or chicken) stock

1 tablespoon olive oil
2 Bosc pears, peeled and cut into small cubes
1/2 teaspoon ground cinnamon
1/4 teaspoon curry powder
1/4 teaspoon ground cloves
1/4 teaspoon cumin

Preheat the oven to 425°F.

Place the squash, onions, and carrot in a large bowl (or Ziploc bag) and toss with the olive oil to coat. Arrange on a baking sheet and season with salt and pepper. Scatter 4 thyme sprigs on top of the vegetables. Roast for 30 minutes or until tender. Discard the thyme sprigs.

Dump the squash mixture, garlic, and spices into a pot and cook over medium high heat for a 2 minutes, stirring to combine. Add the vegetable stock and remaining thyme springs and bring the mixture to a boil. Reduce to a simmer and cook, covered for 10 minutes or until tender. Remove from the heat and let cool slightly. Discard the thyme sprigs.

Working in batches, blend the mixture in a blender until smooth. Feel free to thin with additional broth if it appears too thick. Pour back into a clean pot to keep warm on the stove. Season with salt and pepper to taste.

For the pears, heat the olive oil over medium-high heat in a large sauté pan. Add the pears and cook for about 2 minutes. Add the spices and continue cooking, stirring constantly for another 3 minutes or until the pears are tender and coated with the spices. Set aside.

SERVING VARIATIONS:
• Add a big spoonful of spiced pears to each bowl of soup and have your guests stir them into the soup.
• For a smoother, more complex soup, blend the pears into the soup (using the blender, working in batches). This is what I did and end result was outstanding! The spiced pears blended beautifully with the earthy flavors of the roasted butternut squash soup.
• Garnish each bowl with a dollop of crême fraiche or yogurt and, using a toothpick or wooden skewer, sketch little white patterns into the surface of the soup. (Mine turned out kind of ugly, but it's fun to try!)
• This soup can be made several days in advance–just store in an airtight container in the refrigerator and reheat over medium heat on the stove.


click for recipe & more…
Your two cents...

If you don't have a Google login, please select Name/URL from the "Comment as" list below

Wednesday, October 26, 2011

Comfort Food: Whole Wheat Chicken Pot Pies with Kale

Chicken pot pies remind me of my childhood. We ate them probably once a week–the frozen ones that came in little aluminum tins with chicken, carrots, and peas. And that delicious pastry. The house smelled so good when they were in the oven, and we'd race to the table when the buzzer went off. Mom would bring them to the table with (unheeded) instructions to let them cool off a bit. I loved the moment when my fork would break open the crust and a huge gust of steam would escape. The filling was practically boiling. Despite mom's warnings of "Be careful, you'll burn your tongues!" we dove right in, blowing on each bite briefly, and of course promptly scalding our entire mouths. We'd spit out the first bite and gulp our cold milk to cool our scorched tongues. And then we'd dig back in and do it again.


It wasn't until last winter that I actually attempted to create my own chicken pot pies. Maybe it was something about being newly married and wanting to nest, or maybe it was the brutally cold January weather that pushed me to make this childhood favorite. Since mom had never attempted to make them from scratch (with three kids, I don't blame her!) I didn't have a recipe to go by. So I started experimenting. I knew I wanted to create a dish that was ultra-flavorful, but was hoping to make it healthier than the typical butter- and cream-laden version. I decided to make a whole wheat crust, and to add lots of veggies to the filling–carrots, celery, and kale in lieu of the peas. Instead of milk or cream in the filling, I used stock and some white wine, and added fresh thyme for an extra herbal note. The first few times I made this, I admit I used store-bought crust to save on time. But recently I thought, "how hard can it be to make my own 5-ingredient pastry dough?" As it turns out, not hard at all. This whole wheat crust recipe is super-simple to make–especially if you have a food processor. (Otherwise you can use a fork and knife, or a pastry cutter.)


Make sure to chill your dough for at least an hour before rolling out. It's important for it to have a chance to rest or else it will be tough and brittle. You can actually make the pastry dough a day in advance–just keep it wrapped in plastic wrap until you are ready to use it. Actually, this entire recipe can be made in advance, which makes it ideal for entertaining. Make your filling the day before and fill four 6-ounce ovenproof ramekins. Cover with plastic wrap and keep in the refrigerator until ready to bake. Just before baking, roll out your dough and cut your pastry circles, assemble the pot pies, and slide into the oven. Almost as easy as those frozen ones (and so much better!).


This is a great way to get your kids–or husbands!–to eat their veggies. With the yummy whole wheat crust and the creamy chicken filling, they'll hardly notice the carrots and kale. After eating chicken pot pie two days in a row this past weekend, Brandon said this was one of his all-time favorite things I make. Coming from a former vegetable abstainer, that's an especially high compliment! Of course, despite a lifetime of warnings, I still managed to burn my tongue on my first bite (and second, and third). No one's fault but my own...I suppose old habits die hard!

INDIVIDUAL WHOLE WHEAT CHICKEN POT PIES WITH KALE

Makes 4 pot pies

1 cup whole wheat flour
1/2 cup all-purpose flour
1/2 teaspoon salt
1/2 cup (1 stick) unsalted butter, cut into small pieces
8 tablespoons ice cold water

4 tablespoons unsalted butter
1/2 cup diced carrot
1/2 cup diced celery
1 small onion, diced
2 teaspoons fresh thyme leaves
1/4 cup flour
1/4 cup white wine
3 cups chicken stock
Salt and pepper to taste
2 cups shredded rotisserie chicken
1/2 bunch kale, torn into 1-inch pieces
1 egg, beaten and mixed with 1 teaspoon water

Four 6-ounce ovenproof ramekins

For the pastry, combine the flours and salt in the bowl of a food processor. Add the butter and pulse until the mixture is full of pea-size lumps. With the motor running, add the water slowly, just until the dough begins to come together. Dump it onto a floured surface, knead a few times, and shape into a round disc. Wrap tightly in plastic wrap and place in the refrigerator at least one hour.

Preheat the oven to 375°F.

For the filling, heat 4 tablespoons butter in a large pot or Dutch oven. Saute the carrot, celery, onion, and thyme over medium heat for 8 to 10 minutes or until the vegetables are softened and the onion is translucent. Add the flour and continue to cook over medium heat, stirring constantly, for 2 to 3 minutes or the mixture is lightly browned, with a nutty smell. Add the wine and let simmer for a couple of minutes to absorb.

Add the chicken stock and bring the mixture to a boil. Reduce the heat to a simmer, and let cook for a few minutes to thicken. Season with salt and pepper to taste. Stir in the chicken and the kale, cooking for 2-3 minutes until the kale wilts. Remove from the heat and let cool slightly.

Remove the dough from the oven. Let sit out for about 10 minutes before rolling it out.

Using a rolling pin, roll the dough on a floured surface to about 1/4-inch thickness. Using a six-inch ramekin as a guide, cut the dough into 4 circles, cutting each one 1/2-inch wider on all sides than the ramekin.

Fill four ramekins with the chicken mixture. Place one dough circle on top of each ramekin, gently pressing the dough into the sides of the ramekin. Cut several small slits in the top of each crust.

Place the pot pies on a baking sheet and brush the tops with the egg wash. Sprinkle the tops of each one with sea salt.

Bake for 30 minutes or until the crust is golden brown and the filling is bubbly. Let cool for at least 15 minutes before attempting to eat...I've burned my tongue many a time due to impatience!


click for recipe & more…
Your two cents...

If you don't have a Google login, please select Name/URL from the "Comment as" list below

Monday, October 24, 2011

Healthy Living: Roasted Eggplant Dip

You may not have heard, but today is our first national Food Day, organized to celebrate healthy, sustainable eating. I'm really pumped that a day like today actually exists, to promote things I feel so strongly about. You can read more about the movement's objectives (like supporting sustainable farming, promoting healthy food choices for kids, and fighting diet-related diseases) here or participate in one of the many nationwide Food Day events. Or you can do what I'm doing and cook a healthy meal at home tonight–using the freshest ingredients you can find–and enjoy it around the table with your family or friends.


I read a SHOCKING statistic today: According to The Lancet (the world's leading general medical journal), obesity costs the U.S. $10,273,973 per hour. Not per week or per year. PER HOUR. Also, according the the World Health Organization, diet-related diseases are two of the top five causes of premature death globally. These are statistics we cannot ignore, because the numbers will only go up if we don't make some major changes in the way we eat. If I can inspire even a handful of people to cook (and eat) more healthfully and consciously through this blog, I will feel like my mission is accomplished. Alright, enough preaching for one day. Now for a story and a (healthy) recipe.

When I moved to the city back in 2007, my first apartment was in Astoria, Queens. Living in a predominately Greek neighborhood was fantastic for a budget-seeking foodie. When I wasn't cooking at home, I lived off Greek takeout: salads with cucumber, tomato, and feta, chicken souvlaki with tzatziki sauce, crisp spanakopita, and most frequently, melitzanosalata (pronounced meh-leed-zah-no-sah-LAH-tah in case you were wondering), a garlicky roasted eggplant dip served with warm pita bread. This dip became so addictive that I found myself eating it almost daily.

Now that I live in Manhattan, good Greek takeout is nearly impossible to find (at least in my neighborhood). Rather than trekking out to Astoria every time the melitzanosalata craving hits, I started experimenting with my own recipe and realized that not only is it easy to prepare, it's MUCH cheaper to make it at home. With only six ingredients (three of which are pantry items), it costs around $5 to make and is perfect for parties, or just as a snack or sandwich spread at home. And it’s super healthy, to boot. Try it at your own risk–you, too, may become an addict.

MELITZANOSALATA (ROASTED EGGPLANT DIP)

Makes about 1 1/2 cups

1 large eggplant
Juice from 1/2 lemon
2 to 3 cloves garlic, finely chopped
1 teaspoon cumin
1/3 cup extra virgin olive oil
1/2 cup Italian parsley, chopped
Salt and freshly ground pepper to taste

Preheat the oven to 400°F.

Prick the eggplant all over with a fork and place on a baking sheet. Roast for 30 to 40 minutes until soft.

When the eggplant is cool enough to handle, cut it in half and scoop the flesh onto a cutting board (or into the bowl of an electric mixer). Discard the skin.

If preparing by hand: finely chop the eggplant and place in a bowl. Add the lemon juice, garlic, and cumin and mash together with the back of a fork. Slowly add the olive oil, stirring continuously with a fork to combine. Stir in the parsley and season with salt and pepper to taste.

If preparing by mixer: add the lemon, garlic, and cumin to the eggplant and pulse several times to combine. With the mixer running, add the olive oil in a steady stream until the mixture is smooth. Add the parsley and pulse a few times to combine. Season with salt and pepper to taste.

Serve with warm triangles of whole wheat pita bread.

Your two cents...

If you don't have a Google login, please select Name/URL from the "Comment as" list below

Friday, October 21, 2011

Budget Bubbly: A Rosé in a Gang of Bruts

My good friends can tell you that my favorite drink in the whole wide world is Champagne. I love the bubbles, the crisp, dry taste, the elegant flutes. It's fun, it's festive, and it makes any moment better. And I'm a firm believer that bubbly need not be tucked away for special occasions. I love celebrating life's small moments as well as the big ones–dinner with good friends, a lovely sunset, a new job, the end of a moving day, a race run, a prayer answered. Of course, opening a bottle of true Champagne can set you back $50 or more. Which is why I've become somewhat of an expert on budget bubblies–lovely, dry sparklers that are sophisticated and celebratory without breaking the bank.


There are such a wide array of sparkling wines available these days, that it's hard to make sense of what is what. To break down a few of the terms you will encounter, here is my little bubbly cheat sheet:

Brut - This means "dry" and is found on the labels of many sparkling wines.
Cava - Spanish sparkling wine made using the Methode Champenoise. It is usually the driest of the sparkling wines.
Champagne - French sparkling wine made ONLY in the region of
Champagne
. These are the top of the top, the most expensive, and have some of the most widely recognized labels (Mumm, Krug, Veuve Clicquot, Cristal, Dom Perignon). Champagne is tightly regulated and can only be made from three grapes (either blended or solo): Chardonnay, Pinot Noir, and Pinot Meunier. Its flavors can be quite complex, with yeasty, toasty aromas and a golden color (which gets darker as it ages).
Cremant - French sparkling wine from other regions, such as Cremant d'Alsace, Cremant de Bourgogne, and Cremant de Loire. These have much lower price-points than Champagne, but often have wonderfully aromatic flavors from grapes like Chenin Blanc or Vouvray.
Demi-Sec - A sweet, dessert style sparkling wine.
Extra-Dry - Contrary to what you might think, extra-dry is actually sweeter than brut, usually served as an aperatif. It's perfect for someone who wants a bit of sweetness, without going as sweet as a demi-sec.
Methode Champenoise/Traditional Method - A sparkling wine made in the traditional Champagne method, i.e. the second fermentation (which creates the bubbles) takes place in the bottle. This is slightly more expensive than the Prosecco method, and usually creates more complex wines.
N.V. - This stands for non-vintage and is often found on the labels of sparkling wines. This simply means that the wine is not from a certain year, but rather a blend of wines from several years to make sure the quality is consistent from year-to-year.
Prosecco - Italian sparkling wine, made using a method where the wine undergoes a second fermentation in large tanks and is bottled under pressure. Prosecco tends to have finer bubbles than Champagne and can be a bit on the sweeter side.


I've worked at a few wine shops over the years, which has given me ample opportunity to taste a variety of bubblies–both on the pricey end and the budget side of things. This list is by no means definitive (you'll notice there's not a Prosecco on the list, which I happen to love), but it does give several fabulous, under-$20 options to take to a party, or pop open tonight! Personally, I'd recommend the latter...

La Gaudrelle Cremant de Loire - Crisp, aromatic sparkling Chenin Blanc from the Loire Valley. Delicious as an aperatif or served with shellfish. ($17.99)

Gruet Brut - Toasty, yeasty, full-bodied traditional method bubbly made by a French family in New Mexico. You'll swear you are drinking the real thing. Added bonus–it's all organic. ($13.75)

Cuvée Laurent Brut Rosé - I have a weakness for dry pink bubblies, and this delicate salmon-colored one from Provence fits the bill perfectly. Fantastic with thin-crust pizza. ($8.96)

Savia Viva Brut Reserva Cava - Dry, elegant, organic cava with fine bubbles and hints of lime zest. This one pairs really well with spicy Asian foods and sushi. ($8.96)

Piper Sonoma Brut - Another dry, traditional method bubbly, with a lovely creamy texture and dry finish, from Sonoma. I drank this one last New Year's Eve! ($13.99)
Your two cents...

If you don't have a Google login, please select Name/URL from the "Comment as" list below

Thursday, October 20, 2011

Healthy Living: Tomato Chickpea Curry with Kale

You may have noticed that there is a tab on the blog titled Healthy Living. Since I started the blog, it's been a goal of mine to provide healthy, simple recipes using whole, fresh foods. Of course, given that my last post was on Chocolate Chip Cookies, I should clarify that eating a healthy diet is all about balance! I don't advocate eating cookies every day, but I'm also not one for deprivation. Though I'm not a vegetarian or vegan, after reading books like Michael Pollan's In Defense of Food and Mark Bittman's Food Matters, I have conscientiously started eating a mostly plant-based diet. And that's not to say I rarely eat meat, it just means that when I do, I eat small very small quantities and fill up the rest of my plate with veggies and grains. It actually works out quite well, because buying humanely-raised, organic meats and poultry is pretty pricey. But now that I'm buying such small quantities of it, the price ends up the same.


Before Brandon and I got married, I lived for a year with my good friend Jessica. She's vegan, and she introduced me to all sorts of delicious dishes made solely from veggies and grains. Before I met Jess, I honestly could not have imagined a meal without meat or fish. A snack or an appetizer maybe, but not a meal. I was also convinced that you couldn't get enough protein from an animal-free meal. Which, I've learned, is completely false. Take this dish–tomato chickpea curry with kale and brown rice–for example. Both the chickpeas and the brown rice are naturally high in protein: one serving of this dish provides roughly 20 grams of protein, or the same amount as half a chicken breast.

Every so often, I love to make vegan meals. I feel so full of energy after eating a meal of veggies, legumes, and grains. I must say, Brandon is not as enthusiastic about meat-free meals as I am, but he's amazingly game for trying just about anything. My goal is to make my vegan meals so delicious that he doesn't even miss the meat! I created this dish the other night based on what was in my pantry (chickpeas, onion, garlic, spices, brown rice) and fridge (kale). I love Indian food, so I was going for a sort of vegan curry. It turned out to be so flavorful (the leftovers the next day were even better!) and so easy, that this now tops my list of healthy, quick, weeknight meals.

This is the first in a series of "Healthy Living" recipes I'll be posting. And not to say that the other recipes on the blog are not healthy! I try always to cook in a seasonal, Mediterranean way (lots of olive oil, herbs, veggies, fruits, nuts, grains, fish, some meat), but these recipes in particular will be mostly plant-based, lower in calories and fat, and very high in nutrients–and flavor. In these recipes, I'll introduce some grains, legumes, and vegetables you might not normally use. It's a way to experiment with new ingredients and new flavors as part of a healthy lifestyle. Have fun with it–you'll feel great as a result!

TOMATO CHICKPEA CURRY WITH KALE

Serves 4

(For the eggplant variation, scroll down to the bottom of the recipe.)

2 tablespoons vegetable oil
1/2 red onion, thinly sliced
2 cloves garlic, minced
2 teaspoons grated ginger
1 teaspoon curry powder
1 teaspoon cumin
1/2 teaspoon coriander
1/2 teaspoon turmeric
1 (15-ounce) can chickpeas, drained and rinsed
1/2 (28-ounce) can whole San Marzano tomatoes
3 tablespoons chopped cilantro
Salt and pepper to taste

1 to 2 tablespoons olive oil
1 clove garlic, minced
2 bunches Lacinato kale, rinsed and cut into 1 1/2-inch pieces
Salt and pepper to taste

Heat the vegetable oil in a nonstick wok or large sauté pan over medium-high heat.

Add the onions and sauté for 3 to 4 minutes or beginning to soften. Add the garlic and ginger and sauté for 1 to 2 minutes until fragrant. Add the spices, stirring constantly, and cook for an additional 2 minutes.

Add the chickpeas, stirring well. Crush the tomatoes with your hands, then add them to the pan along with the tomato juices. Let the mixture come to a boil, then reduce to a simmer.

Simmer for 10 minutes to let the flavors combine and the sauce thicken. (If it gets too dry, add a bit of water.) Stir in the cilantro and season with salt and pepper.

Meanwhile, heat the olive oil in another large sauté pan over medium-high heat. Add the garlic and cook for a minute or two until fragrant (do not let burn!). Add the kale and sauté for 4 to 5 minutes or until wilted. About halfway through the cooking, add about 1/4 cup water to partially steam the kale. Season with salt and pepper.

Serve with brown rice, and a dollop of yogurt (for the non-vegans).

EGGPLANT VARIATION: Dice one medium eggplant and toss with 1 tablespoon olive oil; season with salt and pepper. Spread on an aluminum foil-lined sheet tray and roast at 425°F for 20 to 25 minutes or until lightly browned. Make the recipe as instructed above, but add the eggplant to the curry along with the chickpeas and tomatoes. Stir in 3 tablespoons chopped mint at the end, along with the cilantro.


click for recipe & more…
Your two cents...

If you don't have a Google login, please select Name/URL from the "Comment as" list below

Tuesday, October 18, 2011

Perfect Chocolate Chip Cookies

I'm a firm believer that the simple pleasures in life are the most satisfying, and a warm chocolate chip cookie (preferably with a glass of ice-cold milk) has to be one of life's greatest simple pleasures.


As a great lover of chocolate chip cookies, I am always amazed by the lack of good cookies, even in New York City. I've sampled many a bakery cookie and have been sorely disappointed. Generally speaking, it's because they are stale or too tough, but partly because I like homemade cookies so much that it annoys me to pay $3.00 (or more) for a cookie that's just average!

Thus, I've been experimenting for quite some time to develop what I believe to be the perfect chocolate chip cookie. Of course, this is all dependent on what you are looking for. I want a cookie that is crisp on the outside, gooey on the inside, with plenty of chocolate chips and walnuts. (Nuts in chocolate chip cookies are controversial I know, but I adore the extra flavor and texture they add. Brandon, another cookie junkie, refuses to eat chocolate chip cookies with nuts. Tant pis. You can certainly eliminate them from the recipe, or substitute pecans for walnuts.) I like the flavor to be rich—tasting of butter, brown sugar, and vanilla—with a slightly salty aftertaste. Just a hint, though—too much salt can ruin a cookie (as I've learned from experience).

My cookies were inspired years ago by a recipe I found in
The Best Recipe, Cook’s Illustrated's cookbook. I love that they experiment and experiment until they get their desired result, and then explain WHY it turned out the way it did. Their recipe calls for one egg and one egg yolk, a trick that gives the cookie a richer flavor and a denser texture. They also call for more brown sugar than white, which gives a warmer, rounder sweetness than the brightness of white sugar. Over the years, I've continued to adapt the recipe to my taste. Sometimes I like using dark brown sugar or crunchy Demerara sugar to add extra depth of flavor. I add more vanilla than most recipes call for and as I mentioned above, a combination of salted and unsalted butter.

Most importantly, however, is what you do with the dough after you make it (besides eating it by the spoonful!). Chilling the dough for an hour or so allows it to set up (meaning it scoops easier) and cools the butter so the dough doesn’t spread on the cookie sheet. Ultimately, this step makes a cookie that is gooey on the inside and crisp on the outside: just what I love. Best of all, I’ve made these cookies so many times now that I don’t even need a recipe—I just make them from memory. So with no further ado, I present you with MY version of the Perfect Chocolate Chip Cookie.

PERFECT CHOCOLATE CHIP COOKIES

Makes about 3 dozen cookies

1 stick unsalted butter
1 stick salted butter
1 cup light brown sugar, packed
1/2 cup sugar
1 egg
1 egg yolk
1 Tablespoon vanilla
2 1/4 cups all-purpose flour
1 teaspoon baking soda
1/2 teaspoon sea salt
1 16-ounce package bittersweet (or semi-sweet) chocolate chips
1/2 cups chopped walnuts (optional)

Soften the butter in the microwave (or on the stove top) until nearly melted, about 1 minute. Let cool slightly. Cream the butter and sugars with an electric mixer until blended. Add the egg and the yolk, mixing well. Add the vanilla and mix well. In a separate small bowl, combine the flour, baking soda, and salt. Add the dry ingredients to the butter mixture and beat until no flour streaks remain. Stir in the chocolate chips and walnuts.

Cover the dough with saran wrap and place in the refrigerator for at least 1 hour.

Preheat the oven to 350 degrees F.

Drop tablespoonfuls of dough on an ungreased cookie sheet (about 2 inches apart) and place in the oven. Bake for 11 minutes for soft cookies or 13 for crisp ones. The cookies should be slightly brown and puffy. Let the cookies sit on the cookie sheet for 10 minutes to cool before removing to a cooling rack or a plate. Eat one (or two or three) warm with a glass of ice cold milk. Life doesn't get much better than this!


Your two cents...

If you don't have a Google login, please select Name/URL from the "Comment as" list below

Monday, October 17, 2011

Tuna & Avocado Poke

As much as I love to cook, sometimes I feel stuck in a rut. Throughout the year, I rotate through my repertoire of favorites–depending on the season, that could be seared halibut with fava bean puree (spring), slow-simmered Coq au Vin with roasted potatoes (fall), a perfectly ripe Caprese salad (summer), or rigatoni with broccoli rabe and lamb sausage (winter). I love eating with the seasons and getting inspired by what's in the market, or at the Bowery Whole Foods. But some days, especially when I've been on a big cooking/entertaining kick, nothing sounds good. Recently, I was having one of those uninspired, burnt-out-on-all-my-usual-food days. I wasn't in the mood for takeout–I wanted something really light and fresh–but didn't feel like spending lots of time in the kitchen. I wanted to try something new.


Some friends of mine recently went to Hawaii for their honeymoon and, based on their Facebook pictures, it seemed like nearly all they ate there was a delicious-looking dish called poke. Now, for those of you that have never heard of this dish (I hadn't until recently), it doesn't rhyme with "joke," it's pronounced POH-kay. It's basically the Hawaiian version of sashimi, and can be made with all sorts of seafood. After doing a little research, I discovered that there are many, many variations on this dish, but there are a few pretty standard ingredients: soy sauce, sesame oil, onion, and often dried seaweed and sesame seeds. I've never been to Hawaii, but this looked and sounded so fantastic (and seemed so easy to make) that I headed to the store, propelled out of my food funk. I love tuna, so I ordered some deep red Ahi, and decided to add some avocado (another of my favorite ingredients). Just an FYI: it's important to buy the best quality tuna possible for this dish–you're eating it raw, so make sure to ask for sashimi grade tuna.

I looked at several recipes online, and by trial-and-error created a version that is sort of halfway between tuna poke and tuna tartare. I wasn't trying to go completely authentic–I just wanted nicely balanced flavors, and an end result that looked as good as it tasted. This dish could not be any easier to make–you just dice the tuna, mix it with all the other ingredients, and let it chill in the fridge for a few hours. I added the avocado just before serving so it would stay bright green, but you could try marinating it with the tuna if you like. Serve the poke on Bibb lettuce leaves to make cute little wraps, or sprinkle with black sesame seeds and spoon it onto rice crackers for an elegant party hors d'oeuvre.

Food dilemma solved–with minimal prep, minimal clean-up, and maximum flavor. Not to mention, I learned how to make a super-healthy dish in the process. This was the perfect light dinner served with some brown rice and sliced mangoes, and Brandon loved it. Though it's a splurge buying Ahi tuna, half a pound is more than enough to make poke for two (the recipe below feeds four). Hope you enjoy a little trip to Hawaii around your table sometime soon!

TUNA & AVOCADO POKE

Serves 4

1 lb. sashimi-grade tuna, cut into 1/3-inch cubes
1 shallot, minced
2 teaspoons grated fresh ginger
1 jalapeno chile, minced (optional)
2 tablespoons sesame oil
1/4 cup soy sauce
3 tablespoons finely chopped fresh cilantro
1 avocado, cut into 1/3-inch cubes
Salt and pepper to taste
Bibb lettuce leaves, for serving

Combine the tuna, shallot, ginger, jalapeno (if using), sesame oil, soy sauce, and cilantro in a medium bowl and toss gently to combine. Cover with plastic wrap and refrigerate for 1 to 2 hours before serving.

Just before serving, fold in the avocado. Season with salt and pepper to taste. (I found that it was flavorful enough without salt and pepper, but season according to your taste.)

Serve with Bibb lettuce, to make lettuce wraps.

VARIATIONS:

• For an appetizer, serve spoonfuls of the poke on rice crackers or toasted pita chips.
• Add diced mangoes to the tuna avocado mixture.
• Serve with a squeeze of lime juice.
• Substitute 2-3 tablespoons finely sliced green onions for the shallot.
• Sprinkle the poke with black sesame seeds.
• For a heartier meal, serve with brown rice in lieu of the lettuce.

click for recipe & more…

Add a comment!
Your two cents...

If you don't have a Google login, please select Name/URL from the "Comment as" list below

Friday, October 14, 2011

How to Throw a Fall Dinner Party (with Video)


GUEST PHOTO BY SIGNE BIRCK

Based on the title of this blog, you can probably tell that dinner parties are sort of my thing. Especially when they're held around the yellow table. I love this table for so many reasons–and not just because of all the memorable meals and conversations I've shared around it. I love its warm mustard color. I love the scratches and dents that give it personality. I love the story behind it. But one of the things I love most is its ability to expand. Normally we keep it as a cozy six-seater, but when we have larger groups, we can add leaves to expand it to fit 8, 10, or even 12 people. It's a table that can always fit one more. Which was the case a few weekends ago when we hosted a 10-person fall storytelling dinner, the first in what I hope will become a series of story-filled soirées.

When I throw dinner parties, I like mixing up the crowd a bit. I love to bring different friends together–some of Brandon's, some of mine, and some of ours–and watch the worlds collide. As important as the food and the ambiance are, it's the people that make a dinner party. Though I may recall a certain dish the next day (if it was really good), what will linger for weeks and months are stories told, laughter shared, and new friendships formed. One of these new friends is the fantastically talented Danish food photographer Signe Birck. She met my brother Davis last November (that's a story for another time...) and we recently connected in NYC. We were both passionate about similar things–me, food and writing, she, food and photography, so it was a natural fit for us to work together. I told her I was throwing a dinner party and that she should come–with her camera. She did, and the beautiful photographs on today's post (all except the video) are Signe's work. Thank you!!


GUEST PHOTO BY SIGNE BIRCK

People tell me all the time that they are intimidated to host a dinner party. They're not sure what to cook, worried about their lack of space, and afraid it will be a ton of work–so they end up going out to dinner (again). I want to demystify the process as much as possible on this blog, because honestly, having friends over and cooking for them is one of the most rewarding things in life. I've learned a couple of things from throwing dinner parties over the years and one of the most important tips I can pass along is this: PLAN AHEAD. I don't mean to start planning months in advance or anything, just try and do everything ahead that you can (cleaning, set-up, prep, cooking) so you can relax and enjoy your guests once they arrive.

With dinner parties, I'm a list-keeper. First, there's the menu. Then the shopping list. Then there's the to-do list (errands, cleaning, cooking, table, music, etc.), and finally the day of, the cooking prep list. I like to check things off and know where I stand in the process. I actually plan my dinner party menus based on the ability to make things in advance. If I can get the dessert done and the table set the night before, I already feel way ahead of the game. Also, don't be afraid to delegate! Spread the work around...nobody said you have to do everything just because you're hosting! Here's a little video (be nice...I'm no TV host!) taken just before the party, with a play-by-play of the menu, and some easy, stress-free entertaining tips:


Another few dinner party tips:

• Set the ambiance: light some candles, dim the lights (which helps disguise those areas you didn't have time to dust!), and have a great playlist going when guests arrive. I'm a sucker for jazz–Ella Fitzgerald, Miles Davis, John Coltrane, Diana Krall, and St. Germain are all favorites of mine for dinner parties.

• Have drinks and snacks ready when guests arrive! This one is key. As long as everyone has something to sip, and something to nibble on, they are fine hanging out in the living room while I put the finishing touches on the meal. Lucky for me, we have an open kitchen that faces the living room, so I can still be part of the party while I'm cooking. And your hors d'oevres don't need to be elaborate–I usually put out some good olives, a couple of cheeses, and crackers. Or a good homemade dip and flatbread. Keep it simple!

• I'm a huge fan of one-pot dinners, especially in the fall and winter. Coq au Vin, Bouef Bourguignon, braised short ribs (basically anything cooked in red wine!!), or a big pot of soup can be made in advance and reheated when everyone arrives. And best of all, it can be dished out right from the pot, served with a green salad and some crusty bread to round things out.

• Get some cool vintage bottles to use for water on your table. I use old milk bottles and glass carafes (no need for them to match!) and keep them filled with water during a dinner party so I don't have to keep hopping up and down to refill water glasses.

• I love flowers, but I'm not a fan of tall arrangements on the table that block conversation. My mom gave me some of my great grandmother's cosmetics bottles and they make beautiful little vases. I'll put a single flower in each and line the table with these mismatched vintage arrangements. And I love to put one in the bathroom as well.

• Write your menu somewhere that everyone can see. I've got a chalkboard that hangs in the kitchen that I write the menu on, but sometimes it's fun to have hand-written menu cards at everyone's place.


GUEST PHOTO BY SIGNE BIRCK

Fall Dinner Party Menu

Fig & Ricotta Crostini

Butternut Squash Gnocchi with Sage Butter

Herb & Dijon Crusted Pork Shoulder (recipe below)
Balsamic Roasted Pears & Onions (recipe below)
Roasted Brussels Sprouts

Pumpkin Gingerbread Cake
with Cinnamon Whipped Cream


GUEST PHOTO BY SIGNE BIRCK


HERB & DIJON CRUSTED PORK SHOULDER

Serves 10 to 12

1 (4- to 5- lb. boneless pork shoulder, sometimes called "pork butt")
1 tablespoon finely chopped fresh rosemary
1 tablespoon fresh thyme leaves
1 tablespoon Dijon mustard
1 tablespoon apricot jam
3 garlic cloves, minced
3 teaspoons sea salt
2 teaspoons freshly ground pepper
3-4 tablespoons olive oil

Butterfly the pork so it is more or less the same thickness across.

In a mini-prep food processor (or in a smallish bowl), pulse (or whisk) to combine the rosemary, thyme, mustard, apricot jam, garlic, salt, and pepper.

Add the olive oil slowly, pulsing (or whisking) to combine. Rub the herb mixture all over the pork, then roll up the pork shoulder, tying with butcher's twine to secure.

Cover with plastic wrap and let marinate in the refrigerator for 2-3 hours.

Preheat the oven to 325°F. Let the pork come to room temperature before roasting.

Roast the pork skin-side up, in a roasting pan fitted with a rack for about 3 hours or until the meat is fork-tender (the internal temperature should be 180°F).

Let rest for 10-15 minutes, then remove twine and slice.

*This is the most tender, juicy, flavorful pork dish I have ever made–and at only $4.99/lb, it feeds a crowd inexpensively!

BALSAMIC ROASTED PEARS & RED ONIONS

Serves 10 to 12

4 Bosc pears, cut into eighths (skin on)
2 large red onions, halved lengthwise and thinly sliced
1 tablespoon Balsamic vinegar
3 tablespoons olive oil
Salt and pepper to taste
Fresh thyme sprigs

Preheat the oven to 400°F. Line two sheet trays with aluminum foil.

Toss the pears and onions in the Balsamic vinegar and olive oil until well coated, and season with salt and pepper.

Spread the mixture on the sheet trays and scatter 2-3 thyme springs (per pan) over the pears and onions.

Roast for 30 minutes or until tender. Let cool slightly before serving alongside the pork.


click for recipe & more…
Your two cents...

If you don't have a Google login, please select Name/URL from the "Comment as" list below

Wednesday, October 12, 2011

Q&A with Jill Donenfeld (+ A New Cookbook!)

It's tough to describe my friend Jill Donenfeld in just a few words. (Though impressive does come to mind...) By age 22, the personal chef and entrepreneur had already started her own business (The Culinistas) and written a cookbook (Mankafy Sakofo: Delicious Meals from Madagascar). Donenfeld founded The Culinistas in 2006 in New York City with the goal of bringing healthy, home cooked, customizable meals into the homes of busy professionals. The concept was a hit. Now, five years later, Donenfeld has expanded The Culinistas to Los Angeles and Chicago, and is coming out with her second cookbook: Party Like a Culinista (Lake Isle Press). Co-authored with fellow culinista Josie Gordon, the new book is all about parties: how to throw them, what to serve, and how to enjoy yourself in the process. Full of healthy and delicious recipes (like the Potato Kalamata Pizza below) and all sorts of tips on how to keep things stress-free, this is an invaluable read for anyone who loves to entertain–or is too intimidated to try. An avid foodie and intrepid world traveler, Donenfeld divides her time between NYC and LA, with regular inspiration trips abroad. I caught up with her last week and we chatted about her cooking, her new book, and the best foodie finds from her summer travels.


You started your personal chef service The Culinistas back in 2006, when you were just out of college...what inspired you to launch this business?

My family. I grew up eating with my parents and brothers around the dinner table every night. I didn't realize it was a luxury until I moved to NYC at 18 and experienced families living a much more scattered and disparate lifestyle than mine. A few families for whom I babysat asked me to come cook for them and that was the foundation for the company.

When did you first start cooking? What are some of your favorite things to cook?

My first memory cooking is of course with my mom. Cookies. But it was in high school that I got really into it. I used to make brownies a LOT. That usually resulted in my whole crew coming over to the house and hanging around the kitchen for hours on the weekend... ah, heaven.

Of course, you can't make brownies for dinner (at least not every night). I like to cook simply: big stir fries, pasta salads, quinoa salads. I love grilling shrimp and salmon. I use a lot of fresh herbs and spices I smuggle back from various travels. I have a stock pile of cardamom right now that I brought back from Tamil Nadu so I am working my way through that.

You are quite the world traveler, which I know provides inspiration for your cooking. This summer alone you were in Paris, India, and all over the U.S. What were some of your favorite foodie finds?

I was in India during their mango season and had the pleasure of indulging in many varieties, which was just mind-blowing. One day we lined up six types and sliced into them all for a taste test. I also got pretty into coconut oil while there - for cooking and for your skin and hair.

In Paris, I found fresh goat cheese at the Marché at Raspail on Sundays. By fresh I mean like loose, ricotta-textured goat cheese. That was breakfast pretty much every morning. And I was loving MINUTY rosé. But not for breakfast - at least not everyday.

The lobster on the East Coast was legit this summer and I was a maniac, going to Five Island in Maine and Luke's in Manhattan. And it seems like romaine hearts became widely available recently. I've been incorporating those sweet leaves into salads, and serving them as scoopers for appetizer-y dips and spreads and egg salad.

Your new cookbook Party Like a Culinista comes out this weekend (Oct. 16) and specializes in healthy, fun party foods. Tell us a little about it.

I wrote it with Josie Gordon, who's worked with The CULINISTAS since it's inception. The book is full of easIER, healthIER recipes, divided into short menus packed with little tips and tricks.


You're a party-planning pro, both on the catering and hostessing end. Any tips you want to share with us on how to have a stress-free party?

I always try to see things from the guest's point of view–they are there to have fun. And they will have fun if you have fun. So get into it! Also, having wine and a snack ready for the early birds is good so that you can finish up cooking–that can be a big help. Homemade popcorn is always my go to.

Now for the question I love to ask everyone: If you had to throw an impromptu dinner for eight tonight, what would you make?

I have a whole chapter about that! But since I'm answering these questions from gorgeous, sunny Sag Harbor I'll say: Cucumber and herbs salad (lots of herbs. Use herbs like lettuce!). Grilled clams and grilled corn with tarragon aioli. Fried zucchini and eggplant with citrus zest. Or just grill everything.

For the pre-dinner nibble, roast a few heads of garlic, pick up two baguettes, two soft cheeses, and serve with castelvatrano olives.

Dessert: raspberry whipped cream with any sweet thing you have in the house: cookies, brownies, ice cream, blueberries...whatever.

POTATO KALAMATA PIZZA

Serves 8

1 pound whole wheat pizza dough (see Note)
1 pound fingerling potatoes
3 tablespoons extra virgin olive oil
1/2 teaspoon fine grain sea salt
1 sprig fresh rosemary
3/4 cup kalamata or black olives, pitted
1 tablespoon fine extra virgin olive oil, for drizzling
2 tablespoons chopped fresh flat-leaf parsley

Preheat the oven to 400°F. Roll the pizza dough into circle about 14 inches in diameter with a rolling pin and place on a parchment-lined cookie sheet.

Slice the potatoes 1/4 inch thick using a mandoline. Toss the potatoes with 2 tablespoons olive oil and the salt. Spread them out on a rimmed baking sheet and top with the rosemary sprig. Roast for 45 minutes, stirring halfway through.

In a food processor, combine the olives with the remaining 1 tablespoon olive oil to make a quick tapenade. Pulse until mostly smooth.

Spread the tapenade evenly over the pizza dough. Layer on the potatoes. Discard the rosemary.

Reduce oven heat to 350°F and bake the pizza until the crust is browned, 10 to 12 minutes. Sprinkle with chopped parsley and drizzle with fine olive oil.

NOTES:

Whole wheat pizza dough can be purchased in many grocery stores. You can also check with your local pizzeria—they may be willing to sell uncooked dough. If you can’t find whole wheat in a pinch, the next best thing is white pizza dough made with organic ingredients.

Though we don't include cheese on our pie, some people might like some shaved Parmesan or pecorino. Add them as soon as the pie comes out of the oven.

*Recipe reprinted with permission from Party Like a Culinista by Jill Donenfeld and Josie Gordon (Lake Isle Press).


click for recipe & more…

Add a comment!
Your two cents...

If you don't have a Google login, please select Name/URL from the "Comment as" list below

Monday, October 10, 2011

Harvest Pumpkin Muffins

After a gorgeous weekend of blue skies and hot, sunny days, I feel a bit thrown off. Is it fall, or are we heading back into summer? I'm not complaining–this is certainly preferable to the bone-chilling winter ahead–but it sort of makes it difficult to get excited about hearty stews when it's 80 degrees outside. (Not to mention the weirdness of wearing flip flops and sundresses in October!) But one thing assures me that it is decidedly is fall: I've got pumpkin on the brain.


About this time every year–when pumpkins start popping up in the market, cans of it appear in the grocery store, and Starbucks starts serving their pumpkin lattes–the craving hits. Every day I wake up and nothing sounds quite as good as a warm pumpkin muffin and a steaming cup of coffee. Over the past week, I searched my neighborhood in vain for some homemade pumpkin goodies and, finding none, decided just to make my own. (The sweet smells of pumpkin, cinnamon, ginger, and nutmeg wafting from the oven were just an added bonus.)

The bad thing about this craving is that it doesn't go away after October. It sticks around long into the winter. As long as the weather is cool and there is canned pumpkin available in the grocery stores, I am game for a pumpkin baking project. Years ago I set out to find the perfect recipe for a pumpkin layer cake. I wanted a cake that was tender yet resilient, moist, flavorful–full of spices and studded with nuts–and slathered in tangy cream cheese frosting.

The recipe that did the trick (and has since become my standby) was from...drum roll please...Betty Crocker! (And no, it does not involve a cake mix.) Her Harvest Pumpkin Spice Bars not only met every single one of my criteria, but the recipe is extremely versatile. I have tweaked the recipe over the years (taken the sugar down a bit, added some spices, and played around with adding things like chocolate chips and cranberries) and have discovered that it works equally well as layer cake, bundt cake, muffins (or cupcakes, depending on whether you use frosting), or loaf bread.

Yesterday I decided to make muffins and a loaf of bread–the recipe below makes enough batter for two dozen muffins or one dozen muffins + one loaf pan. Making both muffins and bread is nice, because you can either eat the warm muffins and give the loaf away, or vice versa. The bread freezes really well, so if you prefer not to eat it all in one sitting (which I do not recommend!), wrap up the loaf as soon as it cools and stash it away in the freezer for a future unorthodox pumpkin craving.

PUMPKIN SPICE MUFFINS (AND BREAD)

Makes 12 muffins and 1 9x5" loaf of bread (or 24 muffins, or 2 9x5" loaves)

(Scroll down for the Madeleine Variation)

4 eggs
1 3/4 cups granulated sugar
1 cup vegetable oil
1 (15-ounce) can pureed pumpkin (NOT pumpkin pie mix)
2 cups all-purpose flour
2 tsp baking powder
1 tsp baking soda
1/2 tsp salt
2 tsp cinnamon
1/2 tsp ginger
1/4 tsp nutmeg
1/4 tsp cloves
1 cup golden raisins*
1/2 cup chopped walnuts (optional)

Preheat the oven to 350 degrees F. Grease a 12-cup muffin tin and a 9x5" loaf pan.

Beat the eggs, sugar, oil, and pumpkin in a large bowl until smooth, using a hand-held mixer. In a separate bowl, combine the flour, baking powder, baking soda, salt, cinnamon, ginger, nutmeg, and cloves.

With the mixer on low speed, add half the flour mixture to the pumpkin mixture and mix until almost combine. Add the rest of the flour mixture and mix until smooth. Stir in the raisins and the walnuts.

Fill the muffin cups 3/4 full and pour the remaining batter into the loaf pan. Place the muffins and the loaf pan on the center rack in the preheated oven.

Bake the muffins for about 20-25 minutes or until the tops are puffed up and a toothpick comes out clean. Leave the bread in the oven for an additional 35-40 minutes or until the top has risen and is lightly browned and a toothpick inserted into the middle comes out clean.

For both the muffins and the bread, let cool for 5-10 minutes in the pan, then turn out onto a cooling rack to continue cooling.

*Try substituting the golden raisins for dried cranberries or chocolate chips!

VARIATION: Pumpkin Madeleines – Make the batter without the raisins or walnuts. Place heaping tablespoons (probably more like 2 tablespoons for each) in a greased madeleine tin. Bake for 10 to 12 minutes until puffed up and a toothpick inserted into the center of one comes out clean. Cool for a few minutes in the tin, then turn out onto a cooling rack to finish cooling. Dust with powdered sugar before serving. (Makes about 48 madeleines)


click for recipe & more…

Add a comment!
Your two cents...

If you don't have a Google login, please select Name/URL from the "Comment as" list below

Friday, October 7, 2011

Q&A with Chef Guillaume Delaune

Born in Toulon, France, Chef Guillaume Delaune worked his way through some of the top kitchens in the south of France–Roger Vergé's Moulin de Mougins, Villa da Gallici, and La Chèvre d'Or (plus a stint in Montreal at XO at the St. James Hotel)–before landing his dream job this summer. As the chef at Kingsbrae Arms, a charming Relais & Chateaux hotel in St. Andrews-by-the-Sea, New Brunswick, Delaune prepares daily-changing six-course tasting menus for guests, highlighting the incredible Bay of Fundy seafood (like halibut, scallops, and lobster) and seasonal vegetables (mostly from the his garden). His garden- (and ocean)-to-table approach is evident in his beautiful food. A recent meal there included halibut brandade-stuffed ravioli with fennel confit, bathed in a pool of warm lobster bisque. Another course featured melt-in-your-mouth braised beef cheeks with wild boar bacon and porcini mushrooms (all local, bien sûr!) in a red wine glaze. I was in awe. I caught up with Delaune to ask him a few questions about his sublime cooking–and to beg him to share the recipe for his velvety cured salmon. He obliged.


When did you start cooking? And what drew you to cooking?

I started cooking at the age of 16. I used to cook the fish I caught in the Mediterannean Sea, and in the rivers around my hometown [Toulon, France]. I also had a friend who would give me game–hare, pheasant, and wild boar.

How did growing up in the South of France impact your cooking style?

I think [growing up in Toulon] was the most important influence for me. I really love this part of France. I grew up in the middle of olive trees and vineyards, with thyme, rosemary, and anise growing everywhere. That's why I only use olive oil for cooking–I hardly ever use cream or butter. I want to make people feel like they are in Toulon when they eat my bouillabaisse or pistou soup.

Tell us a bit about your job at Kingsbrae Arms. It's such a unique place. What do you love? Any surprises or challenges?

Kingsbrae Arms is really a dream place for me. It's just what I wanted for so long: to cook at a small Relais & Chateaux property. Because we have a small number of guests, we can really focus on them and make them feel at home. I love the fact that I’ve got a vegetable and herb garden and my very own smoker. As for the challenges, think the biggest one is making a different menu every day, especially when dealing with [food] allergies. Sometimes could have up to 2 or 3 different menus when we had a full house.

You all grow a lot of your own vegetables, fruits, and herbs for the restaurant. What sorts of things from the garden did you use this summer?

I use a lot of herbs: coriander, basil, dill, sage, purple sage, rosemary, thyme, tarragon, oregano–I have such a great variety. The vegetables I use the most are carrots, turnips, beets, provider, masai, blue jays and Roma beans, spinach, and my favorite, the zucchinis–both regular and "ronde de Nice." I also have cherry tomatoes, cucumbers, garlic...too many to name them all! I am already working with Harry, one of the owners, to decide which vegetables we will keep, get rid of, or add to the garden next year.

The caviar tasting was one of the highlights of my meal at Kingsbrae Arms. Tell us a big about your partnership with Breviro Caviar.

It’s a privilege to introduce Breviro Caviar to our guests, and for them to discover the uniqueness of this very rare short-nose sturgeon caviar. I often go to [Breviro’s] facilities; I even recently helped to make some caviar. It's a very difficult task to breed those fish, then to find the right moment to harvest the caviar. But the results are beautiful and they really are passionate about making the best product they can possibly have.

Anything new you plan to do with the menu next year?

I will try to add a nice cheese plate, promoting cheeses from Quebec and New Brunswick rather than European ones which everybody already knows. And I’d also like to make gluten-free bread and pastries instead of buying them. A guest gave me some nice [gluten-free] recipes this summer.

What are five ingredients that are always in your pantry?

Cumin, coriander, extra virgin olive oil from les Baux de Provence, garlic, truffle

If you had to throw an impromptu dinner for 8 tonight, what would you make?

For appetizer, a simple arugula salad with Burrata or buffalo mozzarella,
pine nuts, a Balsamic glaze dressing, very thin slices of serrano ham, marinated tomato (just olive oil, chopped fresh basil, microplaned garlic, salt, pepper and rosemary), sprinkled with some fresh scallions, and finished with a bit of pepper from the peppermill and some Maldon salt.

For the main course, a very creamy truffle risotto, with lots of Parmesan and olive oil, with tiny roasted scallops and fresh baby porcini mushrooms. Just before serving, I’d add a piece of crispy smoked wild boar bacon on top and pepper from the peppermill.

For dessert, a vanilla panna cotta with strawberries, raspberries, blueberries, and a berry coulis, finished with a speculoos crumble.

SALMON GRAVLAX

Serves 8

2 pound side salmon, 1-inch thick, skin on
2 cups coarse sea salt
1 cup sugar
1 orange
1 lemon
Bunch of dill, chopped
2 tablespoons course black pepper

Clean and debone the salmon fillet.

In a large bowl, combine the coarse salt with the sugar, the zests and juice of the orange and lemon, the dill, and the pepper.

Lay the salmon skin side up out on a large sheet tray or in a glass baking dish. Rub the salt mixture on both sides of the salmon, packing it on top and around. Cover with plastic wrap and weight down with another sheet tray and a brick or stone on top to press out the moisture. Let cure in the refrigerator for 24 hours.

When ready, rinse the salmon for 5 minutes under cool water, pat dry with paper towels, and let it dry completely for one day in the fridge.

To serve, cut nice thick slices (1/4-inch) and serve with lemon and chive sour cream, olive oil crostini, and some arugula.


click for recipe & more…

Add a comment!
Your two cents...

If you don't have a Google login, please select Name/URL from the "Comment as" list below

Wednesday, October 5, 2011

Tuscan White Bean Soup With Swiss Chard


I love days like today. Blue sky, crisp, cool early fall days where the air feels clean (even in NYC) and you need a scarf to stay warm. Sweater-and-boots weather, as my friend Chrissy says. Not cold yet, just cool enough to make me crave a hot cup of cider or a bowl of soup. In fact, on days like this, soup is exactly what I'm craving. I love to have a big pot simmering on the stove, letting its delicious aromas fill the apartment. My go-to recipe is Tuscan White Bean Soup. I have been making this soup for years, always experimenting with different types of greens according to my mood (or what's in the fridge). Spinach, kale, Swiss chard, collard greens...they're all fantastic in this recipe.

I love Tuscan White Bean Soup for so many reasons. First of all, in the spirit of my late blog the Recession Cookbook, it's super affordable to make, and contains a bunch of ingredients that are already in my pantry (cannellini beans, chicken broth, garlic, onion) and fridge (herbs, carrots, celery, greens, Parmesan). Second, it's extremely versatile. The prosciutto can be substituted for bacon–or eliminated altogether if you want to make the soup vegan (in that case take out the Parm and substitute the chicken broth for veggie broth). Also, as I mentioned above, the Swiss chard can be swapped out for any dark leafy green.

Third, it's chock full of vegetables and I always feel quite virtuous eating something with so much fiber (and so little fat!). And last, but not least, it freezes really well. If you are just cooking for two you'll have tons of leftovers: freeze half of the batch for another cold night.

I made a big pot of this soup on Monday and I've got one last bowl to enjoy for lunch today (an added bonus: the flavors actually improve after a few days in the fridge). If only I could convince my husband Brandon to embrace the concept of soup. I could eat a different soup every day, but he, tragically, has an aversion to hot liquids. Making a pot of soup for one, however, is a bit silly–so if anyone wants to drop by for a bowl, let me know!

TUSCAN WHITE BEAN SOUP WITH SWISS CHARD

Serves 6 to 8

1 bunch Swiss chard (or other dark leafy green such as kale)
1 to 2 tablespoons olive oil
1 medium onion, diced
2 ribs celery, diced
1 large carrot, diced
3 cloves garlic, minced
4 slices finely chopped prosciutto
1 tablespoon chopped rosemary (divided)
1 tablespoon thyme leaves (divided)
1/2 tsp. red pepper flakes (optional)
1 bay leaf
3 cans white (cannellini) beans, drained and rinsed
1 32-ounce box low-sodium chicken broth (about 4 cups)
1 Parmesan rind
Salt and freshly ground pepper to taste
Splash of balsamic vinegar (about 1 teaspoon)

Cut off the tough ends of the chard and rinse the greens thoroughly. Shake or pat dry and tear into bite-size pieces. Set aside.

Heat the oil over medium-high heat in a large heavy-bottomed pot. Saute the onion, celery, carrot, and garlic for 3 minutes or until the onion is translucent, stirring often. Add the prosciutto, HALF the herbs, the red pepper flakes (if you choose), and bay leaf and saute for another 3 minutes until fragrant. Stir in the beans and saute for another minute or two. Pour in the chicken broth, toss in the Parmesan rind, and bring to a boil.

Reduce heat to low and simmer for 30 minutes or until thickened, stirring occasionally. Stir in the Swiss chard and cook over low heat for 2-3 minutes or until the greens have wilted. Season with salt, pepper, the other half of the herbs, and a splash of balsamic vinegar. Remove the Parmesan rind before serving (if you can find it!).

Serve with grated Parmesan cheese and warm crusty bread.

TIP: When I am running short on time, I will sometimes buy the pre-cut "Mirepoix" blend of onion, celery, and carrot at Trader Joe's or Whole Foods. You can find it in the produce section. This seems like cheating, but it really does save time in a pinch!

TIP: Another time-saving tip: substitute chard or kale for a bag of baby spinach leaves.

TIP: This soup gets thicker the longer it sits, so when reheating leftovers I always add some water to thin it out a bit.

click for recipe & more…
Your two cents...

If you don't have a Google login, please select Name/URL from the "Comment as" list below

Monday, October 3, 2011

How to Make Butternut Squash Gnocchi (Video)


GUEST PHOTO BY SIGNE BIRCK

This time of year–when the weather is cooling off and the leaves are starting to change–I start craving butternut squash. To me, this long, funky-shaped squash, with its bright orange, slightly sweet fIesh, represents fall. I love it in all its forms–roasted, sautéed, mashed, puréed. But my favorite way to enjoy butternut squash is in gnocchi–those delicate little larvae-shaped dumplings that taste so good, yet are so painstaking to make.

As I was planning the menu for my dinner party last weekend, I knew I wanted to make butternut squash gnocchi for the first course. I pictured plates of tiny, beautifully-shaped dumplings, tossed with browned sage butter and sprinkled with grated Parmesan. I imagined the oohs and ahhs that would involuntarily escape the mouths of my guests. But I hesitated, reminding myself that making gnocchi from scratch would involve a pretty serious time commitment, and that there was plenty of room for error with the dough. What if I went through all that effort and they turned out as ugly little leaden lumps? I told myself that it would be crazy to try and make enough gnocchi for 10 people in addition to everything else I was planning to make. But then I thought how delicious they would be, and how this was the perfect chance to practice my rather rusty gnocchi-making skills (let's just say it had been a few years...)


I researched a bunch of gnocchi recipes online, and decided that if anyone knew how to make gnocchi, it would be Lydia Bastianich. Using her recipe as a guide (of course I made a few changes along the way...), I started with the butternut squash purée: I roasted the butternut squash, whizzed it in a food processor, then cooked it for five minutes over the stove top to remove all additional moisture. Like traditional gnocchi, Lydia's recipe calls for potatoes as well. I peeled and boiled a few spuds and pressed them through a ricer while they were still warm. I know a potato ricer may not be a tool you have lying around, but it's worth investing in one if you like to make mashed potatoes or gnocchi. It will give your potatoes the light, silky texture needed to make a smooth dough (or a super-creamy potato purée). Let the butternut squash puree and potatoes cool before proceeding to the next step.

In a bowl (see picture above), I gently combined the butternut squash puree, the riced potatoes, an egg, salt, grated Parmesan, and about a cup of flour with a spatula. I gradually added another half cup of flour to create a soft, slightly sticky dough. (The recipe called for 1 3/4 cups of flour, but I only ended up using 1 1/2 cups.) The key here is not to overwork the dough! The less flour you use, the better–you want your dough to be smooth and elastic like Play-Doh, not dry and brittle. At this point, you can remove the dough to a floured surface and knead a few times until you have a smooth ball of dough. Just sprinkle with additional flour if it's still sticky. Divide the dough in half with a bread cutter (this is a really useful, inexpensive tool that will also come in handy when making bread or pastry), then into fourths and eighths. You should have eight small balls of dough.


Now for the fun part...rolling and shaping the gnocchi!! Go ahead and line two sheet trays with parchment paper–you will need these to put the gnocchi on as you shape them. Brandon made a little step-by-step video (below) of me shaping one of the small dough balls into a long rope, cutting it into little pillows, then rolling each dumpling over fork tines to create the traditional gnocchi ridges. Check it out–it's sort of like a gnocchi-making music video (and therefore way more fun to watch than to read boring step-by-step instructions...). This is our first how-to video, with more on the way...let us know what you think!


A big lesson I learned while making gnocchi is that you have to be careful not to let the dough get too warm, or it will get too soft to hold its shape properly. I found that it was really helpful to chill the gnocchi in the refrigerator for about half an hour between cutting them into little pillows and shaping them into gnocchi. I chilled them again before I boiled them–you don't want the dough to be too soft or it will fall apart in the boiling water. Also, if you want to make the gnocchi in advance, you can freeze them for several days or even weeks. Just take them directly from the freezer and place them in the boiling water. They are ready when they float to the surface, usually about 3 or 4 minutes.


GUEST PHOTO BY SIGNE BIRCK

In the end, the gnocchi were delicious. I did everything in advance–even the boiling can be done ahead–so all I had to do was sauté them in the sage butter right before serving. To be honest, from start to finish, they took me about six hours to make. Probably because I was slow and sort of learning as I went, but I definitely loved the way they turned out and I can't wait to make them again!

BUTTERNUT SQUASH GNOCCHI WITH SAGE BUTTER

Makes 6 main course servings, or 10 appetizer portions

1 2-pound butternut squash
Olive oil for brushing
Two 12-ounce russet potatoes, peeled and quartered
3/4 cup finely grated Parmesan cheese, divided
1 large egg, beaten
Pinch of freshly grated nutmeg
1 teaspoon salt
1 1/2 cups (or more) all purpose flour
1/2 cup (1 stick) butter
2 tablespoons chopped fresh sage
Salt and freshly ground pepper
Additional grated Parmesan cheese
Fried sage leaves

Preheat the oven to 425 degrees F. Cut the butternut squash in half, scoop out the seeds and pulp, and brush with olive oil. Roast, cut-side up, for about an hour, or until tender when pierced with a knife and beginning to brown. When cool enough to handle, scoop the flesh into a food processor and purée until smooth. Place the puree in a small saucepan and cook over medium heat, stirring constantly, until the puré is thickened, about five minutes. (This will remove all extra moisture from the squash.) Set aside one cup of purée for the gnocchi and save the rest for another use.

Meanwhile, boil the potatoes in salted water for about 20 minutes, or until tender when pierced with a knife. Drain the potatoes and press them through a potato ricer into a medium bowl. Measure out two cups of potatoes for the gnocchi. Let cool completely. Measure out the remaining gnocchi ingredients and have lined up ready to go. Prepare two parchment-lined sheet trays.

Using a spatula, gently combine the squash purée, potatoes, 1/2 cup Parmesan, egg, pinch of nutmeg, and salt in a large bowl. Fold in a cup of flour, gradually adding the remaining half cup until a soft, slightly sticky dough forms. Feel free to add a few more tablespoons of flour if necessary, taking care not to overwork the dough.

Turn the dough onto a floured surface and knead several times to form a smooth ball. Using a floured dough cutter (or a sharp floured knife), divide the dough in half. Then cut into fourths, and eighths, sprinkling the dough balls with additional flour.

Working with one dough ball at a time, pat the ball into a small log and begin rolling it into a long rope. The dough should ideally feel sort of like Play-Doh, though mine felt slightly softer. If it becomes too soft to roll, use your hands to stretch the dough and pat it into a long rope about 1/2- to 3/4-inch thick (depending on how big you want your gnocchi to be). Using the dough cutter, cut the rope into 1/2- to 3/4-inch pieces (again, personal preference). Place the little dumplings on the parchment-lined sheet tray and chill for about 30 minutes in the refrigerator. This step wasn't in the original recipe, but I found it extremely helpful in shaping the dough–if it's too soft, it's very difficult to shape the gnocchi.

Remove the dumplings from the fridge and roll them, one by one, over the back of fork tines dipped in flour. Press lightly with your thumb as you roll, and they should have small grooves down one side. Watch the video for clarification! Place the dumplings back on the sheet tray and let chill until ready to boil. Continue the process with the remaining dough balls.

Working in batches, boil the gnocchi in a large pot of salted water until they rise to the surface. Remove them with a slotted spoon onto two parchment-lined sheet trays. I did this in four batches, and each batch took around 3-5 minutes. Let chill until just before dinner.

To make the sage butter, heat two large sauté pans over medium-high heat. Place 1/2 stick of butter in each pan and let melt and begin to brown just slightly, about 2 to 3 minutes. Add the sage and cook for an additional minute. Add half the gnocchi to each pan and sauté until heated through and just beginning to brown, about 5 minutes. Season with salt and pepper and toss with the additional 1/4 cup Parmesan.

Serve the gnocchi with additional grated Parmesan and topped with a fried sage leaf. Buon appetito!


click for recipe & more…

Add a comment!
Your two cents...

If you don't have a Google login, please select Name/URL from the "Comment as" list below

Sunday, October 2, 2011

Perhaps the World Ends Here...


I woke up this morning to piles of dishes, empty wine bottles, and stacks of crusty pots and pans. The glorious aftermath of a dinner party. We had our first
Moth-inspired storytelling dinner last night, and among the ten of us gathered around the table, the stories were legendary. We heard tales of ghosts, near-arrests, nightmare first dates, and an attempted arranged marriage. Everyone had such a good time–we were still sipping wine and lingering over dessert long after midnight. But more on the dinner party later...

As I finish my second cup of coffee (and munch on a piece of leftover pumpkin gingerbread cake), I wanted to share with you a lovely poem my friend Kathryn York recently sent me. She said this poem had become an anthem of sorts for her the past year, and I think I'll adopt it as well. It so beautifully sums up everything I believe about living life around the table, but could never quite find the words to express. I hope this poem inspires you all as it did me. It makes the piles of dishes seem worthwhile.

Perhaps the World Ends Here
by Joy Harjo

The world begins at a kitchen table. No matter what,
we must eat to live.

The gifts of earth are brought and prepared, set on the
table so it has been since creation, and it will go on.

We chase chickens or dogs away from it. Babies teethe
at the corners. They scrape their knees under it.

It is here that children are given instructions on what
it means to be human. We make men at it,
we make women.

At this table we gossip, recall enemies and the ghosts
of lovers.

Our dreams drink coffee with us as they put their arms
around our children. They laugh with us at our poor
falling-down selves and as we put ourselves back
together once again at the table.

This table has been a house in the rain, an umbrella
in the sun.

Wars have begun and ended at this table. It is a place
to hide in the shadow of terror. A place to celebrate
the terrible victory.

We have given birth on this table, and have prepared
our parents for burial here.

At this table we sing with joy, with sorrow.
We pray of suffering and remorse.
We give thanks.

Perhaps the world will end at the kitchen table,
while we are laughing and crying,
eating of the last sweet bite.


click for recipe & more…

Add a comment!
Your two cents...

If you don't have a Google login, please select Name/URL from the "Comment as" list below