Friday, December 30, 2011

Healthy Living: Quinoa Salad with Fennel & Pomegranate


Hello friends! I hope everyone has enjoyed their holidays thoroughly. If you've noticed I haven't posted for the past week, it's because we've been trekking across the eastern half of the country visiting family. In the past week we've traveled from NYC to Nashville, TN (my family) to Adairville, KY (my extended family) to Kalamazoo, MI (B's family). There's been lots of cooking, eating, movie-watching, shopping for (and opening of) presents, and lounging by the fire. But unfortunately, not much time for blogging!

Regardless, I wanted to share with you all an amazing recipe I tried over the holidays. I cannot take credit for the recipe–it belongs to Yotam Ottolenghi, my new chef crush. I got his cookbook
Plenty
for Christmas, and have completely fallen in love with his incredible Mediterranean-inspired vegetarian dishes, ranging from simple (baby lettuce and herb salad) to wonderfully complex (leek fritters with herbed yogurt sauce). Israeli-born Ottolenghi runs several high-end "to-go" food shops in London that sell the same sorts of fresh salads, roasted vegetables, grains, and soups that fill his cookbooks and his long-running vegetarian column in The Guardian newspaper. (Perhaps he will expand his shops to NYC one day??)

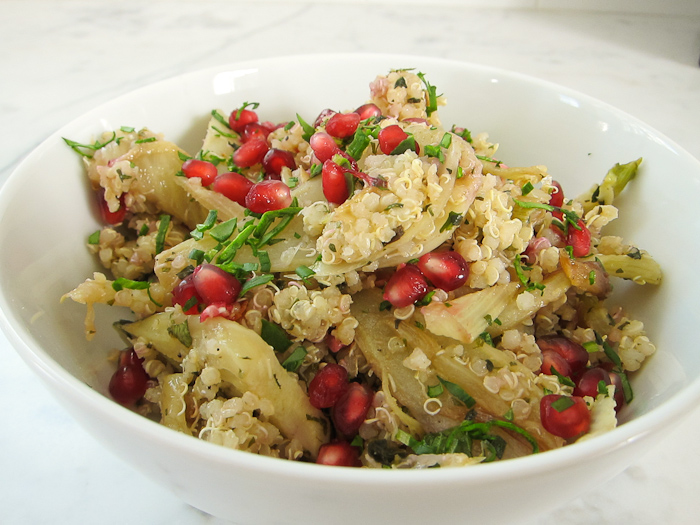
There's a big spread on Ottolenghi and his vibrant vegetable dishes in the January 2012 issue of Bon Appetit that includes this gorgeous quinoa salad. I made it for dinner the other night, with some roasted salmon and steamed green beans, and it was such a welcome respite from all the heavy holiday fare. I love the combination of nutty quinoa with sweet caramelized fennel, fresh herbs, and jewel-like pomegranate seeds. And considering the not-exactly-small ingredient list, it's actually pretty simple to make.

I'm not big on New Year's resolutions, but one of my themes for 2012 is health. Though it's certainly not all in my control, I am on a mission to help Brandon kick his Lyme and babesia with a healthy diet, and starting in January we are going to be cutting back on lots of foods that cause inflammation, like dairy, wheat, sugar, red meat, caffeine, and alcohol. It's definitely going to be a tough adjustment for a gal like me whose basic food groups include bread, cheese, wine, chocolate, and coffee BUT if there's any chance of improving the way B feels by eating a cleaner, leaner diet, then I'm all for it. I am excited to experiment with new vegetables and grains this year, with new herbs and spices, and to eat as simply, healthfully, and deliciously as possible. (And don't worry, I am not giving up ALL coffee and wine and chocolate–that would be cruel and unusual!) Stay tuned in January for more adventures in healthy eating...

Happy New Year!


QUINOA SALAD WITH CARAMELIZED FENNEL AND POMEGRANATE SEEDS

Adapted from Yotam Ottolenghi's recipe in Bon Appetit

Serves 6

1/4 cup extra virgin olive oil
4 small fennel bulbs, cut lengthwise into 1/4"-inch thick slices
Sea salt and freshly ground pepper
2 tablespoons fresh lemon juice
1 1/2 teaspoons cumin
1 teaspoon sugar
1 cup quinoa rinsed
1 lemon
1/2 cup chopped fresh cilantro
1/2 cup chopped fresh mint
1/4 cup pomegranate seeds (from 1/2 small pomegranate)*

Heat 3 tablespoons of the oil in a large skillet over medium high heat. Add the fennel; season wit salt and pepper. Cook, stirring occasionally, until the fennel is tender and lightly golden, about 10 to 12 minutes. Stir in the lemon juice, cumin, and sugar; cook for 1 minute. Season with salt and pepper. Set aside.

Meanwhile, bring the quinoa and 3 cups of water to a boil in a medium saucepan. Cover, reduce heat to low, and simmer until quinoa is cooked, about 10 minutes. Drain; return to pan. Cover; let sit for 15 minutes. Fluff with a fork, transfer to a large bowl.

Using a small sharp knife, cut all peel and white pith from the lemon. Cut between the membranes to release the segments; discard membranes and roughly chop. Add lemon with any juices and the remaining tablespoon of oil to the quinoa; stir. Add the fennel mixture and herbs and toss gently to combine. Season with salt and pepper to taste. Transfer salad to a large platter and sprinkle with pomegranate seeds.

*The easiest way to remove pomegranate seeds is to cut the pomegranate in half crosswise (rather than from stem to stem). Hold one half of the pomegranate over a bowl, cut-side down and smack it on the back with a wooden spoon until the seeds start falling out. Continue to smack the back of the pomegranate, lightly squeezing the sides of the fruit to release more seeds. Discard any bits of white membrane that fall in the bowl.


click for recipe & more…

Add a comment!
Your two cents...

If you don't have a Google login, please select Name/URL from the "Comment as" list below

Tuesday, December 27, 2011

Healthy Living: Hearty Sprouted Lentil Stew with Kale


This is my go-to healthy and hearty recipe for a cold, winter's night. It's simple to prepare, it's packed with vitamins and minerals from the vegetables and–thanks to the sprouted lentils–full of protein, enzymes, and micro-nutrients. It's also vegan and gluten-free. For a creamier soup, feel free to puree half or all of it with an immersion blender (or a food processor) after cooking. It's delicious either way, and tastes even better reheated the next day.

HEARTY SPROUTED LENTIL STEW WITH KALE

Serves 6

2 to 3 tablespoons olive oil
1 small white or yellow onion, diced
2 carrots, peeled, halved, and diced
2 ribs celery, halved and diced
2 garlic cloves, minced
1 teaspoon ground cumin
1/2 teaspoon ground coriander
1/4 teaspoon red pepper flakes (optional)
Sea salt and freshly ground pepper to taste
1 10-ounce package sprouted green lentils
1 10-ounce can diced tomatoes
1 quart vegetable stock
1 bunch Lacinto (Tuscan) kale, tough stems removed and cut into bite-size pieces

Heat the olive oil in a large pot over medium-high heat. Add the onion, carrots, and celery and saute for 5 minutes or so until softened, but not brown. Stir in the garlic and spices, and season with salt and pepper. Let cook for 1 minute or so until the garlic is fragrant (but not brown).

Add the lentils, tomatoes (and juices), and vegetable stock and bring the mixture to a boil, stirring occasionally. Reduce the heat to a simmer and let cook for 20 to 30 minutes or until thickened; remove from heat. If you like, you can use a stick blender to puree the soup to your desired consistency. Or feel free to leave it as is.

Stir in the kale and cook over low heat for a minute or two until wilted. Taste, and season generously with salt and pepper. Serve in shallow bowls with crusty bread.
Your two cents...

If you don't have a Google login, please select Name/URL from the "Comment as" list below

Thursday, December 22, 2011

Happy Holidays from The Yellow Table!


I have a love/hate relationship with Christmas cards. Don’t get me wrong–I LOVE getting them. Our fridge is currently covered with adorable pictures of our friends’ kids (and/or dogs) that have come pouring in the past few weeks. It’s the sending that I hate. Or, rather, it's a) the fact that I don’t ever quite get around to sending cards and b) the accompanying guilt that I hate. Every year, I buy a box of cards that sit, untouched, during the hubbub of the holidays. By the time January rolls around (and I finally have the time to sit down and write them) I realize that it’s a bit tacky to send cards that say “Merry Christmas” a month late. So I pack them up with the decorations, vowing to get an early start the next year.

I think Julia Child had the right idea–facing timing issues as well, she started sending out her holiday cards in February. She and her husband would take a take a funny picture (like, say, in a bubble bath), add a heart or two to make it into a Valentine, and send it out to all their friends and family. I love Julia–bold, unconventional, and always up for a laugh.

I, however, held on to the idea–once again–of sending out Christmas cards in December this year. I mean, if my friends with kids can actually make it happen, what excuse could I possibly have?! So I bought another box of cards and started planning our picture. I had this whole Christmas-y vision of Brandon and I, smiling and sitting beside a beautiful tree, with our two calm, purring cats. (HA!) There were just a few tiny problems with my vision. One, we needed someone to come over and take the picture (the least of our problems). Two, we weren’t entirely sure the cats would sit still long enough to have their picture taken. (Historically, the answer has been no.) And three, up until last Saturday, we didn’t have a tree.

We had decided not to get one this year–partially because Brandon has been so sick, and partially because we’re heading out of town and weren’t sure hauling a seven-foot-tall, 60-pound tree down the block and up five flights of stairs would be worth the effort. (Not to mention our fear of the cats climbing the tree and systematically knocking off every single ornament and chewing through the light chords...)

In the end, Brandon completely surprised me. While I was out at brunch with friends last Saturday, he went out and bought a beautiful little tree, carried it home, and strung it with lights. He knew how much a tree meant to me (even though I had very practically stated the reasons we didn't need one this year) and decided to make it happen. When I walked in and saw the tree all lit up, with Christmas music playing, it was one of the most special moments of my life. That one act, for me, symbolized so much that Christmas stands for. I do, indeed, have an amazing husband! And to add to the Christmas miracle: other than some serious sniffing, the cats have largely left the tree alone.

We finally took the picture last night. It was spontaneous–our friend Jess was over for dinner so we roped her into being the photographer. Of course, cats being cats, they wanted no part of being still–they squirmed, they scratched, they jumped, and finally ran away. Which is why most of the pictures feature Brandon and I–alternately laughing and grimacing–and two blurs of fur. But in the end, the pictures are so us. They’re not perfect, they at least made us laugh, and they’ll probably not go out in the mail until January. But they show what’s most important to us: family, friends, unexpected gifts, laughter, and spontaneity. (And cats!)

May this holiday season be a time of peace, joy, and hope for you and your family. I hope, like me, you'll get to spend lots of time in the kitchen–cooking and baking and talking and laughing–and even more time sitting around the table enjoying great food and conversation with the people you love the most. I hope you'll have time to enjoy the simple pleasures (sitting by the fire, drinking good hot chocolate, maybe singing a Christmas carol or two) and not stress out about all the things that ultimately don't matter. And I hope that if you're celebrating Christmas, you'll have time to reflect on that little baby, born in a humble manger thousands of years ago, that continues to change hearts and lives today.

Merry Christmas!!!


click for recipe & more…
Your two cents...

If you don't have a Google login, please select Name/URL from the "Comment as" list below

Monday, December 19, 2011

Healthy Living: Toasted Flatbread with Avocado & Veggies


My go-to lunch when I'm working from home are these super-simple (and super-healthy!) flat bread sandwiches with a spicy avocado spread and whatever veggies I have on hand. These are inspired by the amazingly delicious avocado toasts at Cafe Gitane–lightly toasted whole grain bread spread with a bright green mash of ripe avocados, lemon juice, chili flakes, salt, and olive oil. I am obsessed with these toasts, so I decided to make my own version at home.

These are so easy to make (10 minutes prep max) and they're full of vitamins and minerals from all the vegetables, and–thanks to the avocado–you won't end up hungry an hour later. In my opinion, this equals a perfect lunch. If you want to make this to take to your office, just make as a regular sandwich with the avocado spread and the vegetables between the two pieces of bread. I figure at this time of year, with all the holiday parties, decadent dinners, and baking marathons, a simple, light lunch is just what the doctor ordered.


OPEN-FACED SANDWICHES WITH AVOCADO SPREAD AND SALAD

Serves 2

Avocado Spread:
1 ripe avocado
Juice of 1/2 lemon
1/4 teaspoon red pepper flakes
Sea salt and freshly ground pepper to taste
Extra-virgin olive oil

Open-Faced Sandwich:
Two round thin-style buns*
Assorted veggies: arugula, grated carrots, grated zucchini, grated red cabbage, sliced radishes, etc.
Extra-virgin olive oil
Lemon wedge
Sea salt and freshly ground pepper to taste

Cut the avocado in half, remove the pit, and scoop out the flesh with a spoon onto a cutting board. Dice the avocado and dump into a bowl. Add the lemon juice (make sure no seeds fall in), red pepper flakes, and salt and pepper to taste. Mash the mixture up with a fork until chunky, but smooth enough to spread. Drizzle with a bit of olive oil and mash that in as well. Taste to see if you need additional salt or red pepper flakes (depends on how spicy you want it!).

Split the buns in two and toast them until golden brown. Spread each half with 1/4 of the avocado mixture. Top each half with a mixture of assorted veggies–I love buying carrots, zucchini, and red cabbage pre-grated at the Whole Foods salad bar, but of course you can easily grate them at home. I love making this as colorful as possible, with arugula, the grated veggies I mentioned above, and thinly sliced radishes. (If you don't want this to be vegetarian, you can easily add some roasted chicken or strips of grilled steak.)

Season each sandwich with a drizzle of olive oil, a squeeze of lemon, and a bit of salt and pepper.

*I use Ozery Bakery's wholegrain ONE buns, which you can buy in the bread section of the grocery store. You can substitute any sort of whole grain bread, flat bread, or pita.


click for recipe & more…
Your two cents...

If you don't have a Google login, please select Name/URL from the "Comment as" list below

Friday, December 16, 2011

Tarte Flambée (and the joys of catering in NYC...)

When a friend of mine recently asked if I'd make some food for our church's Christmas party, I immediately said yes. It was ladies-only, so I figured it would be an intimate affair, maybe 25-30 people max. A couple of easy hors d'oeuvres, a few desserts, no biggie. A couple of days before the event, I found out that over 50 people had RSVP'd. OK, still doable, but suddenly I had to start thinking like a caterer. I didn't have loads of time to cook on the day of the event, so I planned a menu of simple appetizers that I could either make in advance or throw together last minute.


Living in a fifth floor walk-up apartment makes catering quite a workout. First there's the grocery shopping and the lugging of bags up all those stairs. Then there's the prep in my kitchen and the re-packing of all the food–plus any kitchen tool, pot, pan, or cutting board that I think I might need at the venue. And then–my favorite part–there's the challenge of getting a cab. I can't tell you how many times I've hobbled down the block, bags hanging off every single appendage, trying desperately to flag down a cab (which all seem to be off-duty at that particular moment!). Once in the cab I can breathe a huge sigh of relief until I arrive at my destination–and then the lugging begins all over again.

This week was particularly hilarious, as the cabby dropped me off a block and a half from my destination. When I told him that the building I needed was actually on the other side of Sixth Avenue, he screamed at me for not giving him proper directions and ordered me out of the cab. I sighed, paid, and grabbed my 8 bags, 3 sheet trays, and large cutting board, and dragged myself–slowly–back across Sixth Ave. This, I reminded myself, is why I rarely cater anymore. It's not the planning, shopping, or cooking that gets to me–it's the schlepping!

Once in the kitchen, of course, all was well. I unpacked, got the ovens cranking, and started chopping, stuffing, wrapping, and baking. I had made my
Tuscan White Bean Dip
in advance, and I sliced up a bunch of crudités for dipping: red and yellow peppers, fennel, carrots, endives, and sugar snap peas. I made my classic Bacon-Wrapped Dates, assembled a cheese tray with some tapenade and crackers, and sliced up some Old-Fashioned Gingerbread with a bowl of lemon curd for drizzling. Last, but not least, I made my all-time favorite wintry appetizer: Tarte Flambé, an Alsacian flatbread of sorts, with onions, creme fraiche, bacon, and grated Gruyere cheese.

Not only is this combination of flavors absolutely irresistible, but it's so easy to make: there's no pre-cooking the bacon or onions–everything's just sliced, arranged on the dough, and baked in hot oven for 15-20 minutes. (Of course you can make your own dough, but for time's sake I usually buy pre-made.) It's equally delicious as an hors d'oeuvres (sliced into small squares) or for dinner, served with a big green salad. It's also versatile: you can make it with pizza dough or puff pastry, use white or red onions, bacon or pancetta, and add a sprinkling of herbs (I love rosemary). The other night I made four tartes and there was not one piece leftover. Glad I snuck a couple bites in the kitchen...

A NOT QUITE TRADITIONAL TARTE FLAMBEE

Serves 8 as an appetizer (or 3-4 for dinner)

One ball bread or pizza dough (homemade or store-bought) or one sheet frozen puff-pastry, thawed
1/4 cup creme fraiche
1 small onion (red or white), thinly sliced
1/4 cup finely diced bacon or pancetta
1/2 cup coarsely grated Gruyere
1 tablespoon chopped fresh rosemary
Salt and pepper

Preheat the oven to 425°F. Lightly grease a sheet tray or line with parchment paper.

On a floured surface, gently roll out the pizza dough into a rectangular shape, about 1/2-inch thick. (If you are using puff pastry, no need to roll it out.)

Place the dough on the prepared sheet tray and spread the creme fraiche on the dough, leaving about an inch border around the edges. Arrange the onions over the creme fraiche, then sprinkle with bacon, Gruyere, and rosemary. Season with salt and pepper.

Bake until crisp and golden brown, about 20 minutes. Let cool for 5 minutes or so before slicing. Cut into small squares for appetizers, or larger ones if serving for dinner.

*This is delicious with a crisp white wine from Alsace, like a Pinot Gris, or a dry sparkling wine. I love this with a Loire Valley or Alsacian cremant.


click for recipe & more…
Your two cents...

If you don't have a Google login, please select Name/URL from the "Comment as" list below

Wednesday, December 14, 2011

Holiday Gifts: Homemade Mini Loaves


I love this time of year. The trees, the lights, the glittery storefronts, the Christmas music, the parties...in fact, for the month of December, I don't even mind the cold. Everything about this season seems magical–so expectant and filled with hope. But most of all, I love holiday baking. There's just something so cozy about an apartment filled with the smells of cinnamon, ginger, and cloves–and Micheal Bublé crooning Christmas tunes from Pandora. (Brandon doesn't quite agree with the last part, but he thankfully indulges my Christmas fantasy!)

This year, in lieu of store bought gifts, I thought it would be fun to create some homemade treats for friends and family. I have such fond memories as a kid, of my mom's friends popping over during the holidays with homemade goodies: cookies, caramel popcorn, fudge, and mini loaves of bread. Sure, maybe not the healthiest of fare, but I remember how fun it was to get these beautifully wrapped offerings that were made with such love. Why not bring this same holiday tradition into the city?


For my big baking project, I decided to make mini loaves because they are 1) easy 2) really cute and 3) they can be made in a variety of flavors. I pulled out a few of my trusty holiday recipes–delicate cranberry orange bread with walnut streusel topping, and pumpkin chocolate chip (same as my favorite pumpkin spice muffin recipe)–as well as a new one: old-fashioned gingerbread.

Since I didn't have a good recipe for gingerbread, I reached out to some friends for ideas. My friend Emily sent me an old family recipe (thank you!) which I ended up using, with a few tweaks. I substituted the shortening for butter, the white sugar for dark brown, and added a few more spices (extra ginger + some nutmeg). But the end result was just what I was hoping for: super dense, moist, and intensely spicy.


You need just a few things to make your own mini loaves. First, get some nonstick 5 1/2" x 3" x 2 1/4 mini loaf pans. I bought mine at Bed, Bath, and Beyond–a set of four is just $9.99. Next, figure out which recipes you want to make and stock up on your baking ingredients: flour, sugar, spices, eggs, butter, etc. I love Trader Joe's for this...the amount of money I save buying baking ingredients there is absolutely worth the time spent waiting in line. Last, stop by a craft or stationary store and stock up on pretty ribbons and a few gift tags (I used some pre-made ones...you could of course make your own if you're really feeling creative!).


Once you've baked your bread, let them cool completely on a cooling rack before wrapping them. Wrap them carefully in plastic wrap, tie a big 'ol pretty bow around them, and pick out a gift card. So Martha Stewart, yet so simple. The only problem is that so many of the loaves seem to disappear before they actually get wrapped up and given away. Must be the cats again...

CRANBERRY ORANGE BREAD WITH WALNUT STREUSEL

Makes 3 mini loaves

Streusel Topping:
1/2 cup walnuts, finely chopped
1/4 cup brown sugar
1/2 teaspoon cinnamon

Cranberry Orange Bread:
2 cups all-purpose flour
1 1/2 teaspoons baking powder
1/2 teaspoon baking soda
1/2 teaspoon salt
1/2 teaspoon cinnamon
1/4 teaspoon nutmeg
1 1/2 cups fresh cranberries
1 cup granulated sugar
1/4 cup butter (4 tablespoons), softened
1 egg
1 tablespoon grated orange zest
3/4 cup fresh squeezed orange juice

Preheat oven to 350°F. Spray three 5 1/2" x 3" x 2 1/4 mini loaf pans with vegetable oil cooking spray or grease with a little butter or vegetable oil.

Combine the walnuts, brown sugar, and cinnamon in a small bowl for streusel. Set aside.

Whisk together the flour, baking powder, baking soda, salt, cinnamon, and nutmeg in a large bowl. Stir in the (rinsed and dried) cranberries.

In a separate bowl, cream the sugar, butter, and egg with electric beaters. Add the zest and juice, stirring to combine. Slowly add the flour mixture to the orange mixture, stirring to combine.

Scrape the batter (it will be thick) into the prepared pans with a rubber spatula. Sprinkle with streusel topping and place on the center rack of the oven.

Bake on the center rack of the preheated oven for about 35 to 40 minutes or until the streusel topping is nicely browned and a toothpick comes out clean. Let cool on a cooling rack for 15 minutes, then remove from the pans and continue cooling directly on the rack. Or, slice and serve warm with a pot of tea!

OLD-FASHIONED GINGERBREAD

Makes 3 mini loaves

1/2 cup (1 stick) butter, softened
1/2 cup dark brown sugar
1 cup (dark or blackstrap) molasses
1 cup hot water
1 egg, lightly beaten
2 1/2 cups all-purpose flour
1 1/2 teaspoon baking soda
1/2 teaspoon salt
1 1/2 teaspoons ginger
1 teaspoon each cinnamon
1/2 teaspoon ground cloves
1/4 teaspoon ground nutmeg

Preheat oven to 350°F. Spray three 5 1/2" x 3" x 2 1/4 mini loaf pans with vegetable oil cooking spray or grease with a little butter or vegetable oil.

Cream the butter and sugar until light and fluffy; add egg. In a separate bowl, combine the molasses with the water; slowly whisk into the butter mixture.

Add the dry ingredients and beat (or whisk) until smooth.

Scrape the batter into the prepared pans (they'll be about half-full). Bake on the center rack of the preheated oven for 35 to 40 minutes or until a toothpick inserted into the middle of a loaf comes out with a few moist crumbs clinging to it. Let cool on a cooling rack for 15 minutes, then remove from pans and continue cooling directly on the rack. Or, slice and serve warm with homemade whipped cream or lemon curd!

PUMPKIN CHOCOLATE CHIP BREAD

Makes 4 mini loaves

4 eggs
2 cups granulated sugar
1 cup vegetable oil
1 (15-ounce) can pureed pumpkin (NOT pumpkin pie mix)
2 cups all-purpose flour
2 teaspoons baking powder
1 teaspoon baking soda
1/2 teaspoon salt
2 teaspoons cinnamon
1/2 teaspoon ginger
1/4 teaspoon nutmeg
1/4 teaspoon cloves
1 cup semi-sweet chocolate chips
1/2 cup chopped pecans (optional)

Preheat the oven to 350°F. Spray four 5 1/2" x 3" x 2 1/4 mini loaf pans with vegetable oil cooking spray or grease with a little butter or vegetable oil.

Beat the eggs, sugar, oil, and pumpkin in a large bowl until smooth, using a hand-held mixer. In a separate bowl, combine the flour, baking powder, baking soda, salt, cinnamon, ginger, nutmeg, and cloves.

With the mixer on low speed, add half the flour mixture to the pumpkin mixture and mix until almost combined. Add the rest of the flour mixture and mix until smooth. Stir in the chocolate chips.

Scrape the batter into the prepared pans (they'll be about 3/4 full). Bake on the center rack of the preheated oven for 30 to 35 minutes or until the tops are puffed up and lightly browned, and a toothpick inserted in the middle of a loaf comes out clean. Let cool on a cooling rack for 15 minutes, then remove from the pans and continue cooling directly on the rack.


click for recipe & more…

Add a comment!
Your two cents...

If you don't have a Google login, please select Name/URL from the "Comment as" list below

Monday, December 12, 2011

Q&A with Signe Birck

These days, with myriads of foodies tweeting photos of restaurant dishes and bloggers featuring ever-increasingly sophisticated photography, it seems that everyone wants to be a food photographer. And yet, when you look at the stunning images of Danish photographer Signe Birck, you quickly realize that she is the real deal. Not only is she passionate about shooting food–as evidenced by her crisp, clean images (with no clutter to distract from the food itself)–but she's also an avid home cook herself. Birck divides her time between Copenhagen and NYC and has shot numerous cookbooks and editorial spreads. She's worked extensively with chefs in Copenhagen to document the New Nordic movement and was recently in NYC to shoot Noma co-founder Mads Refslund and his upcoming Soho restaurant ACME.


Photo by Lee Edward

I owe my brother a dept of gratitude for introducing me to Birck. They met serendipitously in NYC last Thanksgiving (it's a great story I'll have to share one day!) and he instantly knew that he needed to connect the two of us. I had the pleasure of collaborating with Birck in October–she shot a fall storytelling dinner party here around the yellow table, and thanks to her mad skills, my food has never looked more beautiful. We met up several more times during her time in NYC and started brainstorming about future collaborations. Though we can't reveal any details at the moment, let's just say a cookbook may be in our future...!

Birck is back in Copenhagen at the moment, but we chatted (via email) about cooking, dinner parties, her philosophies behind food photography, and some of her very cool projects–past and present. My fingers are crossed that she'll be back on this side of the pond soon...we have many more projects ahead.

Where were you born?

I grew up in the very southern part of Denmark, near the German border. Our house was surrounded by fields, and was located next to a big forest. It was ideal conditions for raising children, and I spent all my time tending to my horses. I loved it growing up, but I'm not sure if I'll ever move back to the country. Big city life works very well for me.

How did you get into food photography?

Growing up, I remember how I would always arrange my dinner plate with great attention, and tell my parents: "Look, it's like a food picture!" Maybe I already knew at the age of 7...

During my time in the photography industry, I have been in touch with many different genres. In the beginning I thought I would get into fashion, then while I was a student I worked at a studio that mainly handled furniture and interior design photography. On the side I would sometimes assist a food photographer, and I was very impressed with the beautiful work she did–it was so different from what I was used to. During my training, I worked solely with studio flash equipment as my light source (which I am grateful to have been taught). But I found it fascinating to observe how she was able to control daylight to perfection, no matter the conditions she was working under. And suddenly I began to "see" food–and how amazing it can look when photographed. After graduation I was employed at a studio, working primarily with food clients. This was somewhat of a coincidence, but I soon realized that this was my calling.


What do you love most about photographing food? What's the hardest thing?


I think what I love the most is the ability to–through something as simple as a photograph–speak directly to the most basic needs and desires of human existence. A beautiful food photo will make you hungry! These days the debate of sustainability, organic meat and produce, obesity vs. starvation, and the general focus on healthy living is highly present. I find it fascinating how the awareness of environmental issues, combined with a heightened focus on animal rights and the wish to support your local farmer, as opposed to the big bad mass produced food industry, is growing day by day. I don't mean to go all political about this, but to me, these issues go hand in hand with the way I look upon my work. I'm able to combine my love for beautiful photography with my need to participate in continually raising the awareness of food being not only something you eat, but a Global "hot potato", really. Working in the wake of The New Nordic Movement, I'm being confronted with these matters all the time, and I admire how modern chefs and food producers seem to take this very seriously.

I love working alongside chefs and stylists who share my excitement, to feel the set is vibrating of ideas flying through the air. I know it's super nerdy, but it's great to be able to discuss whether this peppercorn should be on the left or the right side of the plate, with someone who won't find you weird!


What is the coolest project you've worked on so far?

Well, there has been quite a few, but if I have to name one, it would be a cookbook project I worked on with the food photographer I mentioned previously. I was actually assisting her, as she was 7 months pregnant at the time, and she needed me to manage all of the physically challenging aspects of the job. Make no mistake–photography can be extremely tough at times!

The job was a book being created in collaboration with a cook book developer, and the topic was "Woman–claim your coals!" Basically it was meant to inspire women to kick their husbands away from the grill, as it seems that men always turn into master chefs, whenever there is a BBQ involved...! The book was being created in a beautiful summer house, and it just turned out to be a great week. We were four women involved, and it was hilarious. Ideas were exchanged, lovely food and pictures were being created, the location was gorgeous–the ocean just outside the windows. It was a lot of fun, and I remember this to be a turning point for me, in terms of the photographer I would like to become. You don't need a big expensive setup, truckloads of gear and a crew of 30 people. Put a bunch of passionate women of different age in a summer house for a week, and creativity will have the best of conditions.


Any upcoming projects you'd care to share?


Currently I am working on a number of different projects. Unfortunately I am not able to reveal anything about them just yet. These days, tendencies shift so rapidly, and what may seem as the greatest idea today, could easily turn out to be "yesterday's news" tomorrow. I actually find this very motivating, as it keeps me on my toes.

One project that I am looking so much forward to, though, is the book you and I are planning on doing together. I just love how the idea spawned from a mutual interest in making a difference, and the fact that we are on the same page in terms of the inspiration we would like to bring to home cooks everywhere–this is the ultimate definition of a dream project. I can't wait for us to start turning this idea into reality!

What type of food do you prefer shooting?

This is a very difficult question, actually, as it all depends on the story being told. I take on every task with the same amount of interest, as it is my job to make everything I work on as perfect as possible.

Of course some foods, by nature, look better than others. Baby greens, sprouts, flowers and seafood tend to make beautiful pictures, almost every time. I find "brown" food, like roasted meat and gravy for instance, a lot more challenging. But these can also be very beautiful in the right setting, with the right props and photographed in the perfect light. I rarely enjoy "rustic" food myself, but I enjoy the challenge of making it look appetizing and pretty, and to my experience, it often seems to turn out very nice, because it has been given that extra attention.

What are you ideal shooting conditions?


In terms of lighting, daylight is always preferred, whether I work on location or in the studio. I set up my table by the window, but pulled into the shadow, avoiding direct light. I prefer the weather outside to be overcast, because it makes the color tones cool, and the highlights beautiful. The shadows will come out soft, yet intense. A piece of white card board is placed on the opposite side of the object, to bounce off a bit of light into the shadows. I always strive to emphasize the highly unique Scandinavian feeling in my pictures, and I prefer my images to be presented in a colder tone. If it's a sunny day, and the light is super bright and slightly warm, keeping away from direct light will do the trick, and it's generally just easier to control. If I for some reason must shoot after sunset, I create a daylight-feeling using flash light bouncing off of white walls or big styrofoam panels. This will work as a decent substitute, but I'm not a fan.


What kind of camera do you use? Favorite lens(es)?


I work with different kinds of camera types, according to the conditions. Working at the studio, I prefer a Sinar–a so-called technical camera–with a Phase One digital back. I also use Hasselblad in combination with the Phase One back. This allows me to hook up the camera to the computer, for immediate view of the image.

Working on location, time is almost always of the essence, and I find it easier to bring "Old Faithful"–my old Canon. It's handheld, no computers or wires, and it allows me to work faster and more efficiently. However, this calls for a little more post work in Photo Shop afterwards, as I will need to make up for the lack of control that I otherwise have, being able to see the image immediately on the monitor.

How would you describe your photography style?

I find it difficult to describe my own style, but I guess it would be feminine and simple–extremely simple. I like for the object to stand out and communicate on its own, not drowning it in a lot of props. Props are perfect–and necessary–as a way of building a universe in which the food can come to life, but I try to make it nothing more than a subtle, understated hint.

Being raised in Scandinavia, I am of course influenced by the tradition of simplicity and "clean" expressions within design, art and cuisine. I find this to be evident in my style, and also in my life in general. I actually don't go to a whole lot of trouble in creating this ambiance in my work, but for some reason it just always seems to turn out that way.

This being said, I am constantly under the influence of what I see, read and hear, so who's to say what my style will be like in a couple of years? I am quite convinced it will forever stay relatively simple, though.


Do you like to cook? If so–what sort of meal would you cook if a few friends were coming over tonight?

I love to cook! I like to experiment, to open my fridge and make something nice from whatever is in there. I call it the "fridge-shake-down", and - for the most parts - something edible actually emerges from the pots and pans. I'm a vegetarian, so my cooking consists of a lot of vegetables, sometimes with eggs and dairy. I'm not vegan, and it's not a result of ethical or religious view-points. I just don't like meat...

When I have people over, I like to create a meal that we can sit and enjoy for more than half an hour. As a result, I prefer making a number of tapas-like dishes, that invite people to relax and engage in good conversation, while slowly eating and sipping wine. And also, these dishes can easily be made in advance, which means that I don't have to be tied to the kitchen while my friends have a good time in the next room. I believe that food must be homemade–it's healthier and it tastes better!

I guess I would serve some nice freshly baked bread, along with homemade hummus, pesto and different tapenades of black olives and sun-dried tomatoes, along with a selection of cheeses. Salads are required, and I would probably put together a green salad with hearts of artichoke, slices of Parmesan and roasted pumpkin seeds. Very simple. I would like to serve something hot as well, which would probably be mini-quiches with spinach and feta cheese. For dessert we would have "monkey meal", basically a fruit salad served with a vanilla custard and coarsely grated dark chocolate.

If I was short of time, as would probably be the case on a week day, I guess I would just put together a nice pizza of potato, rosemary and goat cheese.

click for recipe & more…

Add a comment!
Your two cents...

If you don't have a Google login, please select Name/URL from the "Comment as" list below

Tuesday, December 6, 2011

Instant Cocktail Party: Bacon-Wrapped Dates


These salty-sweet snacks are absolute musts for any party. 1) Because they're delicious. 2) Because they're quite possibly the easiest appetizer in the world to make. Roasted salted almonds are stuffed into sticky-sweet dates, wrapped in bacon, and baked until crisp and brown. What's not to love??

For a holiday party on the fly, make some crostini (cut a baguette into thin slices, brush with olive oil and sprinkle with sea salt, and bake at 375°F for about 8 minutes or until golden and crisp) and serve with good quality jarred olive tapenade, a few nice cheeses (I like a combination of a soft goat cheese, an aged blue, a creamy cow's milk, and a hard cheese like aged Gouda), and my
Tuscan white bean dip
with some crudités–radishes, carrots, thinly sliced fennel, and raw haricots verts. With this spread of tasty nibbles–plus your bacon-wrapped dates–your friends will think you're a party-planning pro. Just don't forget the bubbly!

BACON-WRAPPED DATES WITH ALMONDS

Serves 8 to 10

Approx. 30 almonds
Approx. 30 seedless dates
1 pound bacon, each slice cut into thirds

Preheat the oven to 375°F.

Cut the dates open, remove the seeds, and slip the almonds into the center of each. Wrap each date in 1/3 slice of bacon, tucking the loose ends under the date. Arrange the dates in rows on a baking sheet.

Bake for 15 minutes or until golden brown and crisp. Place on a paper-towel-lined-plate to soak up some of the grease; let cool slightly before serving.

VARIATION: Substitute blue cheese for the almonds, or try prunes instead of dates.


click for recipe & more…
Your two cents...

If you don't have a Google login, please select Name/URL from the "Comment as" list below

Sunday, December 4, 2011

Healthy Living: Two Delicious Party Dips


'Tis the season for holiday parties, and despite the trays of pigs-in-a-blanket and bowls of cheesy spinach dip you'll encounter, there's no need to fear. The key to feeling good this holiday season (and to avoid packing on the pounds) is simple: eat your vegetables! If you're eating a balanced diet with plenty of veggies–and making sure to get in some exercise–then you can enjoy your holiday treats guilt-free. Of course moderation is key. (I just wrote a piece on
healthy holiday eating
in the Huffington Post if you're interested in reading more!)

Personally, when I'm throwing a Christmas party I like to throw in some healthy options. I especially love making flavorful dips with veggies, beans, and herbs like Tuscan White Bean and Lemony Fava Bean with Mint. They are easy to whip together in a blender or food processor, and can be made completely in advance–which makes serving a breeze. I like putting out a few bowls of homemade dips (other favorites are Fig-Olive Tapenade, Roasted Red Pepper Hummus, and Roasted Eggplant Dip) and serving them with an assortment of flatbreads, pita chips, and crackers.

In the coming weeks, I'll be featuring several of my favorite holiday nibbles–some healthy, some not-so-much (bacon-wrapped dates!), but all ultra-flavorful and simple to prepare. Because–as I've said before and I'll continue to say–why throw a party if you can't enjoy it?! So pop open some (budget) bubbly and get out that blender...you'll have two fabulous dips ready in no time at all!

TUSCAN WHITE BEAN DIP

Serves 8 to 10

2 tablespoons olive oil
1 small yellow onion, finely chopped
3 cloves garlic, minced
2 (15-ounce) cans cannellini beans
1 cup vegetable (or chicken) broth
2 teaspoons fresh thyme leaves*
1/2 teaspoon red pepper flakes
1/4 cup freshly grated Parmesan
Salt and pepper, to taste
Extra virgin olive oil for garnish
Chopped sun-dried tomatoes for garnish (optional)

Heat the olive oil in a large skillet over medium-high heat. Sauté the onion and garlic for 3 to 4 minutes, stirring frequently, until softened and fragrant (do not let the garlic brown). Add the beans and the stock and bring to a boil. Let simmer until thickened, about 5 to 10 minutes. Add the thyme and red pepper flakes.

Pour the mixture (carefully!) into a blender or food processor. Add the Parmesan and pulse several times to until smooth. Season with salt and pepper. Let cool to room temperature before serving.

Garnish with a drizzle of olive oil and some chopped sun-dried tomatoes (optional) and serve with whole wheat pita chips, whole grain flatbread, or grainy crackers.

*In the summertime, I like to substitute 1/4 fresh basil for the thyme.

LEMONY FAVA BEAN DIP WITH MINT

Serves 8 to 10

2 1/2 cups frozen fava beans, thawed*
2 cloves garlic, peeled and smashed
1 teaspoon lemon zest
Juice of 1/2 lemon
1/2 teaspoon red pepper flakes
3 tablespoons extra virgin olive oil
1/4 cup chopped fresh mint
Salt and pepper to taste

Bring a medium saucepan of salted water to a boil. Add the fava beans and garlic cloves and let simmer for 4 to 5 minutes or until tender. Meanwhile, prepare a bowl of ice water.

Save 1/2 cup of the cooking water, then drain the beans and garlic. Place the beans in the ice water to stop cooking. Remove and discard the white outer skins from the fava beans, saving the bright green beans inside.

Place the peeled fava beans and garlic in a blender or food processor. Add the lemon zest, lemon juice, red pepper flakes, olive oil, and mint and pulse to combine. The mixture shouldn't be completely smooth–it's nice to leave some texture. If it's too thick, add in a bit of the reserved cooking liquid. Season with salt and pepper to taste. (Also feel free to adjust the flavorings to suit your palate–if you like more lemon or more spice from the red pepper flakes, feel free to add more of either!).

Serve with whole wheat pita chips, whole grain flatbread, or grainy crackers.

*In the spring and summertime, by all means make this with fresh fava beans! There will be more peeling involved, but it will be even more flavorful. If you can't find frozen fava beans in your grocery store (I usually buy mine at a Middle Eastern store) feel free to substitute frozen peas or even peeled edamame. The taste will be slightly different, but still delicious.


click for recipe & more…

Add a comment!
Your two cents...

If you don't have a Google login, please select Name/URL from the "Comment as" list below

Friday, December 2, 2011

Q&A with Melissa Clark

If you've ever read Melissa Clark's "A Good Appetite" column in the New York Times (which I do, religiously)–or thumbed through any of her 32 cookbooks–then you know that she's a terrific cook and a captivating writer. She's also hilarious. Reading her stories over the years–of running a catering business out of her fifth floor walk-up apartment, of her childhood brush with vegetarianism (it never quite stuck), or the whiskey-soaked chocolate cake that earned her major cool points in high school–you quickly realize that her recipes are comprised as much from memories as they are ingredients. Clark's warm writing style draws you into the kitchen with her, and makes you feel that making duck confit or homemade spaetzle are entirely possible feats.


Clark's latest cookbook, Cook This Now, is a collection of "120 Easy and Delectable Dishes You Can't Wait to Make" and was inspired by simple dishes she cooks at home for her family and friends. Arranged seasonally, and full of recipes I personally can't wait to try (the sticky cranberry gingerbread is high on my list), Cook This Now is the sort of cookbook that is equally fun to curl up with before bed as it is to cook from at dinner. In addition to her weekly New York Times column and cookbook-writing, she's mom to a 3-year old and a contributing editor at Gilt Taste. Oh, and she also has a blog. (I'm not sure when she sleeps?!) I caught up with her recently and we chatted (via email) about her latest cookbook, her favorite make-at-the-last-minute dinner, and the biggest challenge of all: cooking for a toddler.


How long have you been cooking? What first drew you into the kitchen?


I've been cooking since I was a kid–I think I was was eight when I made my first cake. A purple cake, without the baking powder (accidentally). It was flat as a pancake, but I loved the color and was very pleased at myself for cooking anything at all. I think the desire to control what I ate drew me into the kitchen. My childhood home was a desert of rice cakes and health foods, with parents who, when they weren't cooking from Julia Child's cookbook for elaborate dinner parties, were on diets. If I wanted cake, I had to learn how to make it myself. My sweet tooth gets the credit!

Your career seems pretty equally divided between cooking and writing. Do you consider yourself more of a cook or a writer, and why?


Definitely a writer first. If I had to choose (and I really hope I never do!) I would choose writing over cooking. Though I know all my metaphors would still be food related because that's the way I think.

As a freelancer, you're always juggling different hats. What aspects of your job do you most love? What are a few challenges?

I love the constant discovery part. Every time I cook something, I learn something–and then think about a way to tell people exactly what that is. I love fantasizing about food, sitting around dreaming up delicious things to eat–and then to go home and make them (usually they work, sometimes they don't). I love the process of sitting down to write an article (actually it's a love/hate relationship, but I think most writers feel that way about starting something). I love working creatively.

The challenges are many and I love them too! I guess the hardest part for me is juggling so many projects, which I need to do as a freelancer. Not that I'd want to go work in an office everyday, but it would be nice to have fewer, bigger projects that I could immerse myself in without being pulled in so many different directions.

You write about a different recipe every week in your "A Good Appetite" column in the New York Times. Where do you find your inspiration for these columns?

Everywhere! I see the world through a lens of food. A ginger colored sweater can inspire a cookie. A ruffled flower can make me want to eat a salad. Some people wear rose colored glasses. My analogue would be glasses that turn everything into meals.


Your latest cookbook, Cook This Now, just came out in October. On your blog, you said that you are particularly excited about this book because it's the food you actually cook at home for your family. What are a few dishes in the book that are special family favorites?

That's exactly why I love the book–because it's exactly what I cooked last year. All the recipes are simple, fast, and striving to be slightly health-conscious, while still being incredibly full-flavored and interesting. But fast and easy seasonal food is the foundation of the book because that's how I really cook.

And favorites...that's tough. I love all my little babies (recipes, that is). I guess right now I'm really into the roasted cauliflower with cumin, salted yogurt and pomegranate. It's so warming and hearty while still being super easy to throw together (you can leave out the pomegranates if you can't get them...). Another favorite is the carrot mac & cheese. My daughter LOVES this so we make it often, and it's fairly nutritious for mac & cheese because of the carrots and whole wheat pasta, but tastes great because I don't skimp on the good cheddar cheese!

I love the way that Cook This Now is divided into chapters not just by seasons, but by months! Have you always eaten this seasonally? Any months that you particularly love from a cooking standpoint?

First of all, to clarify, I only eat semi-seasonally. I'm not strict about it. If I want the cucumber in February, as long as it tastes good, I'll eat it (which rules out tomatoes in winter because they never taste good....). I eat seasonally because food in season tastes better. And it connects me to the earth and grounds me in a way that I find profound, but that is also yummy. And since I buy most of my food at the farmers market, it's kind of my default. And every month is great for cooking seasonally–even the depths of winter can be inspiring (if you love to eat as much as I do, that is)!

How has having a toddler changed your cooking style? Is your daughter an adventurous eater or does she stick to the basics?

She's a typical 3 year old and goes back and forth being adventuresome and meek about what she eats. Right now it's a meek phase, except for salmon roe, which she loves. She's made me streamline my cooking and speed it up. I have less time for cooking than ever! But love it just as much.

What five items are always in your pantry?


Does the fridge count too? Lemons, olive oil, garlic, good flaky salt, pasta. There's a recipe right there! (Hint use the juice and lemon zest).

If you had to cook an impromptu dinner for eight tonight, what would you make?

Pasta! I always have it on hand and you don't need to do much to make it taste good, as long as you use enough salt in the water, and have some good olive oil and garlic around...and maybe some herbs or vegetables. It's very forgiving stuff. Plus, everyone loves it, so I can surely please all eight.


click for recipe & more…

Add a comment!
Your two cents...

If you don't have a Google login, please select Name/URL from the "Comment as" list below