Showing posts with label health. Show all posts

Tuesday, March 6, 2012

My Favorite (End of) Winter Salad


Not that we've had much of a winter this year (I haven't had to wear my fur boots once!), but there are still certain winter foods that I love. Warming soups and stews, hearty pasta dishes, braised pork over creamy polenta, roasted veggies, and homemade chicken pot pies. But alongside these wintry comfort foods, I like to serve a light, colorful, citrusy salad. A sort of palate cleanser, if you will, to cut through the richness of the main dish. In the summer, I practically live off salads, but in the winter, I like them more as a side dish.

This arugula, radicchio, and fennel salad is my favorite wintry combination–I love the bright colors, the pleasant crunch of the fennel, the peppery bite of the arugula, and the slightly bitter taste of the radicchio. I also like the simple lemon vinaigrette (lemon juice + extra virgin olive oil), and the salty finish of the Parmesan. The walnuts and Parmesan are optional, though both add wonderful flavor and depth.

This salad is simple, delicious, and healthy. And it plays well with other ingredients – try swapping out the lemon juice for orange juice and adding some sliced oranges. Add some toasted hazelnuts in lieu of walnuts and crumbled ricotta salata instead of Parmesan. Or for a light dinner, add a grilled chicken breast or a piece of grilled salmon. Be creative! We don't have much more winter left – it's creeping into the 60's this week in NYC! – so enjoy this salad for the weeks to come.

ARUGULA, RADICCHIO, AND FENNEL SALAD WITH LEMON VINAIGRETTE

Serves 4 to 6

4 cups baby arugula
1 small head radicchio, thinly sliced (about 2 cups)
1 fennel bulb, cored and thinly sliced
Juice of 1/2 lemon
1/4 cup extra virgin olive oil
Sea salt and freshly ground pepper
1/4 cup chopped, toasted walnuts (optional)
Freshly grated Parmesan (optional)

Combine the arugula, radicchio, and fennel in a large bowl. In a smaller bowl, whisk together the lemon juice and olive oil in a bowl and season with salt and pepper. Taste the vinaigrette – feel free to add more lemon juice if you want a more acidic vinaigrette.

Toss the vinaigrette with the salad greens until lightly coated. Sprinkle with chopped walnuts and freshly grated Parmesan if desired.

VARIATIONS: This salad is delicious with sliced oranges and toasted hazelnuts (in lieu of walnuts). Try substituting ricotta salata for Parmesan. If you'd like to make this a main dish salad, it is delicious with grilled chicken, shrimp, or salmon. I also love serving this salad as a palate cleanser after a hearty pasta dish or stew.


click for recipe & more…
Your two cents...

If you don't have a Google login, please select Name/URL from the "Comment as" list below

Wednesday, February 1, 2012

Healthy Living: An Energy-Boosting Salad for Winter


If there's one thing I've realized as I've gotten older it's this: food has a lot to do with my energy level. Obviously, sleep does, too, and a host of other factors, but what I eat is a big part of the equation. For years, my low-energy solution was a coffee and some sort of sugary baked good (more than likely a chocolate chip cookie). The only problem was, after the sugar rush, I immediately felt miserable as my energy–and mood–crashed.

Recently, as we've been trying to eat more healthfully, I've been paying attention to blood sugar levels. Instead of eating three big meals a day, I'm eating smaller meals, packed with vegetables and fruits and proteins. And my snacks in between–rather than cookies or pastries–usually consist of roasted almonds or sprouted toast with avocado or a piece of fruit with some almond butter. I'm realizing that the more steadily I eat, the more energy I have. And most importantly of all, the less sugar I eat, the better I feel. Period. As a former sweets ADDICT, it's amazing that I can admit this. But I really love the way I feel without it, so bring on the nuts, fruits, and veggies!

One of my favorite things as a cook is to throw together a meal based on what's inside my fridge. (I know, I know...for some people, that's your worst nightmare!) I like the challenge and actually, some of my best dishes have been inspired this way. I went scavenging in my fridge the other day, and found a bag of baby spinach, some roasted chicken breasts (cooked the day before), some leftover quinoa, and some chickpeas. And given that citrus fruits are amazing right now–especially my favorite, Cara Cara oranges–I threw in a couple of oranges for good measure. I tossed it all together, along with a tangy vinaigrette made with white Balsamic vinegar, and the result was a salad as beautiful as it was flavorful. And best of all, I felt like a million bucks afterward. I'll take feeling this good over a cookie any day.

SPINACH SALAD WITH QUINOA, CHICKEN, CHICKPEAS AND ORANGES

Serves 4 to 6

2 oranges (I especially love Cara Cara)*
6 ounces baby spinach (about 6 cups)
3/4 cup cooked quinoa, cooled
1/2 cup chick peas, drained and rinsed
2 chicken breasts (roasted or grilled), thinly sliced
2 tablespoons white Balsamic vinegar
1/4 cup extra virgin olive oil
Salt and pepper to taste

Using a sharp knife, cut off the ends of each orange so they can sit flat on a cutting board. With smooth, downward strokes, cut the skin off the orange in sections, so you are removing the white pith and can see the orange flesh beneath. Once the skin is removed, pick up an orange and hold it over a large bowl. Carefully cut each section out of the orange in between the membranes, so you're just getting the fruit and none of the pith or membrane. Let each slice drop in the bowl (along with the juices); repeat with the other orange. Discard the peels and the membranes.

Add the spinach, quinoa, chick peas, and chicken to the oranges; toss gently to combine.

In a small bowl, whisk together the white Balsamic vinegar and olive oil until smooth; season with salt and pepper to taste.

Drizzle the vinaigrette over the salad and toss to combine. Season the salad with additional salt and pepper if you'd like.

SERVING SUGGESTION: This salad is delicious with avocado slices, thinly sliced red onions, or crumbled ricotta salata or feta. Or serve with avocado toast: smashed avocado mixed with lemon juice, sea salt, and red pepper flakes on toasted whole grain bread.


click for recipe & more…
Your two cents...

If you don't have a Google login, please select Name/URL from the "Comment as" list below

Sunday, January 22, 2012

Gluten-Free Blue Cornmeal Waffles

Hello friends! I know it's been awhile since I posted–this month has been a bit crazy juggling a month-long freelance job (with regular office hours!), writing assignments, and normal life stuff (like cooking for 50 for a friend's birthday). Last weekend I snuck away for a much-needed little getaway to Jamaica with my man (will post pictures soon...it was heavenly!). All of this has kept me a tad busy and I find myself having to choose between blogging and, say, showering. Sorry, my sense of hygiene won out this week...


This weekend we got our first snow in NYC (hooray!) and it's been so nice to stay inside and try out some recipe ideas I've been kicking around. It's been awhile since we've had a chill weekend at home with just B, me, and the kitties, so I decided to revive our Saturday brunch tradition and break out the waffle iron (which, for the record, has been one of our favorite wedding gifts). We have one of the round ones, the kind that makes thinner, slightly crisp waffles. I'm not huge on the thick Belgian waffles, but you could still make this recipe with a Belgian waffle-maker if you have one.

Last year, when some friends of ours were cleaning out their pantry before a move, they gave us some gluten-free blue cornmeal pancake and waffle mix. Even though we're not gluten-free, we tried it and loved it. Once it ran out, I wanted to try and recreate my own version from scratch. I found a recipe for
Blue Cornmeal Waffles on Food Network's website which I used a guide, though I substituted regular flour for gluten-free, since we are trying to eat less gluten right now. I also cut back on the sugar and butter, and added some cinnamon (a suggestion from my taste-tester husband).

The result was fantastic. I don't think I've ever seen B more excited about a breakfast before! We both loved the nutty flavor of the blue cornmeal, the buttermilk gave it a tangy taste and a tender consistency, and best of all, you would NEVER know these were gluten-free.

The great thing about this recipe is that it's SO adaptable. If you're not gluten-free, just use regular all-purpose flour in place of the gluten-free flour. If you don't have buttermilk, you can make your own by adding a teaspoon of white vinegar or lemon juice to 1 cup of regular milk. Let it sit for 5 minutes or so, until it curdles, and carry on with the recipe. If you want to make it dairy-free, just substitute a non-dairy milk (almond, rice, or soy) and use vegetable oil instead of the butter. I will say, this will change the taste and consistency some–the buttermilk really makes these waffles out of this world–but they're still good without. And last, if you want to make this totally vegan, follow the dairy-free instructions and use egg substitute for the eggs.

I am so thrilled to have a waffle recipe that is as delicious as it is healthy. (Sure, the side of bacon isn't the healthiest option, but we buy the farm-raised, nitrate-free version...all in moderation!) I love adding fresh berries and sliced bananas to these waffles and a drizzle of maple syrup (or honey). These are definitely a brunch keeper, snow-day or not.

GLUTEN-FREE BLUE CORNMEAL WAFFLES

Makes 6 waffles

3/4 cup organic blue cornmeal
3/4 cup gluten-free all-purpose flour
1/4 teaspoon baking powder
1/4 teaspoon baking soda
1/4 teaspoon salt
1/2 teaspoon cinnamon
1 tablespoon organic sugar
1 cup buttermilk
2 eggs
2 tablespoons melted butter, plus more for brushing griddle

Preheat your waffle maker.

Whisk together the dry ingredients in a medium bowl. Pour the buttermilk into a liquid measuring cup and add the eggs; whisk together until combined. Add the buttermilk mixture into the dry ingredients, along with the butter; whisk until smooth.

Brush your waffle maker with about a teaspoon of butter and add 1/3 cup of batter. Cook about 2 to 3 minutes or until lightly golden (I just wait until my waffle maker's green light comes on, signaling it's done). Serve with butter, maple syrup (or honey) and whatever topping strikes your fancy: berries, sliced bananas, toasted pecans...whatever you like!

If you have a cinnamon grinder (which you can buy in the spice section of the grocery store), grind some cinnamon on top just before eating-that makes it even better!

DAIRY-FREE VERSION: Substitute almond, rice, or soy milk for the buttermilk, and vegetable (or coconut) oil for the butter. If you want to make it totally vegan, use egg substitute in place of the eggs.


click for recipe & more…
Your two cents...

If you don't have a Google login, please select Name/URL from the "Comment as" list below

Saturday, January 14, 2012

Part II: Flatbread Pizzas with Broccoli Rabe Pesto


As you can tell, I’m still on a broccoli rabe kick. Though it’s available year-round, winter is when this bitter, leafy green vegetable tastes best–and when I crave it the most. Usually I just sauté it in some garlic and olive oil, but recently I decided to try making pesto out of it. I love fresh basil pesto in the summer–its bright green color, intense garlicky-herb-Parmesan flavor, and its versatility. You can put it on pizza, drizzle on a salad, stir into soup, or toss with pasta. But given basil’s not in season, I thought broccoli rabe would be a perfect substitute.

As long as you have a blender, food processor, or even an immersion blender, this recipe is a piece of cake. Blanch the rabe (quickly boil until bright green, plunge into ice water to stop the cooking) then throw it in a blender with the usual pesto ingredients: garlic, pine nuts, Parmesan, and olive oil. I added a few red pepper flakes and some fresh lemon juice for an added kick, and of course salt and pepper (which, I found you need to use quite a lot of). You can play around with this recipe if you like–try swapping the pine nuts for walnuts or pistachios, or adding more lemon or red pepper. Or you can make a vegan version by eliminating the Parmesan (though you'll have to play around with the proportions...I've heard you can add nutritional yeast as a substitute).

Once you have your pesto made (which only takes 15 minutes or so), you can keep it in the fridge to use in all sorts of dishes. Try dolloping it on crostini with Parmesan shavings for a rustic appetizer. Or you can make these fantastic flatbread pizzas (recipe below), topped with sausage and feta cheese.


Or, add the broccoli rabe pesto to your favorite pasta: boil the pasta according to the package instructions, drain, and save about 1/2 cup of the cooking water. Depending on how many people you are feeding, add 1/4 cup or so of the pesto to the pasta, along with some of the cooking water, and toss together–you'll have an instant sauce! I love adding in some sausage to the rabe pesto pasta or if I want a vegetarian dish, I'll just top with some freshly grated Parmesan, roasted grape tomatoes, and toasted pine nuts. Not only is this so easy and delicious, it's a great way to sneak some extra vegetables into your diet...which is always a good thing!

BROCCOLI RABE PESTO

Makes about 2 cups

1 bunch broccoli rabe, woody ends removed
2 garlic cloves, minced
1/2 cup pine nuts
1/2 cup ground Parmesan (feel free to use more if you like)
1/4 teaspoon red pepper flakes
Juice of 1/2 lemon
1/2 to 3/4 cup extra-virgin olive oil
Sea salt and freshly ground pepper to taste

Bring a large pot of salted water to boil. Prepare a large bowl of ice water and place it next to the pot.

Working in batches, boil the broccoli rabe for 3 to 4 minutes or until bright green and softened. Plunge instantly into the ice water to stop the cooking; drain and squeeze dry.

Roughly chop the rabe and add to a blender or food processor (if using an immersion blender, just put all ingredients in a large bowl). Add the garlic, pine nuts, Parmesan, red pepper flakes, and lemon juice and pulse several times to combine. With the motor running, slowly add the olive oil until it reaches the desired consistency. (It should be sort of like a thick sauce). Season generously with salt and pepper–I found I needed over 1 tsp of salt and about 1/2 tsp pepper. Just be sure to taste and adjust as you go.)

Use immediately or store in an airtight container in the refrigerator–it should last for 3 to 4 days.

FLATBREAD PIZZAS WITH BROCCOLI RABE PESTO, SAUSAGE, AND FETA

Makes 4

4 whole-wheat flatbreads (or naan breads)
Broccoli rabe pesto (recipe above)
2 nitrate-free sausages (either pre-cooked or raw, made from lamb, chicken, duck, or pork)
1/2 cup grape tomatoes, sliced in half (optional)
Crumbled feta (about 1/2 cup)
Olive oil for drizzling

Preheat the oven to 425°F.

Place the flatbreads on a baking sheet. Spread about 3 tablespoons of the pesto on each flatbread, leaving a 1/2-inch border on the edges.

If you are using pre-cooked sausage, slice it and arrange the pieces over the pesto. If you are using raw sausage, cook it for 7-8 minutes on the stove top and add the cooked sausage to the pizza. (If you are vegetarian, eliminate the sausage and substitute for grape tomatoes). Sprinkle each pizza with a couple tablespoons of crumbled feta.

Drizzle each pizza with a bit of olive oil and bake for 10 to 12 minutes or until the crust is brown and the cheese is beginning to melt. Let cool for a few minutes, then slice into pieces and serve.

I love serving this with a wintry salad of arugula, radicchio, endive, and thinly sliced fennel with a citrus vinaigrette.


click for recipe & more…
Your two cents...

If you don't have a Google login, please select Name/URL from the "Comment as" list below

Monday, January 9, 2012

Healthy Living: Broccoli Rabe Part I

Broccoli rabe is one of those vegetables I didn’t try until I was an adult. Actually, there were a long list of those vegetables: kale, Swiss chard, collard greens, cauliflower, fava beans, sugar snap peas, eggplant, red cabbage, fennel, radicchio, endive, arugula, butternut squash, zucchini, wild mushrooms, parsnips, bok choy, radishes...the list goes on and on. It's not like my family didn't eat vegetables growing up (we did!), it's just that we stuck with a steady all-American rotation of green beans, broccoli, peas, carrots, potatoes, yellow squash, corn, and maybe Brussels sprouts or asparagus on special occasions. I'm sure these were probably the vegetables most readily available at grocery stores in the 1980's and '90's, supplemented by whatever my grandparents happened to be growing in their gardens. As a child, I was pretty ambivalent about vegetables. I didn't hate them, but I certainly didn't love them. They were basically just an obstacle between me and dessert: if I ate the vegetable, I got the dessert. So more or less begrudgingly, I ate the vegetables.


Everything changed in my twenties. Whereas vegetables had previously been an annoyance or an afterthought, as I started cooking more, they gradually became the centerpiece of my diet. Living in France (in Paris, Provence, and Burgundy) over a period of several years definitely changed the way I viewed vegetables. I started shopping at the markets, buying my fresh produce daily instead of weekly–letting the seasons and the colors inspire me. In Provence, I made tians–colorful layered vegetable dishes with eggplants, potatoes, zucchini, tomatoes and fresh herbs (and lots of garlic and olive oil) and beautiful salads of baby greens with steamed haricots verts and heirloom tomatoes with hazelnut vinaigrette. I stuffed zucchini flowers with fresh goat cheese and made hearty winter soups with potatos and leeks.

I learned how to roast vegetables in Burgundy, transforming formerly bland items like cauliflower or sweet potatoes into deeply flavored, caramelized treats. I began experimenting with a host of vegetables I'd never tried before (see: list above) and soon enough, plants were crowding out the meat on my plate. It's not just the colors and flavors and variety of vegetables I've grown to appreciate–it's the way my 31-year old body feels after eating them that I especially love. I feel lighter, healthier, and more energized when I eat a mostly vegetable diet. (But don't worry, I'm not going totally vegan on you all...my husband would never allow that!)


Which brings me back to broccoli rabe. This dark leafy vegetable looks sort of like a lovechild between broccoli and kale, and has a distinctly bitter taste (which I happen to love). It's also packed with antioxidants like Vitamin A and C, and loaded with fiber, calcium, and potassium. I first tried broccoli rabe in Italy sautéed in garlic, olive oil, and a few red pepper flakes, finished with just a squeeze of lemon. So simple and so delicious. Back home I've cooked this dish so many times, though recently I made it Sicilian style, with toasted pine nuts and golden raisins. I love the contrast of the bitter greens with the sweet golden raisins and buttery toasted pine nuts. Sometimes I add a splash of Balsamic vinegar at the end for a little extra complexity. Though you can sauté broccoli rabe raw, I like to blanch it first (a quick boil followed by a dunk ice water) to cut down on its bitterness. Just make sure to drain it well and pat dry before throwing it in the sauté pan.

This broccoli rabe makes a delicious side dish for grilled sausage (or meatballs) with tomato sauce and polenta. For a lighter meal, it's fantastic with grilled salmon, or you can go entirely vegetarian and pair it with roasted squash (butternut, delicata, or spaghetti) and perhaps some farro with wild mushrooms.

Coming up next: Broccoli Rabe Pesto + two recipes

BROCCOLI RABE WITH PINE NUTS AND GOLDEN RAISINS

Serves 4

1 head broccoli rabe, tough ends removed
3 tablespoons pine nuts
2 tablespoons olive oil
1 clove garlic, minced
1/8 teaspoon red pepper flakes
3 tablespoons golden raisins
Sea salt and freshly ground pepper

Bring a pot of salted water to a boil. Prepare a large bowl of ice water and set it by the pot. Working in batches, boil the broccoli rabe for a minute or two until bright green. Using tongs, remove the rabe from the pot and place in the ice water to stop the cooking. Once all the rabe is cool, pour the rabe into a colander and set aside.

Toast the pine nuts in a small, nonstick saute pan over medium heat for 3 to 4 minutes, stirring constantly, or until evenly browned (it will smell like popcorn). Take care not to burn them–they cook quickly! Dump the pine nuts into a bowl to stop cooking.

In a large frying pan, heat the olive oil over medium-high heat. Add the garlic and red pepper flakes and cook for one minute or until fragrant (but not brown). Add the broccoli rabe and cook, stirring constantly, for 3 to 4 minutes or until tender-crisp. Add the raisins and the pine nuts and toss to combine. Season with salt and pepper to taste.

If you want, add a dash of Balsamic vinegar or a squeeze of lemon at the end. This is delicious with grilled salmon, pork tenderloin, or meatballs with tomato sauce. Definitely one of my favorite easy vegetable side dishes!


click for recipe & more…

Add a comment!
Your two cents...

If you don't have a Google login, please select Name/URL from the "Comment as" list below

Thursday, January 5, 2012

The Best Cold Remedy: Homemade Chicken Noodle Soup


After our whirlwind holiday travels, I've been excited to get back home and get back to work. I've had big plans for the blog–for healthy new recipes and tips to stick to your New Year's healthy eating goals–as well as all sorts of projects I want to do around the apartment, like clean out the closet, the pantry, the bathroom, and the file cabinet. (OK, in all honesty, Brandon's the one who usually initiates these organization projects, but I'm all for following his lead!) I have lists of stories to pitch, emails to send, books to start reading, and resolutions to begin, like more running and yoga. And then the cold hit.

The day after we got home (Monday), I woke up with a stuffy nose. Which turned into a sneezing, dripping, red-nosed, puffy-eyed head cold. Luckily it hasn't spread to my throat or chest, but it's left me feeling bad enough to pretty much stay in my PJ's, down zinc and vitamin C, chug water, and blow through boxes of tissues. And eat lots of grapefruit and blood oranges.

Though the blog has stayed a bit neglected (I haven't had the energy to cook plus photograph and write) and the clean-out projects have been left undone for the moment, I have been reading. And brainstorming and journaling. The cold has forced me to actually slow down for the first time in a long while, and pay attention to the parts of me–namely, my heart and my soul–that often get pushed into the background as more immediate concerns demand my attention.


It has been amazing to have time to reflect on 2011: on struggles and victories and things I learned, on goals–some reached and others left undone, on friendships deepened, on trips taken, on books read, on dinners shared. And most of all, on the Lord's goodness and faithfulness. Brandon and I took time this week to reflect on our first year of marriage (with all its joys and upheavals), and to talk about through our goals and dreams for 2012.

Though my head is still stuffy and my nose is still raw, I feel so inspired by all that 2012 holds. I feel like this is going to be a year of purpose, of healing, and of dreams fulfilled. And of course, lots more cooking and writing and yellow table dinner parties!

As much as I love getting my apartment cleaned out and re-organized at the beginning of the year, I've loved even more this quiet, reflective time. I haven't stopped cooking, but my cooking has been simple and cleaner–lots of veggies and soups and grains–and I've replaced wine (for the time being) with water and herbal tea and my new favorite drink Kombucha. As I mentioned in my last blog post, we're following a special Lyme diet full of vitamin- and mineral-filled anti-inflammatory foods (veggies, grains, fruits, lean proteins, healthy fats) and little to no sugar, dairy, or white carbohydrates. If it weren't for this cold, I'm sure I'd be feeling incredible by now...


Anyway, my real purpose in writing this blog post is that I wanted to share with you my favorite at-home cold remedy (besides citrus fruits and Kombucha): homemade chicken noodle soup. It is super-easy to make, and there is something so comforting about warm broth filled with veggies, noodles, and shredded chicken. I love adding spinach at the end for extra vitamins and color. I made this soup a few days ago, and have been eating it every day since.

Keep in mind that this soup is intended to be restorative, so it will only be as good as the quality of the ingredients you put in it. Meaning, buying broth or meat from mass-produced chickens (often pumped with hormones and antibiotics) is not going to help you get well. I recommend buying free-range organic chicken stock (or making your own) and roasting organic chicken breasts to shred and put in the soup.

Healthy or not, I would recommend easing into 2012. Take time to think, pray, journal, and reflect. And to make a pot of chicken noodle soup. You will thank yourself.

HOMEMADE CHICKEN NOODLE SOUP WITH SPINACH

Serves 6

2 to 3 tablespoons olive oil
2 carrots, peeled, halved and diced
2 ribs celery, halved and diced
1/2 yellow onion, diced
2 cloves garlic, minced
6 thyme sprigs, leaves removed (discard stems)
Sea salt and freshly ground pepper to taste
2 quarts chicken stock, homemade or store-bought (free-range, organic)
8 ounces dried wide egg noodles
1 1/2 cups shredded, cooked, organic chicken (can be white or dark meat, roasted, boiled, or store-bought rotisserie)
2 cups baby spinach leaves

Heat the olive oil in a large pot over medium heat. Saute the carrots, celery, onion, garlic, and thyme for 5 minutes or so until the vegetables are softened, but not brown. Season with salt and pepper.

Add the chicken stock and bring to a boil. Add the egg noodles; reduce heat to simmer and let cook for 5 minutes or until the noodles have softened a bit. Stir in the chicken and the spinach and simmer for a couple more minutes to cook through. Season generously with salt and pepper to taste.


click for recipe & more…

Add a comment!
Your two cents...

If you don't have a Google login, please select Name/URL from the "Comment as" list below

Friday, December 30, 2011

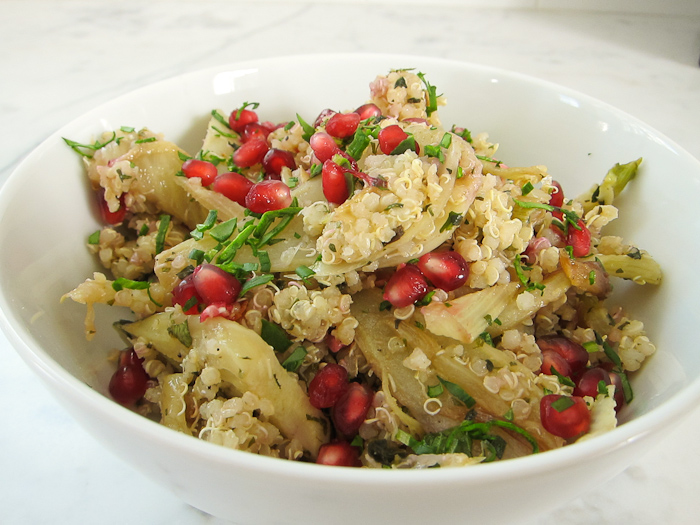
Healthy Living: Quinoa Salad with Fennel & Pomegranate


Hello friends! I hope everyone has enjoyed their holidays thoroughly. If you've noticed I haven't posted for the past week, it's because we've been trekking across the eastern half of the country visiting family. In the past week we've traveled from NYC to Nashville, TN (my family) to Adairville, KY (my extended family) to Kalamazoo, MI (B's family). There's been lots of cooking, eating, movie-watching, shopping for (and opening of) presents, and lounging by the fire. But unfortunately, not much time for blogging!

Regardless, I wanted to share with you all an amazing recipe I tried over the holidays. I cannot take credit for the recipe–it belongs to Yotam Ottolenghi, my new chef crush. I got his cookbook
Plenty
for Christmas, and have completely fallen in love with his incredible Mediterranean-inspired vegetarian dishes, ranging from simple (baby lettuce and herb salad) to wonderfully complex (leek fritters with herbed yogurt sauce). Israeli-born Ottolenghi runs several high-end "to-go" food shops in London that sell the same sorts of fresh salads, roasted vegetables, grains, and soups that fill his cookbooks and his long-running vegetarian column in The Guardian newspaper. (Perhaps he will expand his shops to NYC one day??)

There's a big spread on Ottolenghi and his vibrant vegetable dishes in the January 2012 issue of Bon Appetit that includes this gorgeous quinoa salad. I made it for dinner the other night, with some roasted salmon and steamed green beans, and it was such a welcome respite from all the heavy holiday fare. I love the combination of nutty quinoa with sweet caramelized fennel, fresh herbs, and jewel-like pomegranate seeds. And considering the not-exactly-small ingredient list, it's actually pretty simple to make.

I'm not big on New Year's resolutions, but one of my themes for 2012 is health. Though it's certainly not all in my control, I am on a mission to help Brandon kick his Lyme and babesia with a healthy diet, and starting in January we are going to be cutting back on lots of foods that cause inflammation, like dairy, wheat, sugar, red meat, caffeine, and alcohol. It's definitely going to be a tough adjustment for a gal like me whose basic food groups include bread, cheese, wine, chocolate, and coffee BUT if there's any chance of improving the way B feels by eating a cleaner, leaner diet, then I'm all for it. I am excited to experiment with new vegetables and grains this year, with new herbs and spices, and to eat as simply, healthfully, and deliciously as possible. (And don't worry, I am not giving up ALL coffee and wine and chocolate–that would be cruel and unusual!) Stay tuned in January for more adventures in healthy eating...

Happy New Year!


QUINOA SALAD WITH CARAMELIZED FENNEL AND POMEGRANATE SEEDS

Adapted from Yotam Ottolenghi's recipe in Bon Appetit

Serves 6

1/4 cup extra virgin olive oil
4 small fennel bulbs, cut lengthwise into 1/4"-inch thick slices
Sea salt and freshly ground pepper
2 tablespoons fresh lemon juice
1 1/2 teaspoons cumin
1 teaspoon sugar
1 cup quinoa rinsed
1 lemon
1/2 cup chopped fresh cilantro
1/2 cup chopped fresh mint
1/4 cup pomegranate seeds (from 1/2 small pomegranate)*

Heat 3 tablespoons of the oil in a large skillet over medium high heat. Add the fennel; season wit salt and pepper. Cook, stirring occasionally, until the fennel is tender and lightly golden, about 10 to 12 minutes. Stir in the lemon juice, cumin, and sugar; cook for 1 minute. Season with salt and pepper. Set aside.

Meanwhile, bring the quinoa and 3 cups of water to a boil in a medium saucepan. Cover, reduce heat to low, and simmer until quinoa is cooked, about 10 minutes. Drain; return to pan. Cover; let sit for 15 minutes. Fluff with a fork, transfer to a large bowl.

Using a small sharp knife, cut all peel and white pith from the lemon. Cut between the membranes to release the segments; discard membranes and roughly chop. Add lemon with any juices and the remaining tablespoon of oil to the quinoa; stir. Add the fennel mixture and herbs and toss gently to combine. Season with salt and pepper to taste. Transfer salad to a large platter and sprinkle with pomegranate seeds.

*The easiest way to remove pomegranate seeds is to cut the pomegranate in half crosswise (rather than from stem to stem). Hold one half of the pomegranate over a bowl, cut-side down and smack it on the back with a wooden spoon until the seeds start falling out. Continue to smack the back of the pomegranate, lightly squeezing the sides of the fruit to release more seeds. Discard any bits of white membrane that fall in the bowl.


click for recipe & more…

Add a comment!
Your two cents...

If you don't have a Google login, please select Name/URL from the "Comment as" list below

Tuesday, December 27, 2011

Healthy Living: Hearty Sprouted Lentil Stew with Kale


This is my go-to healthy and hearty recipe for a cold, winter's night. It's simple to prepare, it's packed with vitamins and minerals from the vegetables and–thanks to the sprouted lentils–full of protein, enzymes, and micro-nutrients. It's also vegan and gluten-free. For a creamier soup, feel free to puree half or all of it with an immersion blender (or a food processor) after cooking. It's delicious either way, and tastes even better reheated the next day.

HEARTY SPROUTED LENTIL STEW WITH KALE

Serves 6

2 to 3 tablespoons olive oil
1 small white or yellow onion, diced
2 carrots, peeled, halved, and diced
2 ribs celery, halved and diced
2 garlic cloves, minced
1 teaspoon ground cumin
1/2 teaspoon ground coriander
1/4 teaspoon red pepper flakes (optional)
Sea salt and freshly ground pepper to taste
1 10-ounce package sprouted green lentils
1 10-ounce can diced tomatoes
1 quart vegetable stock
1 bunch Lacinto (Tuscan) kale, tough stems removed and cut into bite-size pieces

Heat the olive oil in a large pot over medium-high heat. Add the onion, carrots, and celery and saute for 5 minutes or so until softened, but not brown. Stir in the garlic and spices, and season with salt and pepper. Let cook for 1 minute or so until the garlic is fragrant (but not brown).

Add the lentils, tomatoes (and juices), and vegetable stock and bring the mixture to a boil, stirring occasionally. Reduce the heat to a simmer and let cook for 20 to 30 minutes or until thickened; remove from heat. If you like, you can use a stick blender to puree the soup to your desired consistency. Or feel free to leave it as is.

Stir in the kale and cook over low heat for a minute or two until wilted. Taste, and season generously with salt and pepper. Serve in shallow bowls with crusty bread.
Your two cents...

If you don't have a Google login, please select Name/URL from the "Comment as" list below

Monday, December 19, 2011

Healthy Living: Toasted Flatbread with Avocado & Veggies


My go-to lunch when I'm working from home are these super-simple (and super-healthy!) flat bread sandwiches with a spicy avocado spread and whatever veggies I have on hand. These are inspired by the amazingly delicious avocado toasts at Cafe Gitane–lightly toasted whole grain bread spread with a bright green mash of ripe avocados, lemon juice, chili flakes, salt, and olive oil. I am obsessed with these toasts, so I decided to make my own version at home.

These are so easy to make (10 minutes prep max) and they're full of vitamins and minerals from all the vegetables, and–thanks to the avocado–you won't end up hungry an hour later. In my opinion, this equals a perfect lunch. If you want to make this to take to your office, just make as a regular sandwich with the avocado spread and the vegetables between the two pieces of bread. I figure at this time of year, with all the holiday parties, decadent dinners, and baking marathons, a simple, light lunch is just what the doctor ordered.


OPEN-FACED SANDWICHES WITH AVOCADO SPREAD AND SALAD

Serves 2

Avocado Spread:
1 ripe avocado
Juice of 1/2 lemon
1/4 teaspoon red pepper flakes
Sea salt and freshly ground pepper to taste
Extra-virgin olive oil

Open-Faced Sandwich:
Two round thin-style buns*
Assorted veggies: arugula, grated carrots, grated zucchini, grated red cabbage, sliced radishes, etc.
Extra-virgin olive oil
Lemon wedge
Sea salt and freshly ground pepper to taste

Cut the avocado in half, remove the pit, and scoop out the flesh with a spoon onto a cutting board. Dice the avocado and dump into a bowl. Add the lemon juice (make sure no seeds fall in), red pepper flakes, and salt and pepper to taste. Mash the mixture up with a fork until chunky, but smooth enough to spread. Drizzle with a bit of olive oil and mash that in as well. Taste to see if you need additional salt or red pepper flakes (depends on how spicy you want it!).

Split the buns in two and toast them until golden brown. Spread each half with 1/4 of the avocado mixture. Top each half with a mixture of assorted veggies–I love buying carrots, zucchini, and red cabbage pre-grated at the Whole Foods salad bar, but of course you can easily grate them at home. I love making this as colorful as possible, with arugula, the grated veggies I mentioned above, and thinly sliced radishes. (If you don't want this to be vegetarian, you can easily add some roasted chicken or strips of grilled steak.)

Season each sandwich with a drizzle of olive oil, a squeeze of lemon, and a bit of salt and pepper.

*I use Ozery Bakery's wholegrain ONE buns, which you can buy in the bread section of the grocery store. You can substitute any sort of whole grain bread, flat bread, or pita.


click for recipe & more…
Your two cents...

If you don't have a Google login, please select Name/URL from the "Comment as" list below

Sunday, December 4, 2011

Healthy Living: Two Delicious Party Dips


'Tis the season for holiday parties, and despite the trays of pigs-in-a-blanket and bowls of cheesy spinach dip you'll encounter, there's no need to fear. The key to feeling good this holiday season (and to avoid packing on the pounds) is simple: eat your vegetables! If you're eating a balanced diet with plenty of veggies–and making sure to get in some exercise–then you can enjoy your holiday treats guilt-free. Of course moderation is key. (I just wrote a piece on
healthy holiday eating
in the Huffington Post if you're interested in reading more!)

Personally, when I'm throwing a Christmas party I like to throw in some healthy options. I especially love making flavorful dips with veggies, beans, and herbs like Tuscan White Bean and Lemony Fava Bean with Mint. They are easy to whip together in a blender or food processor, and can be made completely in advance–which makes serving a breeze. I like putting out a few bowls of homemade dips (other favorites are Fig-Olive Tapenade, Roasted Red Pepper Hummus, and Roasted Eggplant Dip) and serving them with an assortment of flatbreads, pita chips, and crackers.

In the coming weeks, I'll be featuring several of my favorite holiday nibbles–some healthy, some not-so-much (bacon-wrapped dates!), but all ultra-flavorful and simple to prepare. Because–as I've said before and I'll continue to say–why throw a party if you can't enjoy it?! So pop open some (budget) bubbly and get out that blender...you'll have two fabulous dips ready in no time at all!

TUSCAN WHITE BEAN DIP

Serves 8 to 10

2 tablespoons olive oil
1 small yellow onion, finely chopped
3 cloves garlic, minced
2 (15-ounce) cans cannellini beans
1 cup vegetable (or chicken) broth
2 teaspoons fresh thyme leaves*
1/2 teaspoon red pepper flakes
1/4 cup freshly grated Parmesan
Salt and pepper, to taste
Extra virgin olive oil for garnish
Chopped sun-dried tomatoes for garnish (optional)

Heat the olive oil in a large skillet over medium-high heat. Sauté the onion and garlic for 3 to 4 minutes, stirring frequently, until softened and fragrant (do not let the garlic brown). Add the beans and the stock and bring to a boil. Let simmer until thickened, about 5 to 10 minutes. Add the thyme and red pepper flakes.

Pour the mixture (carefully!) into a blender or food processor. Add the Parmesan and pulse several times to until smooth. Season with salt and pepper. Let cool to room temperature before serving.

Garnish with a drizzle of olive oil and some chopped sun-dried tomatoes (optional) and serve with whole wheat pita chips, whole grain flatbread, or grainy crackers.

*In the summertime, I like to substitute 1/4 fresh basil for the thyme.

LEMONY FAVA BEAN DIP WITH MINT

Serves 8 to 10

2 1/2 cups frozen fava beans, thawed*
2 cloves garlic, peeled and smashed
1 teaspoon lemon zest
Juice of 1/2 lemon
1/2 teaspoon red pepper flakes
3 tablespoons extra virgin olive oil
1/4 cup chopped fresh mint
Salt and pepper to taste

Bring a medium saucepan of salted water to a boil. Add the fava beans and garlic cloves and let simmer for 4 to 5 minutes or until tender. Meanwhile, prepare a bowl of ice water.

Save 1/2 cup of the cooking water, then drain the beans and garlic. Place the beans in the ice water to stop cooking. Remove and discard the white outer skins from the fava beans, saving the bright green beans inside.

Place the peeled fava beans and garlic in a blender or food processor. Add the lemon zest, lemon juice, red pepper flakes, olive oil, and mint and pulse to combine. The mixture shouldn't be completely smooth–it's nice to leave some texture. If it's too thick, add in a bit of the reserved cooking liquid. Season with salt and pepper to taste. (Also feel free to adjust the flavorings to suit your palate–if you like more lemon or more spice from the red pepper flakes, feel free to add more of either!).

Serve with whole wheat pita chips, whole grain flatbread, or grainy crackers.

*In the spring and summertime, by all means make this with fresh fava beans! There will be more peeling involved, but it will be even more flavorful. If you can't find frozen fava beans in your grocery store (I usually buy mine at a Middle Eastern store) feel free to substitute frozen peas or even peeled edamame. The taste will be slightly different, but still delicious.


click for recipe & more…

Add a comment!
Your two cents...

If you don't have a Google login, please select Name/URL from the "Comment as" list below

Monday, November 21, 2011

Healthy Living: Brussel Sprouts and Red Cabbage Slaw


Though I hated them as a kid, now I LOVE Brussels sprouts. Usually I just eat them roasted with a little olive oil and sea salt. And maybe a squeeze of lemon juice or a sprinkling of grated Parmesan. I also love them in pasta, on a pizza, or alongside roasted fish or poultry. But recently I discovered how delicious they are raw–grated or thinly sliced into a slaw or salad. This salad was inspired by a
recipe I saw in Food & Wine last year that combined roasted Brussels sprouts with raw red cabbage in a colorful slaw. I loved the idea of combining Brussels sprouts with red cabbage, but I thought it would be great to keep it simple and just to serve everything raw, tossed with a tangy Dijon vinaigrette.


Super healthy and easy to prepare, Brussels sprouts are a must for me on Thanksgiving day. This slaw is delicious served with roast turkey (or chicken or pork) and is really simple to make. Thinly slice your Brussels sprouts and red cabbage, combine with toasted pine nuts and dried cranberries, and toss with vinaigrette. And if you want, top with some Parmesan shavings. Less than 20 minutes and you're done! Thanksgiving never looked, tasted (or felt) better.

BRUSSELS SPROUTS & RED CABBAGE SLAW

Serves 8

1 pound Brussels sprouts, woody ends removed (as well as any discolored leaves)
1 1/2 pounds red cabbage (about 6 cups)
1/2 cup dried cranberries
1/4 cup toasted pine nuts
2 teaspoons Dijon mustard
1 1/2 tablespoons honey
3 tablespoons sherry vinegar
1/4 cup extra-virgin olive oil
Salt and pepper to taste
Parmesan shavings (optional)

Slice the Brussels sprouts in half lengthwise and slice as thinly as possible. Slice the red cabbage in half, remove the core and slice as thinly as possible. (You can use a mandoline if you have one–just be careful!).

In a large bowl, combine the Brussels sprouts and the cabbage with the dried cranberries and toasted pine nuts. In a separate bowl, whisk together the Dijon mustard, honey, and sherry vinegar. Add the olive oil in a steady stream, whisking constantly until combined. Season with salt and pepper.

Pour the vinaigrette over the slaw and toss well to combine. Serve immediately, garnished with Parmesan shavings, if desired.


click for recipe & more…

Add a comment!
Your two cents...

If you don't have a Google login, please select Name/URL from the "Comment as" list below

Sunday, November 20, 2011

Healthy Living: Farro with Wild Mushrooms


One of my favorite Thanksgiving dishes growing up was my mom's Brown Rice. (And let's be honest–it still is!) It's actually not brown rice at all: it's regular white rice that is baked with a can of beef consommé, a can of French onion soup, a can of mushrooms, and a stick of butter. The end result has a golden brown color (thus the name) and a deliciously rich flavor. And the house always smells heavenly while it's in the oven. However, the high levels of fat (from the butter) and the intense levels of sodium (from the canned soups) made me a bit hesitant to make this dish for our Thanksgiving this year.

So I set out to create a healthier version of my childhood favorite. I wanted to make a dish that still had the lovely golden color, intense mushroom flavor, and pleasantly grainy texture as my mom's Brown Rice, but with less fat and sodium. I got to work, substituting farro (a high-fiber Italian grain) for the rice and replacing the canned mushrooms with sautéed fresh mushrooms. I eliminated the cans of soup just added a little white wine, garlic, and fresh thyme for flavor. And rather than butter, I just used a bit of heart-healthy olive oil.

The end result? Definitely different than my mom's original dish, but it was still intensely flavorful–without feeling so heavy. I love the nutty flavor and the chewy texture of the farro, and of course, the fresh mushrooms taste so much better than the canned. I certainly won't turn down my mom's Brown Rice the next time she's making it, but in the meantime, it's nice to have a healthy alternative. I'm actually serving this in lieu of a traditional stuffing at my Thanksgiving dinner this year–hopefully it will be so good that nobody will miss the Brown Rice or the Stove Top!

FARRO WITH WILD MUSHROOMS

Serves 8

One (1.1 pound) bag farro
3 tablespoons olive oil, divided
3 garlic cloves, minced
1 small shallot, minced
1 1/2 pound assorted mushrooms (cremini, shiitake, chanterelle, porcini, etc.), cleaned, trimmed, and sliced
1 tablespoon fresh thyme
Salt and pepper to taste
1/4 cup white wine

Place the farro in a large pot and cover with cold water. Let soak for 15-20 minutes while you prep your other ingredients. Drain the farro and place back in pot. Cover with 2 quarts of water.

Bring to a boil. Reduce the heat and simmer, uncovered, for about 25 minutes; drain. The grains should be tender but still slightly chewy.

Meanwhile, heat 2 tablespoons of olive oil over medium-high heat in a large skillet. Sauté the garlic and shallot for 2 minutes or until fragrant (do not let brown). Add the mushrooms and thyme and saute for 5 to 7 minutes, or until the mushrooms are softened and beginning to brown. Season generously with salt and pepper.

Add the wine and let simmer for 2 to 3 minutes or until the wine evaporates. Stir in the cooked farro and turn off heat. Pour the mixture into a bowl and let cool slightly.

MAKE AHEAD: Cook the farro mushroom mixture a day or two in advance and keep in the refrigerator. Just before serving, heat the remaining tablespoon of olive oil in the same skillet and add the farro mushroom mixture. Sauté for a couple of minutes, stirring frequently, until the farro mushroom mixture is heated through. Season with additional salt and pepper (if needed) and garnish with extra thyme leaves.


click for recipe & more…

Add a comment!
Your two cents...

If you don't have a Google login, please select Name/URL from the "Comment as" list below

Sunday, November 13, 2011

Winter Squash Salad with Kale & Pomegranate Seeds


Full disclosure: I am obsessed with this salad. I started making it a week or so ago and have now eaten it almost every day. It is that good. (And super-healthy and dinner-party beautiful!) It was inspired by a salad I ate last winter at Emporio, a great Italian restaurant in our neighborhood. I loved their combination of kale, roasted winter squash, pomegranate seeds and Pecorino shavings and figured it would be easy enough to recreate at home. As it turned out, it was (with a few tweaks of course!). Between the squash roasting and the ingredient prepping, it is a little bit time consuming, but the end result is well worth the effort.


This salad is a perfect canvas to experiment with different types of winter squash. I used acorn and Delicata squash the other day, but you could really use any type–butternut or Kabocha would also be nice. The acorn squash skins are particularly tough so I'd recommend roasting them in halves, and cutting them into smaller pieces after they are baked. The Delicata have thinner (edible) skins, so I went ahead and cut them into half-moon pieces before roasting them.

While your squash is roasting, you can prep all your other ingredients: clean and chop the kale, remove the pomegranate seeds (see below for tips on how to do this), toast the pine nuts, make the vinaigrette, and shave the Parmesan. I love to serve this buffet-style on a big platter and let guests serve themselves, but you could also serve this on individual plates as a beautiful first course.


The gorgeous colors in the dish, and the sweet/salty/earthy flavor combinations, make it an ideal side dish for the holidays. I plan on serving it next Thursday as a welcome healthy addition to the Thanksgiving spread!

ROASTED SQUASH WITH KALE, PINE NUTS, & POMEGRANATE SEEDS

Serves 8

2 pounds assorted winter squash (acorn, butternut, delicata, or kabocha)
5 tablespoons extra-virgin olive oil, divided
1 bunch Lacinto kale
2 to 3 tablespoons pomegranate seeds*
2 to 3 tablespoons toasted pine nuts**
2 tablespoons Balsamic vinegar
Salt and pepper to taste
Parmesan shavings for garnish

Preheat the oven to 425°F. Using a sharp knife, cut the squash in half and scoop out the seeds with a spoon. If using acorn or butternut squash, roast the squash in two halves and cut into pieces after it is baked. For Delicata or Kabocha squash, cut the squash into half moon pieces. Brush the squash pieces with one tablespoon of olive oil and sprinkle with salt. Roast for about 45 minutes or until soft. (You may need to remove the half moon pieces before the acorn or butternut squash halves.) When cool enough to handle, cut the large pieces of squash into half-moon pieces.

While the squash is baking, prepare the other ingredients. Rinse the kale, remove the stems, and cut into bite-size pieces. Place the kale in a colander and let air dry.

*You can buy pomegranate seeds in some grocery stores in the produce section. OR you can extract the seeds yourself from a whole pomegranate. Using a sharp knife, carefully cut the pomegranate in half, then in quarters. (Be sure to wear an apron, as the pomegranate juice will stain light clothes.) Fill a medium bowl halfway with cold water and using your fingers, separate the seeds from the membrane and let drop into the water. The seeds will sink to the bottom and the membrane will float to the top. Once you get all the seeds out, remove the white membrane and pour the water and the seeds into a strainer. Dry them off with paper towels and keep in an airtight container for 2 - 3 days.

**To toast the pine nuts, cook them in a dry skillet over medium heat for 4 to 5 minutes until lightly toasted and nutty smelling. Keep a close eye on them, swirling the pan and/or stirring often, as they can quickly burn. OR roast in a 350°F oven for 6 - 7 minutes until lightly browned, stirring them once or twice to make sure they cook evenly. After either method, dump the pine nuts onto a plate to stop the cooking. Let cool.

Whisk the Balsamic vinegar with the remaining 4 tablespoons of olive oil in a small bowl until combined. Season with salt and pepper to taste. Place the kale in a large bowl and toss with half the vinaigrette until evenly coated.

To assemble the salad, arrange the squash slices on a large platter–you can leave the skin on and people can cut it off themselves (though you can eat the Delicata squash skin, FYI)–and drizzle with the remaining vinaigrette. Layer with the kale and sprinkle with pomegranate seeds, pine nuts, and Parmesan shavings (use a vegetable peeler and a chunk of Parmesan).


click for recipe & more…
Your two cents...

If you don't have a Google login, please select Name/URL from the "Comment as" list below

Monday, November 7, 2011

Healthy Living: 30-Minute Black Bean Soup


I love black beans. As in LOVE. I could eat them every day: with rice, in tacos and quesadillas, in salads (with mangoes and cilantro), and–my favorite way–in this deliciously spicy soup. Lucky for me, black beans are incredibly healthy–they're full of protein (a 1-cup serving has 15 grams) and packed with fiber. This weekend I was craving black bean soup, but only had 30 minutes to throw it together before we headed over to a friend's house for a potluck dinner. I was missing a couple of ingredients, but I was able to run to the corner store AND make the soup in half an hour. (No joke!) Of course if you really wanted to go all out, you could make this soup using dried beans, but that would require soaking and waiting, and frankly I'm far too impatient.


When I make this soup for friends, I like to serve it with several little bowls of garnishes: Greek yogurt, finely chopped red onion, chopped cilantro, diced avocado, or even chopped hard-boiled egg. For a dinner party, I'll also make a simple frisée citrus salad (with sliced oranges or grapefruit or both) and some avocado toasts (toasted bread topped with mashed avocado, lemon, red chili flakes, sea salt, and olive oil) to round out the meal. On Saturday, my friend Rachel made a fantastic roasted squash gratin for our potluck meal, and paired with a simple arugula salad and my black bean soup, we had a gorgeous fall vegetarian buffet. (I think the boys may have been a bit disappointed at the lack of meat initially, but there were clean plates all around afterwards!)

If you're looking for a delicious, healthy, easy-to-prepare idea for dinner this week, look no further. Added bonus: this soup is even better the next day reheated for lunch. Bon appetit!

SPICY BLACK BEAN SOUP

Serves 4 to 6

This soup freezes really well, so double the recipe and freeze half for a rainy (or snowy!) day.

1 to 2 tablespoons vegetable oil
1 small red onion, finely chopped
4 garlic cloves, minced
1 jalapeno, minced (optional)
2 teaspoons cumin
1/2 teaspoon coriander
1/4 teaspoon cayenne
3 15-ounce cans black beans, rinsed
3 to 4 cups vegetable stock
1/2 cup chopped cilantro, divided
Juice of 1 lime
Salt and pepper to taste
Greek yogurt, for garnish (optional)

Heat the oil in a large heavy-bottomed pot over medium-high heat. Sauté the onion and garlic (and jalapeno if using) for 3 to 4 minutes until the onion is soft and the garlic is fragrant, stirring frequently. (Do not let the mixture brown).

Add the cumin, coriander, and cayenne and let cook for 1 minute, stirring constantly. Add the black beans, stirring to combine. Add about 3 cups of vegetable stock (enough to just cover the beans) and bring the mixture to a boil. Stir in 1/4 cup of the chopped cilantro and reduce heat to a simmer. Let simmer for 15 minutes or until thickened, stirring occasionally.

Stir in additional broth if you want a thinner consistency. Stir in the remaining 1/4 cup of chopped cilantro, the lime juice, and season with salt and pepper to taste.

Serve with a dollop of Greek yogurt and additional chopped cilantro.

click for recipe & more…
Your two cents...

If you don't have a Google login, please select Name/URL from the "Comment as" list below

Monday, October 24, 2011

Healthy Living: Roasted Eggplant Dip

You may not have heard, but today is our first national Food Day, organized to celebrate healthy, sustainable eating. I'm really pumped that a day like today actually exists, to promote things I feel so strongly about. You can read more about the movement's objectives (like supporting sustainable farming, promoting healthy food choices for kids, and fighting diet-related diseases) here or participate in one of the many nationwide Food Day events. Or you can do what I'm doing and cook a healthy meal at home tonight–using the freshest ingredients you can find–and enjoy it around the table with your family or friends.


I read a SHOCKING statistic today: According to The Lancet (the world's leading general medical journal), obesity costs the U.S. $10,273,973 per hour. Not per week or per year. PER HOUR. Also, according the the World Health Organization, diet-related diseases are two of the top five causes of premature death globally. These are statistics we cannot ignore, because the numbers will only go up if we don't make some major changes in the way we eat. If I can inspire even a handful of people to cook (and eat) more healthfully and consciously through this blog, I will feel like my mission is accomplished. Alright, enough preaching for one day. Now for a story and a (healthy) recipe.

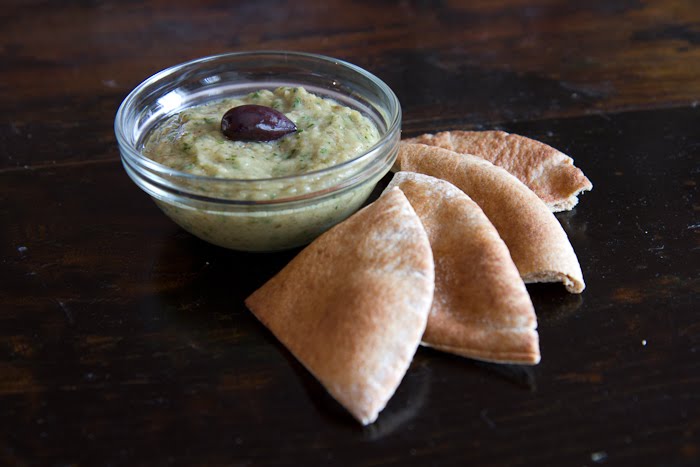
When I moved to the city back in 2007, my first apartment was in Astoria, Queens. Living in a predominately Greek neighborhood was fantastic for a budget-seeking foodie. When I wasn't cooking at home, I lived off Greek takeout: salads with cucumber, tomato, and feta, chicken souvlaki with tzatziki sauce, crisp spanakopita, and most frequently, melitzanosalata (pronounced meh-leed-zah-no-sah-LAH-tah in case you were wondering), a garlicky roasted eggplant dip served with warm pita bread. This dip became so addictive that I found myself eating it almost daily.

Now that I live in Manhattan, good Greek takeout is nearly impossible to find (at least in my neighborhood). Rather than trekking out to Astoria every time the melitzanosalata craving hits, I started experimenting with my own recipe and realized that not only is it easy to prepare, it's MUCH cheaper to make it at home. With only six ingredients (three of which are pantry items), it costs around $5 to make and is perfect for parties, or just as a snack or sandwich spread at home. And it’s super healthy, to boot. Try it at your own risk–you, too, may become an addict.

MELITZANOSALATA (ROASTED EGGPLANT DIP)

Makes about 1 1/2 cups

1 large eggplant
Juice from 1/2 lemon
2 to 3 cloves garlic, finely chopped
1 teaspoon cumin
1/3 cup extra virgin olive oil
1/2 cup Italian parsley, chopped
Salt and freshly ground pepper to taste

Preheat the oven to 400°F.

Prick the eggplant all over with a fork and place on a baking sheet. Roast for 30 to 40 minutes until soft.

When the eggplant is cool enough to handle, cut it in half and scoop the flesh onto a cutting board (or into the bowl of an electric mixer). Discard the skin.

If preparing by hand: finely chop the eggplant and place in a bowl. Add the lemon juice, garlic, and cumin and mash together with the back of a fork. Slowly add the olive oil, stirring continuously with a fork to combine. Stir in the parsley and season with salt and pepper to taste.

If preparing by mixer: add the lemon, garlic, and cumin to the eggplant and pulse several times to combine. With the mixer running, add the olive oil in a steady stream until the mixture is smooth. Add the parsley and pulse a few times to combine. Season with salt and pepper to taste.

Serve with warm triangles of whole wheat pita bread.

Your two cents...

If you don't have a Google login, please select Name/URL from the "Comment as" list below

Thursday, October 20, 2011

Healthy Living: Tomato Chickpea Curry with Kale

You may have noticed that there is a tab on the blog titled Healthy Living. Since I started the blog, it's been a goal of mine to provide healthy, simple recipes using whole, fresh foods. Of course, given that my last post was on Chocolate Chip Cookies, I should clarify that eating a healthy diet is all about balance! I don't advocate eating cookies every day, but I'm also not one for deprivation. Though I'm not a vegetarian or vegan, after reading books like Michael Pollan's In Defense of Food and Mark Bittman's Food Matters, I have conscientiously started eating a mostly plant-based diet. And that's not to say I rarely eat meat, it just means that when I do, I eat small very small quantities and fill up the rest of my plate with veggies and grains. It actually works out quite well, because buying humanely-raised, organic meats and poultry is pretty pricey. But now that I'm buying such small quantities of it, the price ends up the same.


Before Brandon and I got married, I lived for a year with my good friend Jessica. She's vegan, and she introduced me to all sorts of delicious dishes made solely from veggies and grains. Before I met Jess, I honestly could not have imagined a meal without meat or fish. A snack or an appetizer maybe, but not a meal. I was also convinced that you couldn't get enough protein from an animal-free meal. Which, I've learned, is completely false. Take this dish–tomato chickpea curry with kale and brown rice–for example. Both the chickpeas and the brown rice are naturally high in protein: one serving of this dish provides roughly 20 grams of protein, or the same amount as half a chicken breast.

Every so often, I love to make vegan meals. I feel so full of energy after eating a meal of veggies, legumes, and grains. I must say, Brandon is not as enthusiastic about meat-free meals as I am, but he's amazingly game for trying just about anything. My goal is to make my vegan meals so delicious that he doesn't even miss the meat! I created this dish the other night based on what was in my pantry (chickpeas, onion, garlic, spices, brown rice) and fridge (kale). I love Indian food, so I was going for a sort of vegan curry. It turned out to be so flavorful (the leftovers the next day were even better!) and so easy, that this now tops my list of healthy, quick, weeknight meals.

This is the first in a series of "Healthy Living" recipes I'll be posting. And not to say that the other recipes on the blog are not healthy! I try always to cook in a seasonal, Mediterranean way (lots of olive oil, herbs, veggies, fruits, nuts, grains, fish, some meat), but these recipes in particular will be mostly plant-based, lower in calories and fat, and very high in nutrients–and flavor. In these recipes, I'll introduce some grains, legumes, and vegetables you might not normally use. It's a way to experiment with new ingredients and new flavors as part of a healthy lifestyle. Have fun with it–you'll feel great as a result!

TOMATO CHICKPEA CURRY WITH KALE

Serves 4

(For the eggplant variation, scroll down to the bottom of the recipe.)

2 tablespoons vegetable oil
1/2 red onion, thinly sliced
2 cloves garlic, minced
2 teaspoons grated ginger
1 teaspoon curry powder
1 teaspoon cumin
1/2 teaspoon coriander
1/2 teaspoon turmeric
1 (15-ounce) can chickpeas, drained and rinsed
1/2 (28-ounce) can whole San Marzano tomatoes
3 tablespoons chopped cilantro
Salt and pepper to taste

1 to 2 tablespoons olive oil
1 clove garlic, minced
2 bunches Lacinato kale, rinsed and cut into 1 1/2-inch pieces
Salt and pepper to taste

Heat the vegetable oil in a nonstick wok or large sauté pan over medium-high heat.

Add the onions and sauté for 3 to 4 minutes or beginning to soften. Add the garlic and ginger and sauté for 1 to 2 minutes until fragrant. Add the spices, stirring constantly, and cook for an additional 2 minutes.

Add the chickpeas, stirring well. Crush the tomatoes with your hands, then add them to the pan along with the tomato juices. Let the mixture come to a boil, then reduce to a simmer.

Simmer for 10 minutes to let the flavors combine and the sauce thicken. (If it gets too dry, add a bit of water.) Stir in the cilantro and season with salt and pepper.

Meanwhile, heat the olive oil in another large sauté pan over medium-high heat. Add the garlic and cook for a minute or two until fragrant (do not let burn!). Add the kale and sauté for 4 to 5 minutes or until wilted. About halfway through the cooking, add about 1/4 cup water to partially steam the kale. Season with salt and pepper.

Serve with brown rice, and a dollop of yogurt (for the non-vegans).

EGGPLANT VARIATION: Dice one medium eggplant and toss with 1 tablespoon olive oil; season with salt and pepper. Spread on an aluminum foil-lined sheet tray and roast at 425°F for 20 to 25 minutes or until lightly browned. Make the recipe as instructed above, but add the eggplant to the curry along with the chickpeas and tomatoes. Stir in 3 tablespoons chopped mint at the end, along with the cilantro.


click for recipe & more…
Your two cents...

If you don't have a Google login, please select Name/URL from the "Comment as" list below

Thursday, September 29, 2011

Healthy Living: Fall Quinoa Salad


I'll be honest: a few years ago I had never even heard of quinoa. I've loved couscous for years, but quinoa wasn't on my radar until recently. Now this fluffy grain seems to be everywhere, touted as a "super-food" and praised for its nine essential amino acids and high protein content. It's also gluten-free, which is great news for people who have gluten allergies. I finally broke down and bought some a few months ago and, even though it takes a bit longer to cook than couscous (15 minutes instead of 5), its nutty flavor and light texture hooked me instantly. It also blends well with practically everything, and can be stored in the fridge for several days after being cooked.

This recipe was actually inspired by some leftover quinoa I had in the fridge yesterday. I also had some butternut squash, baby spinach, red onion and dried cranberries (a fabulous combo my friend Dori introduced me to) on hand, so I just sort of went from there. I've made quinoa salad with all sorts of flavor combinations–it's great in the summer with a ratatouille blend (roasted eggplant, peppers, tomatoes, and zucchini) and in the fall and winter with any sort of squash and dark greens. I admit, I sometimes buy butternut squash already peeled and cut from Whole Foods or Trader Joe's, which cuts down on prep time considerably. But if you're buying a whole squash, you might want to wear some plastic gloves while peeling and cutting it. Some people (myself included) have allergic reactions to raw butternut squash–my hands will dry out immediately and begin to crack. It's really weird, so I just wear gloves now when I'm prepping butternut squash.

I love making dishes like this that are as colorful and delicious as they are healthy–AND that use up leftovers! This makes a great meal all by itself or a perfect side for a piece of fish or some roast chicken or pork.

QUINOA SALAD WITH BUTTERNUT SQUASH AND SPINACH

Serves 4

2 cups peeled, cubed butternut squash
1 small red onion, halved and thinly sliced
2 tablespoons olive oil, divided
Salt and pepper to taste
1/4 tsp. cayenne
1 bag baby spinach
1/2 cup dried cranberries
1 cup cooked quinoa

Preheat the oven to 425 degrees.

Arrange the butternut squash and onion on an aluminum foil-covered baking sheet and drizzle with 1 tablespoon olive oil. Season with salt and pepper and 1/4 teaspoon cayenne and toss to combine. Roast for 30 minutes or until tender and just beginning to brown.

Meanwhile, steam the spinach for 1-2 minutes until bright green and slightly wilted. Drain and squeeze out any excess water.

In a large bowl combine the squash, onion, spinach, dried cranberries, quinoa, and the remaining tablespoon of olive oil. Season with salt and pepper to taste. Serve warm or at room temperature.

(NOTE: This is also really delicious with toasted pine nuts!)


click for recipe & more…
Your two cents...

If you don't have a Google login, please select Name/URL from the "Comment as" list below

Friday, September 23, 2011

Dinner Party: Roasted Branzini and Brussel Sprouts


I love dinner parties (clearly). And in spite of the fact that I've thrown hundreds in my life, I still get a little nervous having people over if I don't have time to prep in advance. I hate feeling rushed, which is why I try to get as much done ahead of time as possible. For me, entertaining is the most fun when the apartment is clean, the food is more or less prepped, and I can actually sit down and have a drink with guests when they arrive. Of course in reality, things never go quite as smoothly as I plan–I can't tell you how many times I've jumped in the shower and heard the doorbell ring! But if there's one thing I've learned from entertaining, it's this: if you're short on prep time, Keep. It. Simple. Your friends aren't expecting you to recreate The French Laundry in your apartment. If anything, they'll be happy to get a home cooked meal and will love whatever you prepare.

So when Brandon asked me the other day if some friends could come over for dinner, I hesitated, as it was a day where I'd literally be getting home at the same time they'd be arriving. I seriously considered ordering takeout. But then I thought about it a bit more and gave myself a little pep talk. (I'm not Thomas Keller, etc.) And I realized that I could cook a beautiful, simple meal in the same amount of time it would take to wait on a pizza delivery. I came up with a game plan: I'd run by the grocery on my way home, then throw together a little appetizer platter (I already had some cheese, crackers, charcuterie, and olives on hand) for everyone to munch on when they arrived. For the meal, I decided to make roasted branzini (Mediterranean sea bass) stuffed with lemon and thyme, roasted Brussels sprouts, and roasted baby potatoes–the prep is minimal and everything cooks together in a 425 degree oven. Which would give me time to sit and have a leisurely glass of wine with my friends. Perfect!


I find that a lot of people are intimidated by whole fish. They're not sure how to cook them, and how to get the bones out afterwards. Or maybe they're just creeped out by the eyes staring back at them. Nonetheless, roasting whole fish is so easy. You can ask the fishmonger to scale the fish and remove the guts, so all you have to do is stuff the cavity with herbs and thinly sliced lemons, season with salt and pepper, drizzle with olive oil, and pop them in the oven. Buying whole fish is much cheaper than buying fillets ($11.99/lb. for whole branzini versus $24.99/lb. for sea bass fillets), but the best part of all is the flavor. Roasting fish on the bones keeps the flesh moist, and it takes on the taste and aroma of whatever herbs you've stuffed inside the cavity. The bones are a bit tricky, as there always seem to be a few tiny ones mixed in even after deboning–just eat carefully and you should be fine.

In the end (despite my initial fears), the dinner was fun and relaxed. I put out the hors d'oeuvres, poured some wine, and one of my friends helped me assemble the fish and Brussels sprouts. We had everything in the oven in about 10 minutes, and we all headed up to the roof. When we came downstairs 25 minutes later, the apartment smelled heavenly and dinner was done! My challenge to you this weekend is this: go out and buy a whole fish (or two or three). Follow the recipe below–it's completely non-intimidating–and invite some friends over. No more excuses, just try it. You'll be hooked.


ROASTED BRANZINI WITH BRUSSELS SPROUTS

Serves 4

1 pound Brussels sprouts, halved
2 tablespoons olive oil, plus more for drizzling
Sea salt and freshly ground pepper
3 (1 lb.) branzini (or two 1 1/2-lb branzini)
Thyme sprigs
1/2 lemon, thinly sliced

Preheat the oven to 425 degrees F. Cover two sheet trays with aluminum foil or parchment paper.

In a large bowl, toss the Brussels sprouts with 2 tablespoons of the olive oil and season with salt and pepper. Place the Brussels sprouts in the oven.

Meanwhile, pat the fish dry with paper towels, inside and out. Season the cavities with salt and pepper and stuff with thyme sprigs (6 or 7) and lemon slices.

Arrange the fish on the second sheet tray, season with salt and pepper, and drizzle with olive oil. Place the tray in the oven with the Brussels sprouts (on the lower rack) and roast for 20 to 25 minutes or until the flesh is flaky and cooked through, and the Brussels sprouts are lightly browned.

To debone: Using two forks, remove the top skin from the fish and discard. Carefully remove the top fillet to a warm serving platter. Lift out the backbone and ribs, and remove the bottom fillet. Repeat with the remaining fish. Arrange the Brussels sprouts on the platter with the fish. Squeeze with lemon juice and drizzle with olive oil. (Optional: garnish with fresh chopped parsley.)

Serve with roasted potatoes.


click for recipe & more…
Your two cents...

If you don't have a Google login, please select Name/URL from the "Comment as" list below

Friday, September 9, 2011

Yellow Tomato Gazpacho & Cumin-Rubbed Shrimp


As you can tell from my previous post on heirloom tomatoes, I’m clearly a fan. AND given that it's early September, our days are numbered to enjoy these beauties. But if I had to pick a favorite, I’d confess that I especially love the bright yellow ones. Slightly sweeter and less acidic than their red brethren–and only available for a few weeks out of the year–golden tomatoes are fantastic pureed with cilantro, cucumber, and a dash of sherry vinegar into a silky-smooth gazpacho, or simmered with some garlic, onion, and thyme into a golden sauce to drizzle over grilled fish.

The summer I spent working and studying at Chateau du Fey, in Burgundy, France, I had my first introduction to yellow tomatoes. We encountered them at the market in Joigny, and brought them home to make a summery yellow tomato gazpacho, inspired by a recipe from one of my all-time favorite cookbooks: Suzanne Goin’s Sunday Suppers at Lucques (Knopf, 2005). The summer was blazing hot, with highs in the upper 90’s, and we had no air-conditioning. Just the thought of turning on the oven made us sweat, so we stuck to cold dishes. The yellow tomato gazpacho quickly became a favorite–cool and refreshing, and chock full of vegetables and herbs, it was one of the few things we actually enjoyed eating in the heat.


Five years later, I’m still making the soup, albeit with a few small changes. I do think it’s a good idea to blanch and peel the tomatoes as Goin’s recipe recommends, though I don’t bother straining it at the end; I like some texture to remain. I’ve swapped out the red wine vinegar for sherry vinegar, and I love adding thinly sliced radishes as a garnish. And last, if I’m serving this as a main course, I like to add a few cumin-rubbed grilled (or sautéed) shrimp to make it a bit heartier.

Beyond being healthy, delicious, and hyper-seasonal, I love this dish because it is perfect for entertaining: everything can be made totally in advance, chilled, and assembled at the last minute. And because it’s so beautiful with all its colors and garnishes, you’ll be guaranteed to get oohs and ahhs from your guests.

YELLOW TOMATO GAZPACHO

Serves 4 as a main course (or 6 as a starter)

2 ½ pounds ripe yellow tomatoes
1 hothouse cucumber, seeded
½ jalapeno, seeded and cut in half
4 sprigs cilantro, plus extra leaves for garnishing
2 cloves garlic, peeled and coarsely chopped
2 tablespoons sherry vinegar
1/3 cup extra-virgin olive oil, plus more for drizzling
Sea salt and freshly ground pepper
3 small radishes, thinly sliced
3 tablespoons finely diced red onion
18 small red and yellow cherry tomatoes, halved

Cut an “X” in the bottom of each tomato with a paring knife. Blanch the tomatoes in boiling water for 30 seconds to a minute until the skins begin peeling away. Remove the tomatoes with a slotted spoon and plunge immediately into a bowl of ice water. Cool the tomatoes for a few minutes, then use your fingers to slip off their skins. Remove the cores, then cut the tomatoes in half and squeeze the juice into a large bowl. Coarsely chop the tomatoes and place them in the bowl with the juices, pouring in any extra juice from the cutting board.

Carefully dice about three tablespoons’ worth of cucumber for garnish; set aside. Peel the remaining cucumber and coarsely chop; add to the bowl with the tomatoes.

Add the jalapeno, cilantro, garlic, red wine vinegar, and olive oil and gently stir to combine. You will need to blend the soup in two batches: Place half tomato mixture into the blender with a teaspoon of salt and some peppers. Pulse on low to break down the ingredients, then puree on high until smooth. Pour into another large bowl, and repeat with the remaining ingredients. Taste the soup and season with additional salt and pepper if necessary. Cover tightly and chill for several hours.

Prep the garnish ingredients and set aside.

To serve, pour the soup into four large bowls (or six small ones) and garnish with diced cucumber, red onion, radish slices, cherry tomatoes, cilantro leaves, and shrimp (recipe below). Drizzle with olive oil just before serving.

CUMIN-RUBBED SHRIMP

Serves 4 (or 6 as a starter)

12 medium-sized shrimp, peeled and deveined (tails in tact)
1 teaspoon cumin
¼ teaspoon cayenne
1 clove garlic, peeled and crushed
1 tablespoon olive oil
Sea salt and freshly ground pepper

Preheat a grill pan or nonstick sauté pan over medium-high heat.

Place the shrimp in a medium bowl with cumin, cayenne, garlic, and olive oil. Stir gently with a plastic spatula until the shrimp are coated. Season on all sides with salt and pepper.

Grill or sauté the shrimp for about 3 to 4 minutes or until pink on all sides and beginning to curl.

Let cool slightly before serving with gazpacho.


click for recipe & more…

Add a comment!
Your two cents...

If you don't have a Google login, please select Name/URL from the "Comment as" list below

Thursday, September 8, 2011

Secret Weapon: Fleur de Sel de Camargue


You may be wondering what exactly fleur de sel de Camargue means, and why it's a secret weapon. Well I'm glad you asked. First of all, fleur de sel (literally translated "flower of the salt") is a top-quality sea salt that is hand-raked and harvested in France. Specifically, this sea salt comes from the Camargue, a wild, marshy area in the southwest corner of France known for its rice, its horses, and–you guessed it–sea salt. Fleur de sel's coarse granules are incredibly flavorful and have a way of drawing out the flavor in any food, from roasted fish to grilled veggies or even a simple salad. I love sprinkling it over a ripe tomato or a juicy piece of cantaloupe, in olive oil (for dipping bread), or even in chocolate chip cookie batter. I'm obsessed.

Though this highly prized sea salt is intended as a "finishing salt" (i.e. used just to sprinkle on foods before serving), I use it all the time in cooking. I love its intense flavor and coarse texture, especially in a dish like roast chicken, where it's nice to have the crunchy salt granules baked into the skin. I stock up on fleur de sel whenever I'm in France–it's really inexpensive at any local grocery story there–or you can order it online at
SaltWorks for $8.99. A little bit goes a long way, so a 4.4 ounce container should last you awhile. When I'm cooking, I like to put some fleur de sel in a little bowl so I can just sprinkle it into dishes as I go.

I know salt gets a bad rap these days, but all-natural sea salt actually has some important health benefits. Packed with minerals and micro-nutrients, sea salt (unlike refined table salt) actually helps your body absorb nutrients and can aid your body in regulating blood pressure. Eliminating all salt from your diet could actually have a negative effect on your body (not to mention your taste buds!). Of course, everything in moderation, but a little sea salt is far better for you than refined table salt.

So why is it a secret weapon? Because it honestly makes everything taste better! I used this salt in every single dish last night (roast chicken, roast potatoes, salad) and with little effort on my part, the flavors were fantastic. Without any further ado, I want to leave you with the a recipe for an easy Dijon vinaigrette that's delicious on salad greens, steamed green beans, or drizzled over leftover roast chicken or pork. This is a perfect example of a simple recipe that tastes oh-so-much-better with a little sprinkling of fleur de sel...try it for yourself and see!

DIJON VINAIGRETTE

Makes about 1/2 cup

1/2 medium shallot, minced
2 teaspoons Dijon mustard
2 tablespoons red wine vinegar
1/3 cup extra virgin olive oil
Fleur de sel and freshly ground pepper

Whisk together the shallot, mustard, and vinegar in a small bowl. Slowly add the olive oil in a steady stream, whisking constantly to combine. Season with a good sprinkle of fleur de sel and some freshly ground pepper.

You can store the remaining vinaigrette in the refrigerator for 1 to 2 days.

click for recipe & more…

Add a comment!
Your two cents...

If you don't have a Google login, please select Name/URL from the "Comment as" list below