Showing posts with label sweet. Show all posts

Thursday, March 8, 2012

Banana Muffins with Sour Cream and Walnuts


I've always had a weakness for banana anything. Maybe it's because my nickname growing up was 'Anna Banana,' or maybe it's because my mom used to make banana bread all the time. And not just any banana bread. Sweet and ultra-moist (thanks to her secret ingredient: crushed pineapple), I literally had dreams about this bread as a child. It was, and still is, the best banana bread I've ever had, and she usually has a loaf waiting for me when I go home to visit. But lately, as I've begun cutting back on sugar, I find that many baked goods (including her famous bread!) are now a bit too sweet for me. In fact, most pastries I order at restaurants or bakeries are way too sweet. Which is I why I prefer to bake at home. It's not only way more enjoyable, but I can control the amount of sugar that goes into what I'm eating.

The other night, a friend came over for a fun night of baking and brainstorming (the two go hand in hand!). A bottle of bubbly may have been involved. Stories were shared, cookies were baked, and encouragement was doled out. And, spontaneously, the pile of overly-ripe bananas sitting on top of my fridge were transformed into a batch of the most delicious muffins I've ever had.


I can't take credit for the recipe, though I did tweak it a bit. I knew from past experience that the secret weapon for ultra-moist muffins and cakes (besides my mom's crushed pineapple trick!) is sour cream. It not only adds a ton of moisture, but it also gives an unmistakable tang, which helps balance out the sweetness. I did a Google search for sour cream banana muffins and I came across this recipe on a blog called The Cookbook Chronicles (now a book, The Newlywed Kitchen). I cut back on the sugar by 1/2 cup and added 1/2 cup chopped walnuts. The end result was fantastic: super moist, flavorful, with just the right balance of ripe banana flavor and tangy sour cream. And best of all, after cutting back on the sugar, they weren't too sweet.

Of course we had to eat one, warm with a pat of butter, right out of the oven. I'm not even going to tell you how good that was - you'll just have to try it for yourselves. Word to the wise: don't attempt this recipe by yourself! You'll want lots of friends around to help you eat them. Being left alone with two dozen of these bad boys could be dangerous even for the most self-disciplined of people. (Luckily, they freeze well...which is exactly what I did with the rest of the batch!)

BANANA MUFFINS WITH SOUR CREAM AND WALNUTS

(Adapted from The Cookbook Chronicles)

Makes 2 dozen muffins; 1 dozen extra-large

2 cups all-purpose flour
3/4 teaspoon kosher salt
1/2 teaspoon baking soda
1 teaspoon baking powder
1 teaspoon cinnamon
1/2 cup vegetable or canola oil
3/4 cup brown sugar
1/4 cup granulated sugar
2 teaspoons vanilla extract
1 1/2 cups over-ripe bananas, mashed (about 3 large bananas)
1 cup sour cream
2 large eggs
1/2 cup chopped walnuts (or pecans)

Preheat the oven to 350°F. Line two regular-size muffin tins with paper baking cups.

In a large bowl, whisk together the flour, salt, baking soda, baking powder, and cinnamon. In a separate bowl, whisk the oil and sugars together until combined. Stir in the vanilla, bananas, and sour cream. Add in the eggs, one by one, stirring after each addition.

Stir the dry ingredients into the banana mixture until combined. Stir in the walnuts.

Fill each paper cup 3/4 of the way full. Bake for 20 minutes or until golden brown and a toothpick inserted into the middle of a muffin comes out clean. (If you use the large muffin cups, they'll cook for around 25 minutes. You can also bake this as a loaf of bread; allow about 50 to 60 minutes.)

Let cool on a cooling rack for 10 minutes before serving. If you want to freeze them, cool completely and place in a Zip-loc freezer bag.

click for recipe & more…
Your two cents...

If you don't have a Google login, please select Name/URL from the "Comment as" list below

Tuesday, February 28, 2012

Yellow Table Storytelling Dinner #2

This past weekend we hosted our second official storytelling dinner around the yellow table, and what a fun night it was! Our last one was back in the fall, and though we've had a few dinners in between, we hadn't had a proper storytelling night since. If you're new to The Yellow Table, you may be wondering "What is a storytelling dinner?" Well I'm so glad you asked. Our storytelling dinners (inspired by a Moth event I attended last fall) consist of friends (both new and old), sitting around the table, eating good food, drinking wine, and sharing stories. Basically, it's what I hope heaven will be like!


The original storytelling night, our topic was "Firsts," with stories ranging from crazy blind dates to biking accidents and police busts to a creepy ghost-spotting in an abandoned hotel. Everyone had a ball – it was so fun to see a group that only marginally knew each other (and some, not at all), linger over the dinner table well after midnight laughing and talking like old friends. This time, our theme was "Travel" and we heard stories of couch-surfing in Siberia, busking through Italy, and a near lion attack in South Africa. Again, the stories spiraled and we all lingered at the table long past dessert.

I really believe in the power of storytelling to connect and inspire – just think, it's what people sat around and did for thousands of years before there was television or Internet! It's funny, though, how people feel a little uncomfortable with the idea at first. We've all got stories to tell, and though we can post our thoughts and whereabouts on Facebook and Twitter all day long, telling a story with a beginning, middle, and end to a live audience (rather than a virtual one) seems a rather intimidating task. Which is exactly why I think little practice never hurt–especially when everyone ends up having fun in the process!

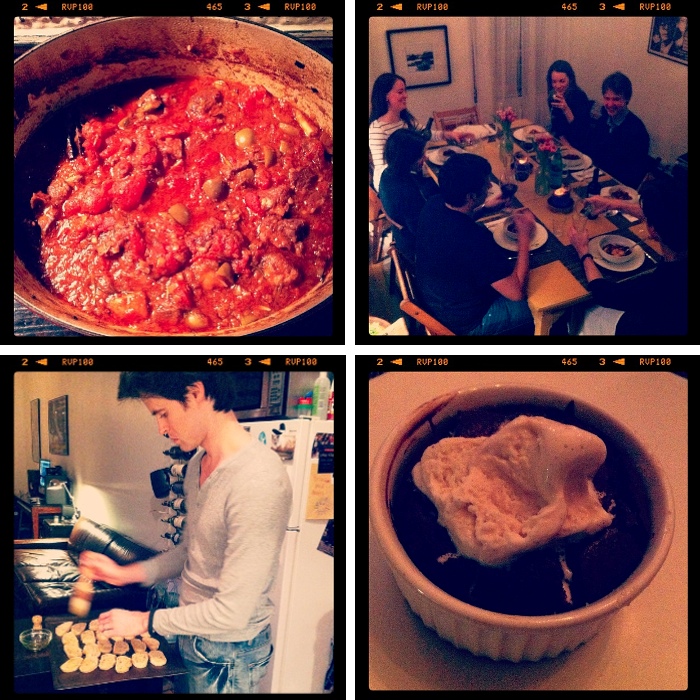
As for the food, since it was a cool, rainy night, I wanted to make something warm and comforting, preferably a stew that could simmer for hours in my Le Creuset dutch oven while I worked on the other dishes. I finally settled on Melissa Clark's fragrant Braised Pork Shoulder with Tomatoes, Cinnamon, and Olives over Polenta from her newest cookbook Cook This Now. Melissa is pretty much my culinary idol – I love her straightforward, seasonal recipes and her wonderful writing that somehow manages to be both authoritative and chatty all at once. I basically want to go hang out in her kitchen and cook with her after reading any of her recipes. Per usual, this one did not disappoint. The intriguing blend of flavors – sweet canned tomatoes and cinnamon, salty anchovies and olives, dry red wine, and a few sprigs of rosemary – melded together to create a braised pork that was meltingly tender and almost tagine-like in taste.

I served goat cheese crostini with kumquat chutney for starters (since I have all this chutney lying around!), and a nice light arugula, fennel, and orange salad as a palate cleanser after the pork stew. And last, but not least, at the request of my husband – who as the birthday boy got to choose his dessert – I made Bittersweet Chocolate Pudding Cakes inspired by a recipe I found in the New York Times. I made the recipe gluten free and used 60% Bittersweet Valrhona chocolate. The result was decadent. B got a candle in his cake and we ended the night singing happy birthday to him.

I hope you feel inspired to host your own storytelling dinner, and if you do, I'd love to hear about it! My sister hosted one in D.C. and her friends loved it – it would be fun to see the idea spread! But in the meantime, I'm collecting dinner party stories for a future post about your experiences...the good, the bad, and the hysterical. Feel free to comment below or send me an email at annawatsoncarl@gmail.com. Can't wait to hear from you!

February Storytelling Dinner Menu

Goat Cheese Crostini with Kumquat Chutney

Braised Pork Shoulder with Tomatoes, Cinnamon, and Olives with Polenta

Arugula, Fennel, and Oranges with White Balsamic Vinaigrette

Bittersweet Chocolate Pudding Cakes with Vanilla Gelato (recipe below)

BITTERSWEET CHOCOLATE PUDDING CAKES

Serves 4

Adapted from New York Time's Diner's Journal February 12, 2009

1/2 cup unsalted butter, plus more to butter the molds
4 ounces bittersweet chocolate (preferably Valrhona), cut into small pieces
2 eggs
2 egg yolks
1/4 cup sugar, plus more for sprinkling

Preheat the oven to 450°F. Butter four 4-inch ramekins and sprinkle each with a bit of sugar; place them on a sheet tray.

In a small, heavy saucepan, melt the butter over low heat. Add the chocolate and whisk constantly until the chocolate begins to melt. Remove from heat and continue whisking until the chocolate is completely melted. Let cool slightly.

In a medium bowl, whisk together the eggs and egg yolks with the sugar until light and fluffy. Slowly pour the melted chocolate and butter into the eggs, whisking constantly. (You can use electric beaters or a stand mixer if you prefer).

Pour the mixture into the ramekins and bake for about 8 minutes or until the center is beginning to set. The tops will puff up slightly like souffles but the centers will be deliciously soft and gooey. Cut a small hole in the top of each one and add a scoop of vanilla ice cream or gelato. Serve immediately in the ramekins, on small dessert plates. (Be careful, they are hot!!)

MAKE AHEAD: You can make the batter and fill the ramekins several hours ahead. Cover with plastic wrap and refrigerate until ready to use. Bring to room temperature before baking.

Add a comment!
Your two cents...

If you don't have a Google login, please select Name/URL from the "Comment as" list below

Friday, February 24, 2012

Weekend Project: Kumquat & Cranberry Chutney


Chutney is one of those exotic condiments that I've always admired but never made (until recently). I'll eat it at Indian restaurants and I've bought it jarred occasionally when I make Indian food at home. A sticky compote of fruit and spices, it's sort of like a chunkier (and more flavorful) version of jam. It wasn't until I went to
La Varenne
that I realized you could make chutney from scratch. Actually, we made everything from scratch there, from croissants to stocks to preserves to sticky bottles of fruit liqueurs. My good friend Chef Randall Price, the former head chef and culinary instructor there, loved chutneys and made them out of anything around: nectarines, peaches, and (my personal favorite), kumquats.


I had never before seen this tiny, oval-shaped citrus fruit until I was living in France. About the size of a cherry tomato, kumquats are typically available in grocery stores only in the winter (roughly November through March) and the skin is thin enough that you can pop the whole thing in your mouth. They have an amazing sweet/tart flavor – a bit too strong for me personally when raw, but beautifully aromatic when cooked. I don't remember Randall's chutney recipe, but I remember it being remarkably easy: he just chopped up his ingredients and threw them in a pot, added some spices, and boiled the mixture until it was thick and jam-like. At Chateau du Fey, we ate his chutney all the time: with roast pork and chicken, on sandwiches, and with cheeses. It was the secret weapon that you could pull out of the fridge to make even leftovers taste great.


Despite my love of chutney, I confess, I was still a little intimidated to try it at home. I don't know why...probably because I was I was associating it with jam-making and sterilizing jars and all of that. (Which as it turns out is not even necessary!) It wasn't until a few weeks ago, after buying a box of kumquats at the grocery store that I attempted my first chutney. I found a great recipe on Epicurious.com that I used as a guide, and was shocked at just how simple it was. As in, it took about 30 minutes form start to finish (plus cooling time). And the result, in addition to being absolutely beautiful, was so delicious! I've now made 3 batches in 2 weeks (I think Brandon may be a bit sick of it by now!), serving it with everything from goat cheese crostini (like in the picture above – you may have seen those in the recent Valentine's Day post) to Dijon-roasted loin to grilled chicken to a smoked turkey sandwich. Seriously, this stuff is good on everything.

But if you're going to make it, do it soon! Kumquats are only around for a few more weeks. Make a big batch, give some away in cute little mason jars, and keep the rest in the refrigerator for the next few weeks. You–and your friends–will love it, I promise.

KUMQUAT & CRANBERRY CHUTNEY

Makes about 1 1/2 cups

This makes a beautiful gift in a pretty jar. (But make sure to keep it refrigerated.)

10 ounces kumquats, quartered lengthwise, seeded
1/2 cup dried cranberries
3/4 cup sugar
3/4 cup fresh orange juice
1/4 cup chopped shallots
1 tablespoon finely minced fresh ginger
3 whole star anise*
4 peppercorns
1/4 teaspoon ground cinnamon
4 whole cloves

Combine all of the ingredients in a heavy-bottomed medium saucepan and bring to a boil. Let boil for 10 to 15 minutes, stirring frequently, until the kumquat skins have softened and the mixture has thickened. Let cool.

Store in the refrigerator for up to 2 weeks.

*I bought these at an Asian grocery store. If you can't fine whole star anise, you can buy ground–just use 1/4 tablespoon. You can also substitute the whole cloves and whole peppercorns for ground if you prefer: use 1/4 teaspoon of each.

SERVING SUGGESTIONS: This is a delicious accompaniment for roasted,grilled, or smoked poultry or pork (I especially love it with smoked chicken or roasted pork loin). It's also insanely good with broiled goat cheese crostini, sprinkled with a bit of chopped rosemary.


click for recipe & more…

Add a comment!
Your two cents...

If you don't have a Google login, please select Name/URL from the "Comment as" list below

Sunday, February 12, 2012

Valentine's Day: Dinner for Two


Let's be honest. Valentine's Day seems a little bit forced (OK a lot!). I'm all for romance, but I don't like being told when it should happen. And I certainly don't associate love with red roses, teddy bears, and heart-shaped boxes of chocolates. For me, romance involves creativity – and an element of surprise. To come home on a random Thursday and find a beautiful bouquet of tulips (which happens to be my favorite flower) on the table would make my week. Or finding a little handwritten love note tucked in my purse, or being served a hot cup of coffee in bed, or getting an unexpected text telling me to put on heels and meet my man out for a glass of bubbly. To me, these little things – done at random – keep the romance alive. And I'm so blessed to have a creative husband who loves surprising me. I have to work hard to keep up!

So for this Valentine's Day, I want to do something special for him. I have no interest in going out to dinner on V-Day with all the cheesy, pre-fixe "aphrodisiac menus" and couples who look, well, bored. Instead, I plan to make a cozy dinner diner à deux at the yellow table. There is nothing more romantic to me than a table set – with fresh flowers and lots of candles – for two. It completely transforms the ambiance of the apartment. Brandon doesn't cook at all, which is fine by me, because I've already got the menu planned!


If you're looking for something special to do for your honey on Tuesday, why not cook him or her dinner? The menu below is delicious, simple, and–obligatory chocolate dessert aside–light and healthy. I tried to pick vibrant colors and flavors, but that wouldn't be overly filling. Because the last thing you want on Valentine's Day is a food coma...trust me!

Menu for 2
(Scroll down for recipes)

• Goat Cheese Crostini with Kumquat Chutney and Rosemary

• Honey Dijon-Glazed Wild Salmon with Frisée, Blood Orange, & Avocado Salad

• Bittersweet Molten Chocolate Cakes with Raspberries and Crème Fraiche

What to drink? Rosé Champagne, of course! (Or crémant, cava, or Prosecco). I just love the pale rosé color–it just seems fitting for Valentine's Day, and you can't get much more celebratory than bubbles!


Don't be intimidated by this menu – it truly is quite simple. Much of it can be prepped in advance, and the dessert can be made the day before and reheated before serving. (Though it definitely tastes best right out of the oven!)

For the crostini, toast some little flatbread rounds (or any type of bread, really) and spread them with goat cheese, a dollop of kumquat chutney (or marmelade), and a sprinkle of chopped rosemary. Five minute appetizer, easy.

For the main course, simply brush some wild salmon with a honey-Dijon-soy glaze and roast it in the oven for about 12 minutes. Meanwhile, toss some frisée (a slightly bitter, curly lettuce) with oranges (I used Cara Cara and blood oranges), avocado, and a citrus vinaigrette.

And for the dessert, these are my favorite little bittersweet chocolate cakes. I know the whole molten chocolate craze has passed, but you really can't get much better than a dark chocolate cake with an ooey-gooey chocolate center. I mean, come on!! Who can say no to that?!


The great thing about these (besides being insanely good) is that you can either a) make the batter in advance, spoon them into souffle dishes, and bake them while you're finishing dinner (this will give you that molten chocolate center) or b) bake them earlier in the day, or even the day before, and just reheat in the microwave for dessert. Option a) tastes better but option b) is easier and still tastes great. So you decide depending on how much time you have.

But honestly, with a homemade dinner, sparkling wine, and candlelight, you kind of can't go wrong – this Tuesday or any day of the week. Happy Valentine's Day everyone!

GOAT CHEESE CROSTINI WITH KUMQUAT CHUTNEY AND ROSEMARY

Serves 2

I made my own kumquat chutney and will post that recipe another day. But on V-day, save yourself some time and just buy a jar of good chutney, bitter orange marmelade, or even some fig jam.

4 crostini (can be any type of bread)
1 tablespoon olive oil
4 tablespoons goat cheese
4 teaspoons jarred chutney (or bitter orange marmelade)
1 teaspoon chopped rosemary

Preheat the oven to 425°F.

Brush the crostini on both sides with olive oil. Toast for a couple of minutes until light brown. Flip the crostini and top each with a tablespoon of goat cheese. Bake for 3 to 4 minutes or so until the goat cheese begins to soften and the crostini edges are golden brown.

Remove from the oven and let cool slightly. Top each crostini with a teaspoon of chutney and sprinkle with a bit of chopped rosemary.

HONEY-DIJON GLAZED WILD SALMON WITH CITRUS FRISEE SALAD

Serves 2

Honey-Dijon Glazed Salmon
2 (4- to 5-ounce) pieces of wild salmon
Salt and pepper, to taste
1/4 teaspoon cayenne
1 teaspoon Dijon mustard
1 tablespoon soy sauce
1 tablespoon honey
1/2 lemon

Citrus Frisee Salad
2 cups friseé, rinsed and dried
1/2 Cara Cara orange, peeled and sliced
1/2 blood orange, peeled and sliced
1/2 avocado, sliced
1 tablespoon fresh squeezed orange juice
1 tablespoon white Balsamic vinegar
2 tablespoons extra virgin olive oil
Salt and pepper to taste

Preheat the oven to 400°F.

Arrange the salmon fillets on an an aluminum foil-covered baking sheet, skin-side down. Season with salt and pepper. In a small bowl, whisk together the cayenne, mustard, soy sauce, and honey. Brush the top of the salmon filets with the glaze.

Cut two thin slices of lemon and place one on each piece of salmon. (Reserve the extra lemon.) Bake for 12 minutes or until just cooked through.

Meanwhile, make the salad. Toss the frisé, orange slices, and avocado slices. In a small bowl, whisk together the orange juice, vinegar, and olive oil; season with salt and pepper. Set aside.

Remove the salmon from the oven and squeeze with the juice from the remaining wedge of lemon. Toss the salad with the vinaigrette and serve each place with a piece of salmon and some salad.

BITTERSWEET MOLTEN CHOCOLATE CAKES

Serves 2

2 ounces bittersweet chocolate
3 tablespoons + 1 teaspoon butter
1 egg + 1 egg yolk
1/2 cup powdered sugar
2 1/2 tablespoons all-purpose flour
1 tablespoon Kahlua (optional)

Preheat the oven to 450°F and butter two 3/4-cup souffle dishes. (NOTE: You can also make these in muffin tins–just butter 4 muffin cups and bake for slightly less time, about 8 to 9 minutes.)

In a small saucepan, melt the chocolate and butter over low heat, stirring constantly. Remove from the heat and cool slightly.

In a medium better, whisk together the egg and egg yolk. Add the sugar, then the chocolate mixture and flour, whisking until smooth. (Whisk in the Kahlua, if desired). Divide the batter into two dishes. (If you are making them in advance, just cover with plastic wrap and refrigerate until you are ready to bake them).

Bake for about 10 to 11 minutes (a few minutes longer if the batter was refrigerated) until the tops of the cakes have puffed up slightly and the center is still runny. Run a knife around the edges and quickly turn the cakes onto two plates. Dust with powdered sugar and serve with creme fraiche (or vanilla ice cream) and raspberries. Serve immediately so you get the chocolate gooeyness!


click for recipe & more…

Add a comment!
Your two cents...

If you don't have a Google login, please select Name/URL from the "Comment as" list below

Friday, February 3, 2012

A Night to Remember...


The smile says it all.

When 12 friends crowd into a tiny NYC apartment to celebrate the birthday of a dear friend, to squeeze onto couches and borrowed chairs and share a meal around a beautiful table (that you’d never guess had been found, discarded on the street that day), with story-telling and laughter and much toasting, something magical happens. It’s as though time is suspended. You get a glimpse of something bigger than this life – a hint of how things should be, a taste of what we long for. Through the candlelit glow, smiles seems brighter, friendships deeper, and though you may not even remember what you ate the next day, that night you could swear it was the best thing you had ever tasted. We need more of these evenings. These are the sweet times. The birthday girl summed it up best:

“I was given the rare and beautiful gift of knowing just how precious a moment is when you are right in the middle of it. Many, many times throughout the evening, I looked around the table with amazement. My life, just as it is, is one I love. The gifts before me – dear friends, good food, and abundant laughter – were more than enough. My cup overflows.”


This fabulous and festive occasion – which I had the privilege of being a part of – was the 30th birthday of my lovely friend Rachel Carter. The party took place at her apartment last weekend and between her beautiful "Winter White Theme" (check out her table decor above), delicious menu (she planned, I cooked), and fantastic friends, it really was an epic evening. The party was beautifully documented by the ultra-talented photographer Sara Beth Turner (that's her, whipping off the Champagne cork below!), who just happens to be one of Rachel's three roommates. Sara Beth has such a gift for capturing the essence of a moment with her photos. Her shots, especially these black and white ones, really portray the spirit of the evening, and I am so honored to feature her photography on The Yellow Table. Thanks SB!


Rachel, being quite the hostess, made up a variety of snacks for people to munch on when they arrived: prosciutto-wrapped asparagus, white bean dip and crudités, spicy nuts with rosemary, and a few cheeses with fig jam and crackers. Everyone packed into the kitchen and sipped on bubbly while I finished up the cooking.

The birthday gal had chosen the menu in advance ("I wanted to to have a menu I'd be excited to have at someone else's dinner party," she said): roasted salmon with a Champagne dill sauce, roasted new potatoes with olive oil and sea salt, and a simple green salad with cucumbers and lemon vinaigrette. The menu was flavorful and light, and was so easy to throw together right before the party.

For dessert, Rachel really something decadent (it was her 30th after all!) and wanted to try making a tiramisu. I insisted on making it – the birthday girl shouldn't make her own cake! – and I had so much fun making it into a round birthday shape (using a springform pan) rather than a traditional rectangle. I changed up the classic recipe a bit, eliminating the raw egg yolks, and using Kahlua in place of the marsala wine. I also used a mix of chocolate and vanilla lady fingers, which not only tasted great, but made for a beautiful presentation. (Recipe coming soon!)


But where Rachel really went all out was on the decor – I'll let her tell you about her theme:

"I was inspired by a favorite blogger of mine, Joanna Goddard from Cup of Jo, who threw a "recession chic" dinner party several years ago. The decor from her party was winter white with lots of candles, snow, a birch bark log, and of course, flowing red wine! I liked the winter white theme (mixed in with a healthy dose of glitter!) because it's easy to find white Christmas decor on sale, and white is usually inexpensive and readily available. As I envisioned it all coming together and procured supplies, my selections took on a more "Narnia~like" quality. This seemed the perfect vision of a magical, wintry, outdoor place. Honestly, though, I didn't know how well it would come together until we started lighting the candles..."


Rachel just so happened to find the perfect log for the centerpiece the weekend before in Vermont, which she lugged home and spray painted white. She also found a mirror on the street (gotta love NYC!) which she used as the base for the centerpiece, garnished with some berries and ferns from Michael's. She pulled the whole look together with piles of glittery white fake snow ("to cover all the ugly edges!"). Rachel's a kindergarten teacher, so she's especially gifted at crafts. She made the snowflakes pictured above, which she hung from the ceiling above the table. Truly, a winter wonderland...


I love this picture of Rachel and me in the kitchen pre-party...we had so much fun plotting and scheming about this night, and I'm so glad it all came together so well. Here's to many more dinner parties...!!

The rest of the pictures don't need much in the way of explanation. They pretty much speak for themselves. The evening was magical, and I am so grateful for the friendships – old and new – that were represented here. And most of all, I'm grateful for Rachel, her friendship, generosity, creativity, and zest for life. It's contagious. Happy Birthday!


A special thanks to:

The birthday gal: Rachel Carter
Photographer: Sara Beth Turner
Everyone else who made this evening so special!

BIRTHDAY TIRAMISU

Serves 12

Coming soon...!


click for recipe & more…
Your two cents...

If you don't have a Google login, please select Name/URL from the "Comment as" list below

Sunday, January 22, 2012

Gluten-Free Blue Cornmeal Waffles

Hello friends! I know it's been awhile since I posted–this month has been a bit crazy juggling a month-long freelance job (with regular office hours!), writing assignments, and normal life stuff (like cooking for 50 for a friend's birthday). Last weekend I snuck away for a much-needed little getaway to Jamaica with my man (will post pictures soon...it was heavenly!). All of this has kept me a tad busy and I find myself having to choose between blogging and, say, showering. Sorry, my sense of hygiene won out this week...


This weekend we got our first snow in NYC (hooray!) and it's been so nice to stay inside and try out some recipe ideas I've been kicking around. It's been awhile since we've had a chill weekend at home with just B, me, and the kitties, so I decided to revive our Saturday brunch tradition and break out the waffle iron (which, for the record, has been one of our favorite wedding gifts). We have one of the round ones, the kind that makes thinner, slightly crisp waffles. I'm not huge on the thick Belgian waffles, but you could still make this recipe with a Belgian waffle-maker if you have one.

Last year, when some friends of ours were cleaning out their pantry before a move, they gave us some gluten-free blue cornmeal pancake and waffle mix. Even though we're not gluten-free, we tried it and loved it. Once it ran out, I wanted to try and recreate my own version from scratch. I found a recipe for
Blue Cornmeal Waffles on Food Network's website which I used a guide, though I substituted regular flour for gluten-free, since we are trying to eat less gluten right now. I also cut back on the sugar and butter, and added some cinnamon (a suggestion from my taste-tester husband).

The result was fantastic. I don't think I've ever seen B more excited about a breakfast before! We both loved the nutty flavor of the blue cornmeal, the buttermilk gave it a tangy taste and a tender consistency, and best of all, you would NEVER know these were gluten-free.

The great thing about this recipe is that it's SO adaptable. If you're not gluten-free, just use regular all-purpose flour in place of the gluten-free flour. If you don't have buttermilk, you can make your own by adding a teaspoon of white vinegar or lemon juice to 1 cup of regular milk. Let it sit for 5 minutes or so, until it curdles, and carry on with the recipe. If you want to make it dairy-free, just substitute a non-dairy milk (almond, rice, or soy) and use vegetable oil instead of the butter. I will say, this will change the taste and consistency some–the buttermilk really makes these waffles out of this world–but they're still good without. And last, if you want to make this totally vegan, follow the dairy-free instructions and use egg substitute for the eggs.

I am so thrilled to have a waffle recipe that is as delicious as it is healthy. (Sure, the side of bacon isn't the healthiest option, but we buy the farm-raised, nitrate-free version...all in moderation!) I love adding fresh berries and sliced bananas to these waffles and a drizzle of maple syrup (or honey). These are definitely a brunch keeper, snow-day or not.

GLUTEN-FREE BLUE CORNMEAL WAFFLES

Makes 6 waffles

3/4 cup organic blue cornmeal
3/4 cup gluten-free all-purpose flour
1/4 teaspoon baking powder
1/4 teaspoon baking soda
1/4 teaspoon salt
1/2 teaspoon cinnamon
1 tablespoon organic sugar
1 cup buttermilk
2 eggs
2 tablespoons melted butter, plus more for brushing griddle

Preheat your waffle maker.

Whisk together the dry ingredients in a medium bowl. Pour the buttermilk into a liquid measuring cup and add the eggs; whisk together until combined. Add the buttermilk mixture into the dry ingredients, along with the butter; whisk until smooth.

Brush your waffle maker with about a teaspoon of butter and add 1/3 cup of batter. Cook about 2 to 3 minutes or until lightly golden (I just wait until my waffle maker's green light comes on, signaling it's done). Serve with butter, maple syrup (or honey) and whatever topping strikes your fancy: berries, sliced bananas, toasted pecans...whatever you like!

If you have a cinnamon grinder (which you can buy in the spice section of the grocery store), grind some cinnamon on top just before eating-that makes it even better!

DAIRY-FREE VERSION: Substitute almond, rice, or soy milk for the buttermilk, and vegetable (or coconut) oil for the butter. If you want to make it totally vegan, use egg substitute in place of the eggs.


click for recipe & more…
Your two cents...

If you don't have a Google login, please select Name/URL from the "Comment as" list below

Wednesday, December 14, 2011

Holiday Gifts: Homemade Mini Loaves


I love this time of year. The trees, the lights, the glittery storefronts, the Christmas music, the parties...in fact, for the month of December, I don't even mind the cold. Everything about this season seems magical–so expectant and filled with hope. But most of all, I love holiday baking. There's just something so cozy about an apartment filled with the smells of cinnamon, ginger, and cloves–and Micheal Bublé crooning Christmas tunes from Pandora. (Brandon doesn't quite agree with the last part, but he thankfully indulges my Christmas fantasy!)

This year, in lieu of store bought gifts, I thought it would be fun to create some homemade treats for friends and family. I have such fond memories as a kid, of my mom's friends popping over during the holidays with homemade goodies: cookies, caramel popcorn, fudge, and mini loaves of bread. Sure, maybe not the healthiest of fare, but I remember how fun it was to get these beautifully wrapped offerings that were made with such love. Why not bring this same holiday tradition into the city?


For my big baking project, I decided to make mini loaves because they are 1) easy 2) really cute and 3) they can be made in a variety of flavors. I pulled out a few of my trusty holiday recipes–delicate cranberry orange bread with walnut streusel topping, and pumpkin chocolate chip (same as my favorite pumpkin spice muffin recipe)–as well as a new one: old-fashioned gingerbread.

Since I didn't have a good recipe for gingerbread, I reached out to some friends for ideas. My friend Emily sent me an old family recipe (thank you!) which I ended up using, with a few tweaks. I substituted the shortening for butter, the white sugar for dark brown, and added a few more spices (extra ginger + some nutmeg). But the end result was just what I was hoping for: super dense, moist, and intensely spicy.


You need just a few things to make your own mini loaves. First, get some nonstick 5 1/2" x 3" x 2 1/4 mini loaf pans. I bought mine at Bed, Bath, and Beyond–a set of four is just $9.99. Next, figure out which recipes you want to make and stock up on your baking ingredients: flour, sugar, spices, eggs, butter, etc. I love Trader Joe's for this...the amount of money I save buying baking ingredients there is absolutely worth the time spent waiting in line. Last, stop by a craft or stationary store and stock up on pretty ribbons and a few gift tags (I used some pre-made ones...you could of course make your own if you're really feeling creative!).


Once you've baked your bread, let them cool completely on a cooling rack before wrapping them. Wrap them carefully in plastic wrap, tie a big 'ol pretty bow around them, and pick out a gift card. So Martha Stewart, yet so simple. The only problem is that so many of the loaves seem to disappear before they actually get wrapped up and given away. Must be the cats again...

CRANBERRY ORANGE BREAD WITH WALNUT STREUSEL

Makes 3 mini loaves

Streusel Topping:
1/2 cup walnuts, finely chopped
1/4 cup brown sugar
1/2 teaspoon cinnamon

Cranberry Orange Bread:
2 cups all-purpose flour
1 1/2 teaspoons baking powder
1/2 teaspoon baking soda
1/2 teaspoon salt
1/2 teaspoon cinnamon
1/4 teaspoon nutmeg
1 1/2 cups fresh cranberries
1 cup granulated sugar
1/4 cup butter (4 tablespoons), softened
1 egg
1 tablespoon grated orange zest
3/4 cup fresh squeezed orange juice

Preheat oven to 350°F. Spray three 5 1/2" x 3" x 2 1/4 mini loaf pans with vegetable oil cooking spray or grease with a little butter or vegetable oil.

Combine the walnuts, brown sugar, and cinnamon in a small bowl for streusel. Set aside.

Whisk together the flour, baking powder, baking soda, salt, cinnamon, and nutmeg in a large bowl. Stir in the (rinsed and dried) cranberries.

In a separate bowl, cream the sugar, butter, and egg with electric beaters. Add the zest and juice, stirring to combine. Slowly add the flour mixture to the orange mixture, stirring to combine.

Scrape the batter (it will be thick) into the prepared pans with a rubber spatula. Sprinkle with streusel topping and place on the center rack of the oven.

Bake on the center rack of the preheated oven for about 35 to 40 minutes or until the streusel topping is nicely browned and a toothpick comes out clean. Let cool on a cooling rack for 15 minutes, then remove from the pans and continue cooling directly on the rack. Or, slice and serve warm with a pot of tea!

OLD-FASHIONED GINGERBREAD

Makes 3 mini loaves

1/2 cup (1 stick) butter, softened
1/2 cup dark brown sugar
1 cup (dark or blackstrap) molasses
1 cup hot water
1 egg, lightly beaten
2 1/2 cups all-purpose flour
1 1/2 teaspoon baking soda
1/2 teaspoon salt
1 1/2 teaspoons ginger
1 teaspoon each cinnamon
1/2 teaspoon ground cloves
1/4 teaspoon ground nutmeg

Preheat oven to 350°F. Spray three 5 1/2" x 3" x 2 1/4 mini loaf pans with vegetable oil cooking spray or grease with a little butter or vegetable oil.

Cream the butter and sugar until light and fluffy; add egg. In a separate bowl, combine the molasses with the water; slowly whisk into the butter mixture.

Add the dry ingredients and beat (or whisk) until smooth.

Scrape the batter into the prepared pans (they'll be about half-full). Bake on the center rack of the preheated oven for 35 to 40 minutes or until a toothpick inserted into the middle of a loaf comes out with a few moist crumbs clinging to it. Let cool on a cooling rack for 15 minutes, then remove from pans and continue cooling directly on the rack. Or, slice and serve warm with homemade whipped cream or lemon curd!

PUMPKIN CHOCOLATE CHIP BREAD

Makes 4 mini loaves

4 eggs
2 cups granulated sugar
1 cup vegetable oil
1 (15-ounce) can pureed pumpkin (NOT pumpkin pie mix)
2 cups all-purpose flour
2 teaspoons baking powder
1 teaspoon baking soda
1/2 teaspoon salt
2 teaspoons cinnamon
1/2 teaspoon ginger
1/4 teaspoon nutmeg
1/4 teaspoon cloves
1 cup semi-sweet chocolate chips
1/2 cup chopped pecans (optional)

Preheat the oven to 350°F. Spray four 5 1/2" x 3" x 2 1/4 mini loaf pans with vegetable oil cooking spray or grease with a little butter or vegetable oil.

Beat the eggs, sugar, oil, and pumpkin in a large bowl until smooth, using a hand-held mixer. In a separate bowl, combine the flour, baking powder, baking soda, salt, cinnamon, ginger, nutmeg, and cloves.

With the mixer on low speed, add half the flour mixture to the pumpkin mixture and mix until almost combined. Add the rest of the flour mixture and mix until smooth. Stir in the chocolate chips.

Scrape the batter into the prepared pans (they'll be about 3/4 full). Bake on the center rack of the preheated oven for 30 to 35 minutes or until the tops are puffed up and lightly browned, and a toothpick inserted in the middle of a loaf comes out clean. Let cool on a cooling rack for 15 minutes, then remove from the pans and continue cooling directly on the rack.


click for recipe & more…

Add a comment!
Your two cents...

If you don't have a Google login, please select Name/URL from the "Comment as" list below

Tuesday, November 29, 2011

Holiday Baking: Nutella Shortbread Brownies


Many years ago, when I was living in Paris and working as a part-time English teacher and part-time nanny, I catered a Christmas party for a Parisian family. The pressure was high, cooking for this group of sophisticated Parisian food-lovers, but I was determined to wow them. Now this crowd, despite the typical French willpower in the face of dessert, loved sweets. In fact, I recall that at least half of the items I made that night contained sugar. They wanted American desserts, so I obliged, with pumpkin cupcakes (and cream-cheese frosting), pecan bars, chocolate chip cookies, and my homage to both France and America, these decadent little Nutella shortbread brownies.

Now the guests at this party may have been a tad skeptical at first, upon hearing about the young American cook, but by the time they had tasted the Nutella brownies, all doubts had turned to bliss. I was swarmed with admirers (of the brownies): "Qu'est-ce que c'est?" (What is it?!) "C'est une reve!" (It's a dream!) "Elles sont magiques... superbes... ravissantes!!" (They're magic... superb... delightful!) I have never heard a more appreciative crowd than these French party-goers post-dessert. Perhaps they were just in a sugar coma (or maybe it was the Champagne talking), but after such an enthusiastic response, I've been making these hazelnut brownie bars ever since.

These are actually inspired by a recipe for Fudgy Brownie Bars I discovered on Epicurious.com years ago. I've changed the recipe a good bit, adding Nutella and vanilla, reducing the sugar by half a cup, and adding in whole roasted hazelnuts. I also swapped out salted butter for unsalted in the shortbread base, and I love the salty-sweet contrast. The result is a crisp shortbread base and a decadent, fudge-like Nutella brownie topping. In other words: heaven!

If there's one thing you bake this holiday season, I'd strongly recommend these show-stoppers. Yes, the butter content is alarmingly high. Yes, they take over 30 minutes to make. And yes, they probably have a zillion calories. But you will be hard pressed to find a more crowd-pleasing confection. Cut them into bite-size pieces for a party, or make a batch and freeze half for a snowy day. They also make fabulous holiday hostess gifts, packaged in a cellophane bag and tied with a pretty ribbon. Happy baking!

NUTELLA SHORTBREAD BROWNIES

Makes 24 bars

Salted Butter Shortbread:
2 cups all-purpose flour
1/2 cup light brown sugar
1/2 teaspoon salt
12 tablespoons salted butter, cut into small pieces

Hazelnut Nutella Brownies:

1 cup (2 sticks) unsalted butter
8 ounces bittersweet chocolate
1 cup sugar
4 eggs
1 teaspoon vanilla
1/4 cup Nutella
3/4 cup flour
1/2 teaspoon salt
1/2 cup whole roasted hazelnuts, skins removed•

Preheat the oven to 350°F.

For the Salted Butter Shortbread:
Combine the flour, brown sugar, and salt in bowl of a food processor and pulse a few times to combine. Add the butter and pulse until the mixture is full of pea-size lumps. (If you don't have a food processor, just combine the mixture in a bowl. Using a fork and knife, cut the butter into the flour to create pea-size lumps. Or just use your fingers!)

Sprinkle the mixture into an ungreased 13"x9"x2" baking pan; press the mixture evenly into the pan with your hands (or a metal spatula). Place in the oven and bake on the middle rack for 20 minutes, or until golden. Remove from the oven and let cool slightly while making the brownie layer. Keep the oven set to 350°F.

For the Hazelnut Nutella Brownies: Melt the butter and the chocolate in a medium saucepan over low heat, stirring constantly. Remove from the heat and let cool slightly.

Pour the mixture into a large mixing bowl. Add the sugar and beat well with electric beaters (or a whisk). Add the eggs, one at a time, beating until thoroughly combined. Add the vanilla and the Nutella and continue beating.

Stir in the flour and the salt, until no streaks remain. Stir in the hazelnuts. Pour the mixture over the shortbread base and smooth the surface with a spatula.

Bake on the middle rack for 35 to 40 minutes or until a toothpick comes out with moist crumbs attached. (The middle of the brownies may crack a bit–this is normal.) Cool completely on a cooling rack before slicing.

TO CUT: Using a sharp knife, cut around the edges of the brownies to loosen them from the pan. Using one hand on the bottom of the pan and one hand on the brownies, carefully flip the pan upside down onto a cutting board. Tap the pan a few times, then remove it–the brownies should be shortbread-side up on the cutting board.

Flip them over so the shortbread side is on the cutting board and the brownies are on top. Dip a sharp knife into hot water and carefully cut the brownies into 24 bars (cleaning the knife and re-dipping it into the water between cuts). It's important to have a sharp knife for this process to cut through the hazelnuts!

Store the brownies in an airtight container at room temperature for up to 5 days (or freeze).

*To roast the hazelnuts, place them on a baking sheet and roast them in a 350°F oven for 5 to 7 minutes or until lightly browned and the skins are beginning to split. Dump the hazelnuts into a bowl and using a kitchen towel (so you don't burn your fingers!), rub the skins off and discard them.


click for recipe & more…
Your two cents...

If you don't have a Google login, please select Name/URL from the "Comment as" list below

Thursday, November 10, 2011

Cranberry Orange Scones with Toasted Pecans

In general I'm a pretty healthy eater. I mean, I have delicata squash roasting in the oven right now to go in a kale salad. I try and eat my veggies every day, I do yoga, and run a couple times a week if I'm lucky. But I have a weakness for baked goods. And you know what, I'm OK with it! All part of a balanced diet, right? Back when I worked in an office, the sweets craving hit every afternoon between 3 and 4 p.m. I'd run out for a much-needed coffee (or tea) and something sweet. I'd usually head to Starbucks or Le Pain Quotidien (the two closest options), but I'd always be disappointed with their baked goods–they were always too big, too sweet, and sort of stale.


Now that I work from home, when my sweets craving hits I usually just bake something. This is great because I can use fresh ingredients and tweak the recipe to make it a bit healthier. But it's also dangerous, since there are just two of us here and I really don't want us to polish off whole batches of sweets! I try and bake on days when I'm meeting up with friends or have people coming over. Otherwise I just freeze half the recipe.

The other day I picked up a bag of fresh cranberries at the store (hooray for cranberry season!) and when the sweets craving hit, I was ready for it. I decided to make some cranberry orange scones with toasted pecans. It's funny that I even like cranberry orange scones, because as a kid I remember my mom serving them for breakfast one morning and I HATED them. After taking one bite of a scone, I scrunched up my face and refused to eat any more. So, she pulled the typical parent response: "Well you're not leaving the table until you finish your scone." And being the very strong-willed child that I was, I sat there for at least 3 hours until I finally got so bored and frustrated that I stuffed the scone in my mouth (I probably swallowed it whole) and got down from the table. Needless to say she never made those again!


As an adult, however, I'm a huge fan of anything cranberry orange: bread, coffee cake, scones, muffins...I just love the way the citrus compliments the tart cranberries. I found an old Gourmet recipe for cranberry lemon scones and adapted it to create the version below. The key with scones is not to overwork the dough. In this recipe, you pulse the butter into the dry ingredients in a food processor (you could use a fork and knife if you don't have a processor) then transfer everything to a bowl to add the cream and eggs. Combine the ingredients just until everything holds together, then dump the dough onto a floured surface. The dough will be really sticky at first, so flour your hands, and keep sprinkling the dough with flour. You'll shape it into two 8-inch rounds that look like this:


At this point you have a choice: you can either make triangle scones (by cutting each round into 8 triangles) or round ones (by using a floured biscuit-cutter). I actually made round ones out of half the dough, cut the other half in triangles, and froze it for another day. (You can put frozen scones directly in the oven to bake–no thawing necessary!) Arrange your scones on a parchment-lined baking sheet, brush with cream and sprinkle with sugar. After 15 minutes or so, start boiling the water for tea. Because there's no better pairing than a warm scone and a cup of Early Grey.


CRANBERRY ORANGE SCONES

Makes 20 round scones (or 16 triangle ones)

2 1/2 cups all-purpose flour
5 tablespoons sugar, divided
1 tablespoon baking powder
1/2 teaspoon salt
1 tablespoon grated orange zest
6 tablespoons unsalted butter
1 cup fresh cranberries, chopped
1/4 cup chopped pecans (toasted)
1 egg + 1 yolk
1 cup heavy cream + additional for brushing
Turbinado sugar for sprinkling

Preheat the oven to 400°F. Line two sheet trays with parchment paper.

Pulse the flour, 3 tablespoons of sugar, baking powder, salt, and zest in a food processor a few times to combine. Add the butter and pulse until the mixture resembles course meal.

Transfer to a large bowl. Toss the cranberries in the remaining 2 tablespoons of sugar. Add the sugared cranberries and pecans to the flour mixture, stirring to combine.

In a smaller bowl, whisk together the egg, egg yolk, and cream. Add the cream mixture to the dry ingredients and stir until just combined.

Turn the dough onto a floured surface and sprinkle with additional flour. Knead the dough (it will be sticky!) a couple of times with floured hands. (Do NOT overwork the dough! The less you handle it, the more tender the scones will be.)

Divide the dough into two roughly 8-inch circles (the dough will be about 1 1/2 to 2 inches thick). At this point you can do one of two things:

Option 1: With a sharp knife (dipped in flour), cut each dough circle into 8 triangles.

Option 2: Using a 2-inch biscuit cutter (dipped in flour), stamp out about 7 or 8 rounds into each circle. Roll the scraps together and stamp out additional rounds. You should have about 20 scones.

Place the scones on the parchment lined trays about one inch apart. Brush the tops with a bit of cream and sprinkle with turbinado sugar (if you don't have turbinado sugar, just use regular granulated sugar).

Bake for 15 to 20 minutes or until a pale golden color. Let cool on a cooling rack for 10 minutes.

Serve with butter and jam and a cup of tea!


click for recipe & more…
Your two cents...

If you don't have a Google login, please select Name/URL from the "Comment as" list below

Friday, November 4, 2011

Pumpkin Spice Pancakes for a Lazy Saturday (or Sunday)


I LOVE weekend mornings. Despite the fact that I work from home, weekday mornings are still early and a bit chaotic, with Brandon rushing off to work, and me stumbling around making coffee and plopping in front of the computer. But Saturdays and Sundays are different. Lazy. Luxurious. No alarms, no agenda, and (usually) nowhere to be. On weekend mornings, we wake up when we want, and while making that first cup of coffee I start thinking about what to make for breakfast. Monday through Friday, breakfast usually consists of toast and yogurt, but Saturdays and Sundays the possibilities are limitless. Pancakes, waffles, French toast, bacon, omelettes, muffins, crepes, fruit salad...the list goes on and on. I'm on a total pumpkin kick right now, so the other day I decided to make pumpkin pancakes.

Typically, I love buttermilk pancakes–they're tangier and lighter than pancakes made with regular milk (and frankly, they just taste better). So I decided to find a pancake recipe with buttermilk AND pumpkin. I did a little research and found a recipe that I proceeded (per usual) to play around with. I replaced some of the all-purpose flour with whole wheat flour. I added a few extra spices and used butter instead of oil. I reduced the sugar a bit. In the end, the pancakes were light and tangy, with a great pumpkin spice flavor that tasted like fall. They're delicious with butter and warm maple syrup, or if you really want to go all out, you can add some roasted apples or toasted pecans.


Given that it's Friday, I'm already thinking about tomorrow morning–and pumpkin pancakes are definitely in the picture. Along with some bacon and plenty of coffee (and a stack of magazines I have every intention to read). Topped off with two highly energetic cats darting around the apartment. That's our typical Saturday morning. What about you?


PUMPKIN SPICE PANCAKES

Makes 8 to 10 pancakes

3/4 cup all-purpose flour
1/2 cup whole wheat flour
2 tablespoons sugar
2 teaspoons baking powder
1/2 teaspoon baking soda
1/2 teaspoon sea salt
1 teaspoon cinnamon
1/4 teaspoon nutmeg
1/4 teaspoon ginger
1/4 teaspoon cloves
1 cup buttermilk*
1 egg
1/2 cup pumpkin puree (NOT pumpkin pie mix)
2 tablespoons melted butter**, plus more for the griddle

In a medium-sized bowl, whisk together the flour(s), sugar, baking powder, baking soda, salt, and spices. In a separate bowl, whisk together the buttermilk, egg, pumpkin puree, and melted butter until smooth.

Whisk the dry ingredients into the pumpkin mixture until just combined. Let sit for five minutes.

Heat a non-stick pan or griddle over medium-high heat and brush with melted butter. Drop 1/3-cupfuls of batter onto the hot griddle and let cook until bubbles form on the surface of the pancakes.

Flip the pancakes with a heatproof spatula and let cook for another couple of minutes, until golden brown on both sides and cooked through.

Serve them as soon as they come off the griddle, with butter, warm maple syrup, and a couple slices of bacon. (Roasted apples, toasted pecans–or both!–would also be DELICIOUS with this recipe.) You can also keep the first batch warm in a 250°F oven as you finish making the rest.

*If you don't have buttermilk, you can use this easy substitution: Place 1 tablespoon of white vinegar or lemon juice in a liquid measuring cup. Pour in enough milk to reach the 1-cup mark. Let the mixture sit for 5 minutes until it is beginning to curdle. It's ready to use!

**Feel free to substitute the butter for canola oil.


click for recipe & more…
Your two cents...

If you don't have a Google login, please select Name/URL from the "Comment as" list below

Tuesday, October 18, 2011

Perfect Chocolate Chip Cookies

I'm a firm believer that the simple pleasures in life are the most satisfying, and a warm chocolate chip cookie (preferably with a glass of ice-cold milk) has to be one of life's greatest simple pleasures.


As a great lover of chocolate chip cookies, I am always amazed by the lack of good cookies, even in New York City. I've sampled many a bakery cookie and have been sorely disappointed. Generally speaking, it's because they are stale or too tough, but partly because I like homemade cookies so much that it annoys me to pay $3.00 (or more) for a cookie that's just average!

Thus, I've been experimenting for quite some time to develop what I believe to be the perfect chocolate chip cookie. Of course, this is all dependent on what you are looking for. I want a cookie that is crisp on the outside, gooey on the inside, with plenty of chocolate chips and walnuts. (Nuts in chocolate chip cookies are controversial I know, but I adore the extra flavor and texture they add. Brandon, another cookie junkie, refuses to eat chocolate chip cookies with nuts. Tant pis. You can certainly eliminate them from the recipe, or substitute pecans for walnuts.) I like the flavor to be rich—tasting of butter, brown sugar, and vanilla—with a slightly salty aftertaste. Just a hint, though—too much salt can ruin a cookie (as I've learned from experience).

My cookies were inspired years ago by a recipe I found in
The Best Recipe, Cook’s Illustrated's cookbook. I love that they experiment and experiment until they get their desired result, and then explain WHY it turned out the way it did. Their recipe calls for one egg and one egg yolk, a trick that gives the cookie a richer flavor and a denser texture. They also call for more brown sugar than white, which gives a warmer, rounder sweetness than the brightness of white sugar. Over the years, I've continued to adapt the recipe to my taste. Sometimes I like using dark brown sugar or crunchy Demerara sugar to add extra depth of flavor. I add more vanilla than most recipes call for and as I mentioned above, a combination of salted and unsalted butter.

Most importantly, however, is what you do with the dough after you make it (besides eating it by the spoonful!). Chilling the dough for an hour or so allows it to set up (meaning it scoops easier) and cools the butter so the dough doesn’t spread on the cookie sheet. Ultimately, this step makes a cookie that is gooey on the inside and crisp on the outside: just what I love. Best of all, I’ve made these cookies so many times now that I don’t even need a recipe—I just make them from memory. So with no further ado, I present you with MY version of the Perfect Chocolate Chip Cookie.

PERFECT CHOCOLATE CHIP COOKIES

Makes about 3 dozen cookies

1 stick unsalted butter
1 stick salted butter
1 cup light brown sugar, packed
1/2 cup sugar
1 egg
1 egg yolk
1 Tablespoon vanilla
2 1/4 cups all-purpose flour
1 teaspoon baking soda
1/2 teaspoon sea salt
1 16-ounce package bittersweet (or semi-sweet) chocolate chips
1/2 cups chopped walnuts (optional)

Soften the butter in the microwave (or on the stove top) until nearly melted, about 1 minute. Let cool slightly. Cream the butter and sugars with an electric mixer until blended. Add the egg and the yolk, mixing well. Add the vanilla and mix well. In a separate small bowl, combine the flour, baking soda, and salt. Add the dry ingredients to the butter mixture and beat until no flour streaks remain. Stir in the chocolate chips and walnuts.

Cover the dough with saran wrap and place in the refrigerator for at least 1 hour.

Preheat the oven to 350 degrees F.

Drop tablespoonfuls of dough on an ungreased cookie sheet (about 2 inches apart) and place in the oven. Bake for 11 minutes for soft cookies or 13 for crisp ones. The cookies should be slightly brown and puffy. Let the cookies sit on the cookie sheet for 10 minutes to cool before removing to a cooling rack or a plate. Eat one (or two or three) warm with a glass of ice cold milk. Life doesn't get much better than this!


Your two cents...

If you don't have a Google login, please select Name/URL from the "Comment as" list below

Monday, October 10, 2011

Harvest Pumpkin Muffins

After a gorgeous weekend of blue skies and hot, sunny days, I feel a bit thrown off. Is it fall, or are we heading back into summer? I'm not complaining–this is certainly preferable to the bone-chilling winter ahead–but it sort of makes it difficult to get excited about hearty stews when it's 80 degrees outside. (Not to mention the weirdness of wearing flip flops and sundresses in October!) But one thing assures me that it is decidedly is fall: I've got pumpkin on the brain.


About this time every year–when pumpkins start popping up in the market, cans of it appear in the grocery store, and Starbucks starts serving their pumpkin lattes–the craving hits. Every day I wake up and nothing sounds quite as good as a warm pumpkin muffin and a steaming cup of coffee. Over the past week, I searched my neighborhood in vain for some homemade pumpkin goodies and, finding none, decided just to make my own. (The sweet smells of pumpkin, cinnamon, ginger, and nutmeg wafting from the oven were just an added bonus.)

The bad thing about this craving is that it doesn't go away after October. It sticks around long into the winter. As long as the weather is cool and there is canned pumpkin available in the grocery stores, I am game for a pumpkin baking project. Years ago I set out to find the perfect recipe for a pumpkin layer cake. I wanted a cake that was tender yet resilient, moist, flavorful–full of spices and studded with nuts–and slathered in tangy cream cheese frosting.

The recipe that did the trick (and has since become my standby) was from...drum roll please...Betty Crocker! (And no, it does not involve a cake mix.) Her Harvest Pumpkin Spice Bars not only met every single one of my criteria, but the recipe is extremely versatile. I have tweaked the recipe over the years (taken the sugar down a bit, added some spices, and played around with adding things like chocolate chips and cranberries) and have discovered that it works equally well as layer cake, bundt cake, muffins (or cupcakes, depending on whether you use frosting), or loaf bread.

Yesterday I decided to make muffins and a loaf of bread–the recipe below makes enough batter for two dozen muffins or one dozen muffins + one loaf pan. Making both muffins and bread is nice, because you can either eat the warm muffins and give the loaf away, or vice versa. The bread freezes really well, so if you prefer not to eat it all in one sitting (which I do not recommend!), wrap up the loaf as soon as it cools and stash it away in the freezer for a future unorthodox pumpkin craving.

PUMPKIN SPICE MUFFINS (AND BREAD)

Makes 12 muffins and 1 9x5" loaf of bread (or 24 muffins, or 2 9x5" loaves)

(Scroll down for the Madeleine Variation)

4 eggs
1 3/4 cups granulated sugar
1 cup vegetable oil
1 (15-ounce) can pureed pumpkin (NOT pumpkin pie mix)
2 cups all-purpose flour
2 tsp baking powder
1 tsp baking soda
1/2 tsp salt
2 tsp cinnamon
1/2 tsp ginger
1/4 tsp nutmeg
1/4 tsp cloves
1 cup golden raisins*
1/2 cup chopped walnuts (optional)

Preheat the oven to 350 degrees F. Grease a 12-cup muffin tin and a 9x5" loaf pan.

Beat the eggs, sugar, oil, and pumpkin in a large bowl until smooth, using a hand-held mixer. In a separate bowl, combine the flour, baking powder, baking soda, salt, cinnamon, ginger, nutmeg, and cloves.

With the mixer on low speed, add half the flour mixture to the pumpkin mixture and mix until almost combine. Add the rest of the flour mixture and mix until smooth. Stir in the raisins and the walnuts.

Fill the muffin cups 3/4 full and pour the remaining batter into the loaf pan. Place the muffins and the loaf pan on the center rack in the preheated oven.

Bake the muffins for about 20-25 minutes or until the tops are puffed up and a toothpick comes out clean. Leave the bread in the oven for an additional 35-40 minutes or until the top has risen and is lightly browned and a toothpick inserted into the middle comes out clean.

For both the muffins and the bread, let cool for 5-10 minutes in the pan, then turn out onto a cooling rack to continue cooling.

*Try substituting the golden raisins for dried cranberries or chocolate chips!

VARIATION: Pumpkin Madeleines – Make the batter without the raisins or walnuts. Place heaping tablespoons (probably more like 2 tablespoons for each) in a greased madeleine tin. Bake for 10 to 12 minutes until puffed up and a toothpick inserted into the center of one comes out clean. Cool for a few minutes in the tin, then turn out onto a cooling rack to finish cooling. Dust with powdered sugar before serving. (Makes about 48 madeleines)


click for recipe & more…

Add a comment!
Your two cents...

If you don't have a Google login, please select Name/URL from the "Comment as" list below

Wednesday, September 21, 2011

The Best Nutella Crêpe Recipe

On a gray day like this, I get nostalgic for Paris. There are so many things I love about that beautiful city, and admittedly, many of them are food-related. A perfectly ripe apricot at a summertime market. A flaky croissant from Poujauran. A still-warm baguette l'ancien from Jean Millet (well worth the wait in line). A glass of bubbly on the terrace at Le Fumoir. A whimsically flavored–and perfectly executed–macaron from Pierre Hermé. Perhaps my favorite thing of all, however, is a 3 Euro takeout treat found all over Paris: a piping hot crêpe oozing with Nutella.


After extensive taste-testing, however, I have realized that a crêpe is not a crêpe. There are the crêpes that are too dry, too soggy, that skimp on the Nutella, or–worst of all–the crêpes that are made in advance and and sit in a limp pile for hours, merely reheated when you order. I've found perfection only once, in a nondescript spot on the Boulevard St. Germain, near Cluny. I stumbled upon Crépuscule many years ago while studying at the Sorbonne–one perfectly browned Nutella-filled crêpe from their takeout window was all it took for me to fall hopelessly in love.

A couple of things set their crêpes apart: 1) they brown their crêpes just long enough for them to remain slightly crisp on the outside. Being a sucker for texture, I love the contrast between the crisp exterior and the creamy hazelnut filling. 2) They have a secret ingredient in their batter: sucre vanille. These little packets of vanilla sugar are sold all over France and are often used in baked goods, giving it an extra vanilla boost. I've bought vanilla sugar in France to make the recipe at home, but if you can't find it, you can substitute vanilla extract. 3) They have achieved the perfect Nutella-to-crêpe ratio. As in, they smooth the Nutella evenly over half the crêpe, so you get an equal spread of Nutella on every single bite. Heaven.

I continue to return to my favorite spot every time I return to Paris, and the crêpes are always just as good. Nutella is clearly my favorite filling, but they also have other delicious options: lemon and sugar, rich chocolate sauce, or butter and jam. And on the savory side, they've got all manner of hearty gallettes, the traditional Breton pancakes made with buckwheat flour. Ham, cheese, and egg is a classic, but I love their goat cheese and spinach gallette for a light lunch.

Even if you never come to Paris, crêpes are amazingly easy–and cheap–to make at home. You just need a flat-bottomed crêpe pan (ideally) or a thin-bottomed non-stick skillet (you can get one for less that $20
here). There are special wooden sticks sold in France to flip your crêpes, but you can just use a nonstick spatula. (Or, of you get really good, you can flip them in the air like the pros). The key when making crêpes is to blend the batter really well so there are no lumps (a blender is great for this), to let it sit in the fridge an hour before cooking, and to learn the proper pan rotation so the batter spreads thinly and evenly. This will all take a bit of practice, but after you've tried it a time or two, you'll be hooked.


Crêpes are great party food–make a stack as people arrive and lay out a variety of toppings so everyone can assemble their own dessert. Your friends will definitely be impressed that you made them from scratch! Though the recipe below is for dessert crepes, be sure to try my recipe for buckwheat galettes
so you can experiment with savory fillings as well. Bon appetit!

SWEET CRÊPE BATTER

Makes about 20 crêpes

2 eggs
1 cup milk
1/4 cup water
2 teaspoons vanilla
1 cup all-purpose flour
2 tablespoons sugar
2 tablespoons melted butter, plus more for pan

If you are in need of a crêpe pan, you can get one on the cheap here. My favorite spatula is from Krampouz and will run you about $15, available here.

Place all the ingredients in a blender and blend until smooth. If you don't have a blender, whisk the eggs, milk, water, and vanilla together in a bowl until smooth. Add the flour and sugar and whisk to combine. Whisk in 2 tablespoons of the melted butter. Strain the batter into another bowl. Cover with plastic wrap and place in the refrigerator for at least an hour to allow all the air bubbles to settle.

Heat a small crêpe pan (or nonstick skillet) over medium high heat. Swirl 1 teaspoon of butter in the pan and add a small amount of batter to the pan–swirl the pan so that the batter evenly and thinly coats the bottom. Cook for about 30 seconds (until lightly browned) and flip. Cook for another 10-15 seconds and remove to a plate. Continue cooking the rest of the batter, adding additional butter every third crêpe or so. Place the crêpes on a sheet tray, cover with aluminum foil, and keep warm in a 225 degree F oven until ready to serve. (NOTE: They taste best right out of the pan, so don't let them sit too long in the oven!)

To serve: Spread each crêpe with your desired topping: Nutella, warm chocolate sauce, jam, butter and sugar, lemon, etc. and then fold in half, then into fourths, like a napkin. Dust with powdered sugar and serve warm.


Your two cents...

If you don't have a Google login, please select Name/URL from the "Comment as" list below

Saturday, August 27, 2011

Blueberry Streusel Coffee Cake


As much as I love a good dessert, I can usually take it or leave it at the end of a meal. Another glass of wine is dessert for me! But breakfast is an entirely different matter. First thing in the morning, I need something sweet with my coffee. Until I've satiated this craving, I can't even look at eggs, bacon, or anything savory. Usually toast and jam does the trick, but sometimes I get a hankering for something homemade...a muffin, a scone, or best of all, a warm piece of coffee cake.

There's nothing quite like a cinnamon-scented coffee cake (with plenty of crumbly topping) to get your morning off to a good start. Preferably one with blueberries and walnuts. With some sour cream to give it tang. And maybe a little lemon zest for good measure. (Well that's at least how I like it!)

I got a new bundt pan as a wedding gift, so I decided to use it to make a coffee cake for a brunch I was hosting. I love Barefoot Contessa's streusel-swirled sour cream coffee cake, but I really wanted to make one with blueberries and a bit of lemon zest. So I adapted her recipe a bit to add the aforementioned ingredients and the result was terrific. Post-brunch, I blissfully enjoyed a slice (or two) every morning (and afternoon) for a few days until I finally had to remove the cake from my sight (and into the trash) lest I polish the rest off! A dangerous prospect.

BLUEBERRY STREUSEL COFFEE CAKE

Serves 12

Cake
2 cups fresh blueberries
1 tablespoon flour
12 tablespoons (1 1/2 sticks) unsalted butter at room temperature
1 1/2 cups granulated sugar
3 large eggs at room temperature
1 1/4 cups sour cream
1 1/2 teaspoons vanilla
1 teaspoon grated lemon zest
2 1/4 cups all-purpose flour
1/4 cup cornstarch
2 teaspoons baking powder
1/2 teaspoon baking soda
1/2 teaspoon salt
2 cups blueberries (fresh not frozen)


Streusel
3/4 cup light brown sugar
1/2 cup all-purpose flour
1 1/2 teaspoons cinnamon
1/4 teaspoon salt
3 tablespoons unsalted butter, cut into pieces
3/4 cup chopped walnuts (optional)

Preheat the oven to 350 degrees. Butter and flour a 10-inch bundt (or tube) pan.

Toss the blueberries in one tablespoon of flour; set aside.

Cream the butter and sugar together in the bowl of a stand mixer or in a large bowl with a handheld mixer for 4 to 5 minutes, until pale yellow. Add the eggs one at a time, beating between each addition, then add the sour cream, vanilla, and lemon zest.

In a separate bowl sift together the remaining flour, cornstarch, baking powder, baking soda, and salt until combined. With the mixer on low, add the flour mixture gradually to the batter until just combined. Stir in the flour-coated blueberries gently with a spatula, scraping the sides to incorporate all the batter.

For the streusel, place the brown sugar, flour, cinnamon, salt, and butter in a bowl and pinch together with your fingers until it forms a crumble. Mix in the walnuts, if desired.

Evenly sprinkle about 3/4 cup streusel mixture over the bottom of the pan. Spoon half the batter into the pan over the streusel; smooth with a spatula. Sprinkle another 3/4 cup of streusel over the batter. Spoon the remaining batter into the pan, spreading it out with a spatula. (You may have leftover streusel--I did. Just put it in an airtight plastic container and keep in the refrigerator for future baking projects! It keeps for a week to 10 days.)

Bake for 60 to 70 minutes or until a cake tester comes out clean.

Let cool in the pan on a wire rack for at least 30 minutes. Using a long thin spatula, carefully remove the cake from the pan and place streusel-side up on a serving platter. Just be careful not to trip and drop the cake on the table, like I did. It will make quite a mess, but will still taste just as good :)

Enjoy!


click for recipe & more…

Add a comment!
Your two cents...

If you don't have a Google login, please select Name/URL from the "Comment as" list below

Thursday, August 18, 2011

My new blender obsession...

I'm married to a non-cook. Which works out just fine, since I clearly love cooking. Though I'm not sure he had ever used them, Brandon did bring two appliances into the marriage: a panini-maker (which will get its own post eventually) and a blender. And not just any blender, but one of those high-powered, ice-crushing types, that can make everything from soups to smoothies to–my personal favorite–frozen margaritas. Up until last week, the poor machine was languishing on the counter, gathering dust, while its fellow electronic neighbors–the hot water pot and the toaster–got daily love. It just wasn't fair. And then, suddenly, everything changed.


Over the past week, I've started using the blender. A lot. This all came about as a result of the fact that Brandon can't drink for the rest of the summer (poor guy), so I decided to start getting creative with some non-alcoholic fruit drinks. (Some people call them mocktails, but I really hate that name.) I was inspired by an amazingly refreshing watermelon lime agua fresca I tried recently in Nashville at Mas Tacos. On a 100-degree day, it was quite frankly, the best thing I could imagine at that moment. Owner Teresa Mason shared her simple recipe with me, which was literally: blend watermelon and lime, add ice, let sit. Easy! I decided to go home and give it a try.

So off came the lid of the blender (along with a cloud of dust), and in went the watermelon chunks and the lime juice. And with the flip of a switch, I had a brilliantly red watermelon puree. I added some ice, but being too impatient to let it sit like a true agua fresca, I blended it again to crush the ice. It was delicious–sort of like a watermelon icee, with a twist of lime.

So that experiment led to more experiments. Like a fantastic yellow tomato gazpacho (recipe to come soon) and a frozen strawberry limeade with mint (pictured below). The strawberry limeade would actually make a killer cocktail with a little tequila or white rum, but in its present form, it is pretty close to perfect. The combo of strawberries, lime, and mint is not only gorgeous to behold, but the flavors–sweet, tart, and herbal–compliment each other beautifully. If you have a dusty blender, pull it out and give this a whirl (pun intended!)–it will only take five minutes, and you'll want to make it again and again.


STRAWBERRY LIMEADE WITH MINT

Serves 2

2 cups strawberries, hulled and halved
Juice of 2 limes
Juice of 1/2 orange
1 tablespoon sugar (you can omit or adjust to your taste)
1/4 cup chopped mint
A handful of ice

Blend until smooth.  Enjoy with a lime wedge on a swampy summer day.


click for recipe & more…

Add a comment!
Your two cents...

If you don't have a Google login, please select Name/URL from the "Comment as" list below