Showing posts with label parties. Show all posts

Tuesday, February 28, 2012

Yellow Table Storytelling Dinner #2

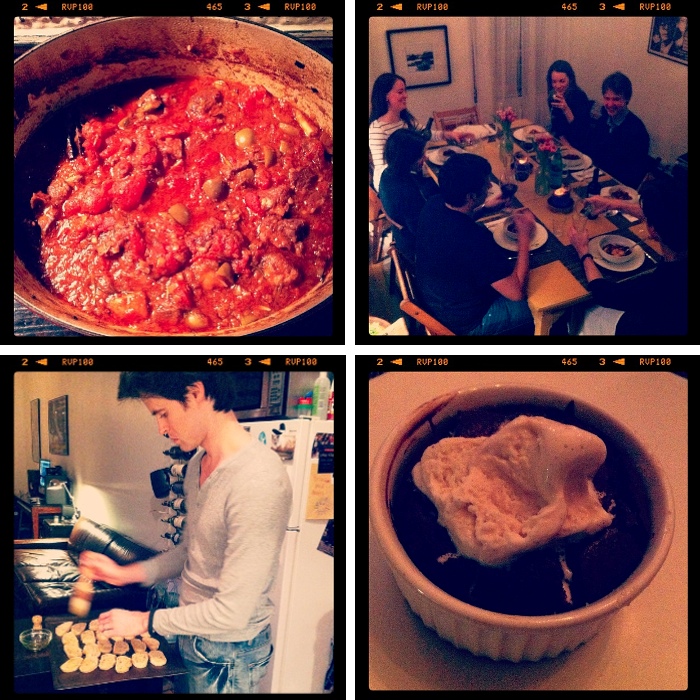
This past weekend we hosted our second official storytelling dinner around the yellow table, and what a fun night it was! Our last one was back in the fall, and though we've had a few dinners in between, we hadn't had a proper storytelling night since. If you're new to The Yellow Table, you may be wondering "What is a storytelling dinner?" Well I'm so glad you asked. Our storytelling dinners (inspired by a Moth event I attended last fall) consist of friends (both new and old), sitting around the table, eating good food, drinking wine, and sharing stories. Basically, it's what I hope heaven will be like!


The original storytelling night, our topic was "Firsts," with stories ranging from crazy blind dates to biking accidents and police busts to a creepy ghost-spotting in an abandoned hotel. Everyone had a ball – it was so fun to see a group that only marginally knew each other (and some, not at all), linger over the dinner table well after midnight laughing and talking like old friends. This time, our theme was "Travel" and we heard stories of couch-surfing in Siberia, busking through Italy, and a near lion attack in South Africa. Again, the stories spiraled and we all lingered at the table long past dessert.

I really believe in the power of storytelling to connect and inspire – just think, it's what people sat around and did for thousands of years before there was television or Internet! It's funny, though, how people feel a little uncomfortable with the idea at first. We've all got stories to tell, and though we can post our thoughts and whereabouts on Facebook and Twitter all day long, telling a story with a beginning, middle, and end to a live audience (rather than a virtual one) seems a rather intimidating task. Which is exactly why I think little practice never hurt–especially when everyone ends up having fun in the process!

As for the food, since it was a cool, rainy night, I wanted to make something warm and comforting, preferably a stew that could simmer for hours in my Le Creuset dutch oven while I worked on the other dishes. I finally settled on Melissa Clark's fragrant Braised Pork Shoulder with Tomatoes, Cinnamon, and Olives over Polenta from her newest cookbook Cook This Now. Melissa is pretty much my culinary idol – I love her straightforward, seasonal recipes and her wonderful writing that somehow manages to be both authoritative and chatty all at once. I basically want to go hang out in her kitchen and cook with her after reading any of her recipes. Per usual, this one did not disappoint. The intriguing blend of flavors – sweet canned tomatoes and cinnamon, salty anchovies and olives, dry red wine, and a few sprigs of rosemary – melded together to create a braised pork that was meltingly tender and almost tagine-like in taste.

I served goat cheese crostini with kumquat chutney for starters (since I have all this chutney lying around!), and a nice light arugula, fennel, and orange salad as a palate cleanser after the pork stew. And last, but not least, at the request of my husband – who as the birthday boy got to choose his dessert – I made Bittersweet Chocolate Pudding Cakes inspired by a recipe I found in the New York Times. I made the recipe gluten free and used 60% Bittersweet Valrhona chocolate. The result was decadent. B got a candle in his cake and we ended the night singing happy birthday to him.

I hope you feel inspired to host your own storytelling dinner, and if you do, I'd love to hear about it! My sister hosted one in D.C. and her friends loved it – it would be fun to see the idea spread! But in the meantime, I'm collecting dinner party stories for a future post about your experiences...the good, the bad, and the hysterical. Feel free to comment below or send me an email at annawatsoncarl@gmail.com. Can't wait to hear from you!

February Storytelling Dinner Menu

Goat Cheese Crostini with Kumquat Chutney

Braised Pork Shoulder with Tomatoes, Cinnamon, and Olives with Polenta

Arugula, Fennel, and Oranges with White Balsamic Vinaigrette

Bittersweet Chocolate Pudding Cakes with Vanilla Gelato (recipe below)

BITTERSWEET CHOCOLATE PUDDING CAKES

Serves 4

Adapted from New York Time's Diner's Journal February 12, 2009

1/2 cup unsalted butter, plus more to butter the molds
4 ounces bittersweet chocolate (preferably Valrhona), cut into small pieces
2 eggs
2 egg yolks
1/4 cup sugar, plus more for sprinkling

Preheat the oven to 450°F. Butter four 4-inch ramekins and sprinkle each with a bit of sugar; place them on a sheet tray.

In a small, heavy saucepan, melt the butter over low heat. Add the chocolate and whisk constantly until the chocolate begins to melt. Remove from heat and continue whisking until the chocolate is completely melted. Let cool slightly.

In a medium bowl, whisk together the eggs and egg yolks with the sugar until light and fluffy. Slowly pour the melted chocolate and butter into the eggs, whisking constantly. (You can use electric beaters or a stand mixer if you prefer).

Pour the mixture into the ramekins and bake for about 8 minutes or until the center is beginning to set. The tops will puff up slightly like souffles but the centers will be deliciously soft and gooey. Cut a small hole in the top of each one and add a scoop of vanilla ice cream or gelato. Serve immediately in the ramekins, on small dessert plates. (Be careful, they are hot!!)

MAKE AHEAD: You can make the batter and fill the ramekins several hours ahead. Cover with plastic wrap and refrigerate until ready to use. Bring to room temperature before baking.

Add a comment!
Your two cents...

If you don't have a Google login, please select Name/URL from the "Comment as" list below

Friday, February 3, 2012

A Night to Remember...


The smile says it all.

When 12 friends crowd into a tiny NYC apartment to celebrate the birthday of a dear friend, to squeeze onto couches and borrowed chairs and share a meal around a beautiful table (that you’d never guess had been found, discarded on the street that day), with story-telling and laughter and much toasting, something magical happens. It’s as though time is suspended. You get a glimpse of something bigger than this life – a hint of how things should be, a taste of what we long for. Through the candlelit glow, smiles seems brighter, friendships deeper, and though you may not even remember what you ate the next day, that night you could swear it was the best thing you had ever tasted. We need more of these evenings. These are the sweet times. The birthday girl summed it up best:

“I was given the rare and beautiful gift of knowing just how precious a moment is when you are right in the middle of it. Many, many times throughout the evening, I looked around the table with amazement. My life, just as it is, is one I love. The gifts before me – dear friends, good food, and abundant laughter – were more than enough. My cup overflows.”


This fabulous and festive occasion – which I had the privilege of being a part of – was the 30th birthday of my lovely friend Rachel Carter. The party took place at her apartment last weekend and between her beautiful "Winter White Theme" (check out her table decor above), delicious menu (she planned, I cooked), and fantastic friends, it really was an epic evening. The party was beautifully documented by the ultra-talented photographer Sara Beth Turner (that's her, whipping off the Champagne cork below!), who just happens to be one of Rachel's three roommates. Sara Beth has such a gift for capturing the essence of a moment with her photos. Her shots, especially these black and white ones, really portray the spirit of the evening, and I am so honored to feature her photography on The Yellow Table. Thanks SB!


Rachel, being quite the hostess, made up a variety of snacks for people to munch on when they arrived: prosciutto-wrapped asparagus, white bean dip and crudités, spicy nuts with rosemary, and a few cheeses with fig jam and crackers. Everyone packed into the kitchen and sipped on bubbly while I finished up the cooking.

The birthday gal had chosen the menu in advance ("I wanted to to have a menu I'd be excited to have at someone else's dinner party," she said): roasted salmon with a Champagne dill sauce, roasted new potatoes with olive oil and sea salt, and a simple green salad with cucumbers and lemon vinaigrette. The menu was flavorful and light, and was so easy to throw together right before the party.

For dessert, Rachel really something decadent (it was her 30th after all!) and wanted to try making a tiramisu. I insisted on making it – the birthday girl shouldn't make her own cake! – and I had so much fun making it into a round birthday shape (using a springform pan) rather than a traditional rectangle. I changed up the classic recipe a bit, eliminating the raw egg yolks, and using Kahlua in place of the marsala wine. I also used a mix of chocolate and vanilla lady fingers, which not only tasted great, but made for a beautiful presentation. (Recipe coming soon!)


But where Rachel really went all out was on the decor – I'll let her tell you about her theme:

"I was inspired by a favorite blogger of mine, Joanna Goddard from Cup of Jo, who threw a "recession chic" dinner party several years ago. The decor from her party was winter white with lots of candles, snow, a birch bark log, and of course, flowing red wine! I liked the winter white theme (mixed in with a healthy dose of glitter!) because it's easy to find white Christmas decor on sale, and white is usually inexpensive and readily available. As I envisioned it all coming together and procured supplies, my selections took on a more "Narnia~like" quality. This seemed the perfect vision of a magical, wintry, outdoor place. Honestly, though, I didn't know how well it would come together until we started lighting the candles..."


Rachel just so happened to find the perfect log for the centerpiece the weekend before in Vermont, which she lugged home and spray painted white. She also found a mirror on the street (gotta love NYC!) which she used as the base for the centerpiece, garnished with some berries and ferns from Michael's. She pulled the whole look together with piles of glittery white fake snow ("to cover all the ugly edges!"). Rachel's a kindergarten teacher, so she's especially gifted at crafts. She made the snowflakes pictured above, which she hung from the ceiling above the table. Truly, a winter wonderland...


I love this picture of Rachel and me in the kitchen pre-party...we had so much fun plotting and scheming about this night, and I'm so glad it all came together so well. Here's to many more dinner parties...!!

The rest of the pictures don't need much in the way of explanation. They pretty much speak for themselves. The evening was magical, and I am so grateful for the friendships – old and new – that were represented here. And most of all, I'm grateful for Rachel, her friendship, generosity, creativity, and zest for life. It's contagious. Happy Birthday!


A special thanks to:

The birthday gal: Rachel Carter
Photographer: Sara Beth Turner
Everyone else who made this evening so special!

BIRTHDAY TIRAMISU

Serves 12

Coming soon...!


click for recipe & more…
Your two cents...

If you don't have a Google login, please select Name/URL from the "Comment as" list below

Friday, December 16, 2011

Tarte Flambée (and the joys of catering in NYC...)

When a friend of mine recently asked if I'd make some food for our church's Christmas party, I immediately said yes. It was ladies-only, so I figured it would be an intimate affair, maybe 25-30 people max. A couple of easy hors d'oeuvres, a few desserts, no biggie. A couple of days before the event, I found out that over 50 people had RSVP'd. OK, still doable, but suddenly I had to start thinking like a caterer. I didn't have loads of time to cook on the day of the event, so I planned a menu of simple appetizers that I could either make in advance or throw together last minute.


Living in a fifth floor walk-up apartment makes catering quite a workout. First there's the grocery shopping and the lugging of bags up all those stairs. Then there's the prep in my kitchen and the re-packing of all the food–plus any kitchen tool, pot, pan, or cutting board that I think I might need at the venue. And then–my favorite part–there's the challenge of getting a cab. I can't tell you how many times I've hobbled down the block, bags hanging off every single appendage, trying desperately to flag down a cab (which all seem to be off-duty at that particular moment!). Once in the cab I can breathe a huge sigh of relief until I arrive at my destination–and then the lugging begins all over again.

This week was particularly hilarious, as the cabby dropped me off a block and a half from my destination. When I told him that the building I needed was actually on the other side of Sixth Avenue, he screamed at me for not giving him proper directions and ordered me out of the cab. I sighed, paid, and grabbed my 8 bags, 3 sheet trays, and large cutting board, and dragged myself–slowly–back across Sixth Ave. This, I reminded myself, is why I rarely cater anymore. It's not the planning, shopping, or cooking that gets to me–it's the schlepping!

Once in the kitchen, of course, all was well. I unpacked, got the ovens cranking, and started chopping, stuffing, wrapping, and baking. I had made my
Tuscan White Bean Dip
in advance, and I sliced up a bunch of crudités for dipping: red and yellow peppers, fennel, carrots, endives, and sugar snap peas. I made my classic Bacon-Wrapped Dates, assembled a cheese tray with some tapenade and crackers, and sliced up some Old-Fashioned Gingerbread with a bowl of lemon curd for drizzling. Last, but not least, I made my all-time favorite wintry appetizer: Tarte Flambé, an Alsacian flatbread of sorts, with onions, creme fraiche, bacon, and grated Gruyere cheese.

Not only is this combination of flavors absolutely irresistible, but it's so easy to make: there's no pre-cooking the bacon or onions–everything's just sliced, arranged on the dough, and baked in hot oven for 15-20 minutes. (Of course you can make your own dough, but for time's sake I usually buy pre-made.) It's equally delicious as an hors d'oeuvres (sliced into small squares) or for dinner, served with a big green salad. It's also versatile: you can make it with pizza dough or puff pastry, use white or red onions, bacon or pancetta, and add a sprinkling of herbs (I love rosemary). The other night I made four tartes and there was not one piece leftover. Glad I snuck a couple bites in the kitchen...

A NOT QUITE TRADITIONAL TARTE FLAMBEE

Serves 8 as an appetizer (or 3-4 for dinner)

One ball bread or pizza dough (homemade or store-bought) or one sheet frozen puff-pastry, thawed
1/4 cup creme fraiche
1 small onion (red or white), thinly sliced
1/4 cup finely diced bacon or pancetta
1/2 cup coarsely grated Gruyere
1 tablespoon chopped fresh rosemary
Salt and pepper

Preheat the oven to 425°F. Lightly grease a sheet tray or line with parchment paper.

On a floured surface, gently roll out the pizza dough into a rectangular shape, about 1/2-inch thick. (If you are using puff pastry, no need to roll it out.)

Place the dough on the prepared sheet tray and spread the creme fraiche on the dough, leaving about an inch border around the edges. Arrange the onions over the creme fraiche, then sprinkle with bacon, Gruyere, and rosemary. Season with salt and pepper.

Bake until crisp and golden brown, about 20 minutes. Let cool for 5 minutes or so before slicing. Cut into small squares for appetizers, or larger ones if serving for dinner.

*This is delicious with a crisp white wine from Alsace, like a Pinot Gris, or a dry sparkling wine. I love this with a Loire Valley or Alsacian cremant.


click for recipe & more…
Your two cents...

If you don't have a Google login, please select Name/URL from the "Comment as" list below

Sunday, December 4, 2011

Healthy Living: Two Delicious Party Dips


'Tis the season for holiday parties, and despite the trays of pigs-in-a-blanket and bowls of cheesy spinach dip you'll encounter, there's no need to fear. The key to feeling good this holiday season (and to avoid packing on the pounds) is simple: eat your vegetables! If you're eating a balanced diet with plenty of veggies–and making sure to get in some exercise–then you can enjoy your holiday treats guilt-free. Of course moderation is key. (I just wrote a piece on
healthy holiday eating
in the Huffington Post if you're interested in reading more!)

Personally, when I'm throwing a Christmas party I like to throw in some healthy options. I especially love making flavorful dips with veggies, beans, and herbs like Tuscan White Bean and Lemony Fava Bean with Mint. They are easy to whip together in a blender or food processor, and can be made completely in advance–which makes serving a breeze. I like putting out a few bowls of homemade dips (other favorites are Fig-Olive Tapenade, Roasted Red Pepper Hummus, and Roasted Eggplant Dip) and serving them with an assortment of flatbreads, pita chips, and crackers.

In the coming weeks, I'll be featuring several of my favorite holiday nibbles–some healthy, some not-so-much (bacon-wrapped dates!), but all ultra-flavorful and simple to prepare. Because–as I've said before and I'll continue to say–why throw a party if you can't enjoy it?! So pop open some (budget) bubbly and get out that blender...you'll have two fabulous dips ready in no time at all!

TUSCAN WHITE BEAN DIP

Serves 8 to 10

2 tablespoons olive oil
1 small yellow onion, finely chopped
3 cloves garlic, minced
2 (15-ounce) cans cannellini beans
1 cup vegetable (or chicken) broth
2 teaspoons fresh thyme leaves*
1/2 teaspoon red pepper flakes
1/4 cup freshly grated Parmesan
Salt and pepper, to taste
Extra virgin olive oil for garnish
Chopped sun-dried tomatoes for garnish (optional)

Heat the olive oil in a large skillet over medium-high heat. Sauté the onion and garlic for 3 to 4 minutes, stirring frequently, until softened and fragrant (do not let the garlic brown). Add the beans and the stock and bring to a boil. Let simmer until thickened, about 5 to 10 minutes. Add the thyme and red pepper flakes.

Pour the mixture (carefully!) into a blender or food processor. Add the Parmesan and pulse several times to until smooth. Season with salt and pepper. Let cool to room temperature before serving.

Garnish with a drizzle of olive oil and some chopped sun-dried tomatoes (optional) and serve with whole wheat pita chips, whole grain flatbread, or grainy crackers.

*In the summertime, I like to substitute 1/4 fresh basil for the thyme.

LEMONY FAVA BEAN DIP WITH MINT

Serves 8 to 10

2 1/2 cups frozen fava beans, thawed*
2 cloves garlic, peeled and smashed
1 teaspoon lemon zest
Juice of 1/2 lemon
1/2 teaspoon red pepper flakes
3 tablespoons extra virgin olive oil
1/4 cup chopped fresh mint
Salt and pepper to taste

Bring a medium saucepan of salted water to a boil. Add the fava beans and garlic cloves and let simmer for 4 to 5 minutes or until tender. Meanwhile, prepare a bowl of ice water.

Save 1/2 cup of the cooking water, then drain the beans and garlic. Place the beans in the ice water to stop cooking. Remove and discard the white outer skins from the fava beans, saving the bright green beans inside.

Place the peeled fava beans and garlic in a blender or food processor. Add the lemon zest, lemon juice, red pepper flakes, olive oil, and mint and pulse to combine. The mixture shouldn't be completely smooth–it's nice to leave some texture. If it's too thick, add in a bit of the reserved cooking liquid. Season with salt and pepper to taste. (Also feel free to adjust the flavorings to suit your palate–if you like more lemon or more spice from the red pepper flakes, feel free to add more of either!).

Serve with whole wheat pita chips, whole grain flatbread, or grainy crackers.

*In the spring and summertime, by all means make this with fresh fava beans! There will be more peeling involved, but it will be even more flavorful. If you can't find frozen fava beans in your grocery store (I usually buy mine at a Middle Eastern store) feel free to substitute frozen peas or even peeled edamame. The taste will be slightly different, but still delicious.


click for recipe & more…

Add a comment!
Your two cents...

If you don't have a Google login, please select Name/URL from the "Comment as" list below

Tuesday, November 29, 2011

Holiday Baking: Nutella Shortbread Brownies


Many years ago, when I was living in Paris and working as a part-time English teacher and part-time nanny, I catered a Christmas party for a Parisian family. The pressure was high, cooking for this group of sophisticated Parisian food-lovers, but I was determined to wow them. Now this crowd, despite the typical French willpower in the face of dessert, loved sweets. In fact, I recall that at least half of the items I made that night contained sugar. They wanted American desserts, so I obliged, with pumpkin cupcakes (and cream-cheese frosting), pecan bars, chocolate chip cookies, and my homage to both France and America, these decadent little Nutella shortbread brownies.

Now the guests at this party may have been a tad skeptical at first, upon hearing about the young American cook, but by the time they had tasted the Nutella brownies, all doubts had turned to bliss. I was swarmed with admirers (of the brownies): "Qu'est-ce que c'est?" (What is it?!) "C'est une reve!" (It's a dream!) "Elles sont magiques... superbes... ravissantes!!" (They're magic... superb... delightful!) I have never heard a more appreciative crowd than these French party-goers post-dessert. Perhaps they were just in a sugar coma (or maybe it was the Champagne talking), but after such an enthusiastic response, I've been making these hazelnut brownie bars ever since.

These are actually inspired by a recipe for Fudgy Brownie Bars I discovered on Epicurious.com years ago. I've changed the recipe a good bit, adding Nutella and vanilla, reducing the sugar by half a cup, and adding in whole roasted hazelnuts. I also swapped out salted butter for unsalted in the shortbread base, and I love the salty-sweet contrast. The result is a crisp shortbread base and a decadent, fudge-like Nutella brownie topping. In other words: heaven!

If there's one thing you bake this holiday season, I'd strongly recommend these show-stoppers. Yes, the butter content is alarmingly high. Yes, they take over 30 minutes to make. And yes, they probably have a zillion calories. But you will be hard pressed to find a more crowd-pleasing confection. Cut them into bite-size pieces for a party, or make a batch and freeze half for a snowy day. They also make fabulous holiday hostess gifts, packaged in a cellophane bag and tied with a pretty ribbon. Happy baking!

NUTELLA SHORTBREAD BROWNIES

Makes 24 bars

Salted Butter Shortbread:
2 cups all-purpose flour
1/2 cup light brown sugar
1/2 teaspoon salt
12 tablespoons salted butter, cut into small pieces

Hazelnut Nutella Brownies:

1 cup (2 sticks) unsalted butter
8 ounces bittersweet chocolate
1 cup sugar
4 eggs
1 teaspoon vanilla
1/4 cup Nutella
3/4 cup flour
1/2 teaspoon salt
1/2 cup whole roasted hazelnuts, skins removed•

Preheat the oven to 350°F.

For the Salted Butter Shortbread:
Combine the flour, brown sugar, and salt in bowl of a food processor and pulse a few times to combine. Add the butter and pulse until the mixture is full of pea-size lumps. (If you don't have a food processor, just combine the mixture in a bowl. Using a fork and knife, cut the butter into the flour to create pea-size lumps. Or just use your fingers!)

Sprinkle the mixture into an ungreased 13"x9"x2" baking pan; press the mixture evenly into the pan with your hands (or a metal spatula). Place in the oven and bake on the middle rack for 20 minutes, or until golden. Remove from the oven and let cool slightly while making the brownie layer. Keep the oven set to 350°F.

For the Hazelnut Nutella Brownies: Melt the butter and the chocolate in a medium saucepan over low heat, stirring constantly. Remove from the heat and let cool slightly.

Pour the mixture into a large mixing bowl. Add the sugar and beat well with electric beaters (or a whisk). Add the eggs, one at a time, beating until thoroughly combined. Add the vanilla and the Nutella and continue beating.

Stir in the flour and the salt, until no streaks remain. Stir in the hazelnuts. Pour the mixture over the shortbread base and smooth the surface with a spatula.

Bake on the middle rack for 35 to 40 minutes or until a toothpick comes out with moist crumbs attached. (The middle of the brownies may crack a bit–this is normal.) Cool completely on a cooling rack before slicing.

TO CUT: Using a sharp knife, cut around the edges of the brownies to loosen them from the pan. Using one hand on the bottom of the pan and one hand on the brownies, carefully flip the pan upside down onto a cutting board. Tap the pan a few times, then remove it–the brownies should be shortbread-side up on the cutting board.

Flip them over so the shortbread side is on the cutting board and the brownies are on top. Dip a sharp knife into hot water and carefully cut the brownies into 24 bars (cleaning the knife and re-dipping it into the water between cuts). It's important to have a sharp knife for this process to cut through the hazelnuts!

Store the brownies in an airtight container at room temperature for up to 5 days (or freeze).

*To roast the hazelnuts, place them on a baking sheet and roast them in a 350°F oven for 5 to 7 minutes or until lightly browned and the skins are beginning to split. Dump the hazelnuts into a bowl and using a kitchen towel (so you don't burn your fingers!), rub the skins off and discard them.


click for recipe & more…
Your two cents...

If you don't have a Google login, please select Name/URL from the "Comment as" list below

Tuesday, November 22, 2011

Thanksgiving Guide 2011


Thanksgiving needn't be a stressful time of year. In fact, hosting Thanksgiving can be a lot of fun. This year, rather than obsessing over the food and the table decor, I've tried to reflect more on the
meaning
of Thanksgiving. To be thankful for what I have, and for the people I love. After all, Thanksgiving is just one day, but we have so much to be thankful for every day. Keeping that perspective takes a lot of the pressure off of trying to create a perfect meal (which, by the way, does not exist outside magazines!). All that aside, planning is a key component of hosting any event. Below, I've laid out a series of Thanksgiving day recipes and ideas–mostly healthy, mostly simple, and most of which can be made (at least partially) in advance. Here's to a fun, relaxed, and joyful Thanksgiving!


Herb Roasted Turkey with Apple Cider Brine
Sick of having a dry turkey? Brining your turkey–soaking it overnight in a saline solution before roasting–definitely creates the moistest, most flavorful turkey you can imagine. Full disclosure: it does take a bit of work, but the end result is fantastic. Give it a try!


Winter Squash Salad with Kale & Pomegranate Seeds
This salad is a perfect canvas to experiment with different types of winter squash. I used acorn and Delicata, but you could really use any type–butternut or Kabocha would also be nice. The gorgeous colors make it an ideal side dish for the holidays.


Farro with Wild Mushrooms
This is a healthy adaptation of my favorite Thanksgiving Day dish growing up: my mom's Brown Rice. I took out the stick of butter and the cans of soup, and substituted farro for the rice and fresh mushrooms for canned. The end result? Still intensely flavorful–without feeling so heavy.


Brussels Sprouts & Red Cabbage Slaw
Super healthy and easy to prepare, Brussels sprouts are a must for me on Thanksgiving day. Studded with dried cranberries and pine nuts, this slaw is delicious and takes only 20 minutes to prepare.


Simple Roasted Cauliflower
If you're not a cauliflower fan (as I used to claim I wasn't), try roasting it. Tossed with a little olive oil, salt, and pepper and blasted in a hot oven, this normally bland vegetable is utterly transformed.


Roasted Sweet Potatoes with Red Onions & Arugula
This is one of my all-time favorite ways to eat sweet potatoes. I love the amazing combination of flavors: sweet potatoes and roasted red onions with rosemary, salty Parmesan, and peppery arugula.


click for recipe & more…
Your two cents...

If you don't have a Google login, please select Name/URL from the "Comment as" list below

Friday, October 21, 2011

Budget Bubbly: A Rosé in a Gang of Bruts

My good friends can tell you that my favorite drink in the whole wide world is Champagne. I love the bubbles, the crisp, dry taste, the elegant flutes. It's fun, it's festive, and it makes any moment better. And I'm a firm believer that bubbly need not be tucked away for special occasions. I love celebrating life's small moments as well as the big ones–dinner with good friends, a lovely sunset, a new job, the end of a moving day, a race run, a prayer answered. Of course, opening a bottle of true Champagne can set you back $50 or more. Which is why I've become somewhat of an expert on budget bubblies–lovely, dry sparklers that are sophisticated and celebratory without breaking the bank.


There are such a wide array of sparkling wines available these days, that it's hard to make sense of what is what. To break down a few of the terms you will encounter, here is my little bubbly cheat sheet:

Brut - This means "dry" and is found on the labels of many sparkling wines.
Cava - Spanish sparkling wine made using the Methode Champenoise. It is usually the driest of the sparkling wines.
Champagne - French sparkling wine made ONLY in the region of
Champagne
. These are the top of the top, the most expensive, and have some of the most widely recognized labels (Mumm, Krug, Veuve Clicquot, Cristal, Dom Perignon). Champagne is tightly regulated and can only be made from three grapes (either blended or solo): Chardonnay, Pinot Noir, and Pinot Meunier. Its flavors can be quite complex, with yeasty, toasty aromas and a golden color (which gets darker as it ages).
Cremant - French sparkling wine from other regions, such as Cremant d'Alsace, Cremant de Bourgogne, and Cremant de Loire. These have much lower price-points than Champagne, but often have wonderfully aromatic flavors from grapes like Chenin Blanc or Vouvray.
Demi-Sec - A sweet, dessert style sparkling wine.
Extra-Dry - Contrary to what you might think, extra-dry is actually sweeter than brut, usually served as an aperatif. It's perfect for someone who wants a bit of sweetness, without going as sweet as a demi-sec.
Methode Champenoise/Traditional Method - A sparkling wine made in the traditional Champagne method, i.e. the second fermentation (which creates the bubbles) takes place in the bottle. This is slightly more expensive than the Prosecco method, and usually creates more complex wines.
N.V. - This stands for non-vintage and is often found on the labels of sparkling wines. This simply means that the wine is not from a certain year, but rather a blend of wines from several years to make sure the quality is consistent from year-to-year.
Prosecco - Italian sparkling wine, made using a method where the wine undergoes a second fermentation in large tanks and is bottled under pressure. Prosecco tends to have finer bubbles than Champagne and can be a bit on the sweeter side.


I've worked at a few wine shops over the years, which has given me ample opportunity to taste a variety of bubblies–both on the pricey end and the budget side of things. This list is by no means definitive (you'll notice there's not a Prosecco on the list, which I happen to love), but it does give several fabulous, under-$20 options to take to a party, or pop open tonight! Personally, I'd recommend the latter...

La Gaudrelle Cremant de Loire - Crisp, aromatic sparkling Chenin Blanc from the Loire Valley. Delicious as an aperatif or served with shellfish. ($17.99)

Gruet Brut - Toasty, yeasty, full-bodied traditional method bubbly made by a French family in New Mexico. You'll swear you are drinking the real thing. Added bonus–it's all organic. ($13.75)

Cuvée Laurent Brut Rosé - I have a weakness for dry pink bubblies, and this delicate salmon-colored one from Provence fits the bill perfectly. Fantastic with thin-crust pizza. ($8.96)

Savia Viva Brut Reserva Cava - Dry, elegant, organic cava with fine bubbles and hints of lime zest. This one pairs really well with spicy Asian foods and sushi. ($8.96)

Piper Sonoma Brut - Another dry, traditional method bubbly, with a lovely creamy texture and dry finish, from Sonoma. I drank this one last New Year's Eve! ($13.99)
Your two cents...

If you don't have a Google login, please select Name/URL from the "Comment as" list below

Friday, October 14, 2011

How to Throw a Fall Dinner Party (with Video)


GUEST PHOTO BY SIGNE BIRCK

Based on the title of this blog, you can probably tell that dinner parties are sort of my thing. Especially when they're held around the yellow table. I love this table for so many reasons–and not just because of all the memorable meals and conversations I've shared around it. I love its warm mustard color. I love the scratches and dents that give it personality. I love the story behind it. But one of the things I love most is its ability to expand. Normally we keep it as a cozy six-seater, but when we have larger groups, we can add leaves to expand it to fit 8, 10, or even 12 people. It's a table that can always fit one more. Which was the case a few weekends ago when we hosted a 10-person fall storytelling dinner, the first in what I hope will become a series of story-filled soirées.

When I throw dinner parties, I like mixing up the crowd a bit. I love to bring different friends together–some of Brandon's, some of mine, and some of ours–and watch the worlds collide. As important as the food and the ambiance are, it's the people that make a dinner party. Though I may recall a certain dish the next day (if it was really good), what will linger for weeks and months are stories told, laughter shared, and new friendships formed. One of these new friends is the fantastically talented Danish food photographer Signe Birck. She met my brother Davis last November (that's a story for another time...) and we recently connected in NYC. We were both passionate about similar things–me, food and writing, she, food and photography, so it was a natural fit for us to work together. I told her I was throwing a dinner party and that she should come–with her camera. She did, and the beautiful photographs on today's post (all except the video) are Signe's work. Thank you!!


GUEST PHOTO BY SIGNE BIRCK

People tell me all the time that they are intimidated to host a dinner party. They're not sure what to cook, worried about their lack of space, and afraid it will be a ton of work–so they end up going out to dinner (again). I want to demystify the process as much as possible on this blog, because honestly, having friends over and cooking for them is one of the most rewarding things in life. I've learned a couple of things from throwing dinner parties over the years and one of the most important tips I can pass along is this: PLAN AHEAD. I don't mean to start planning months in advance or anything, just try and do everything ahead that you can (cleaning, set-up, prep, cooking) so you can relax and enjoy your guests once they arrive.

With dinner parties, I'm a list-keeper. First, there's the menu. Then the shopping list. Then there's the to-do list (errands, cleaning, cooking, table, music, etc.), and finally the day of, the cooking prep list. I like to check things off and know where I stand in the process. I actually plan my dinner party menus based on the ability to make things in advance. If I can get the dessert done and the table set the night before, I already feel way ahead of the game. Also, don't be afraid to delegate! Spread the work around...nobody said you have to do everything just because you're hosting! Here's a little video (be nice...I'm no TV host!) taken just before the party, with a play-by-play of the menu, and some easy, stress-free entertaining tips:


Another few dinner party tips:

• Set the ambiance: light some candles, dim the lights (which helps disguise those areas you didn't have time to dust!), and have a great playlist going when guests arrive. I'm a sucker for jazz–Ella Fitzgerald, Miles Davis, John Coltrane, Diana Krall, and St. Germain are all favorites of mine for dinner parties.

• Have drinks and snacks ready when guests arrive! This one is key. As long as everyone has something to sip, and something to nibble on, they are fine hanging out in the living room while I put the finishing touches on the meal. Lucky for me, we have an open kitchen that faces the living room, so I can still be part of the party while I'm cooking. And your hors d'oevres don't need to be elaborate–I usually put out some good olives, a couple of cheeses, and crackers. Or a good homemade dip and flatbread. Keep it simple!

• I'm a huge fan of one-pot dinners, especially in the fall and winter. Coq au Vin, Bouef Bourguignon, braised short ribs (basically anything cooked in red wine!!), or a big pot of soup can be made in advance and reheated when everyone arrives. And best of all, it can be dished out right from the pot, served with a green salad and some crusty bread to round things out.

• Get some cool vintage bottles to use for water on your table. I use old milk bottles and glass carafes (no need for them to match!) and keep them filled with water during a dinner party so I don't have to keep hopping up and down to refill water glasses.

• I love flowers, but I'm not a fan of tall arrangements on the table that block conversation. My mom gave me some of my great grandmother's cosmetics bottles and they make beautiful little vases. I'll put a single flower in each and line the table with these mismatched vintage arrangements. And I love to put one in the bathroom as well.

• Write your menu somewhere that everyone can see. I've got a chalkboard that hangs in the kitchen that I write the menu on, but sometimes it's fun to have hand-written menu cards at everyone's place.


GUEST PHOTO BY SIGNE BIRCK

Fall Dinner Party Menu

Fig & Ricotta Crostini

Butternut Squash Gnocchi with Sage Butter

Herb & Dijon Crusted Pork Shoulder (recipe below)
Balsamic Roasted Pears & Onions (recipe below)
Roasted Brussels Sprouts

Pumpkin Gingerbread Cake
with Cinnamon Whipped Cream


GUEST PHOTO BY SIGNE BIRCK


HERB & DIJON CRUSTED PORK SHOULDER

Serves 10 to 12

1 (4- to 5- lb. boneless pork shoulder, sometimes called "pork butt")
1 tablespoon finely chopped fresh rosemary
1 tablespoon fresh thyme leaves
1 tablespoon Dijon mustard
1 tablespoon apricot jam
3 garlic cloves, minced
3 teaspoons sea salt
2 teaspoons freshly ground pepper
3-4 tablespoons olive oil

Butterfly the pork so it is more or less the same thickness across.

In a mini-prep food processor (or in a smallish bowl), pulse (or whisk) to combine the rosemary, thyme, mustard, apricot jam, garlic, salt, and pepper.

Add the olive oil slowly, pulsing (or whisking) to combine. Rub the herb mixture all over the pork, then roll up the pork shoulder, tying with butcher's twine to secure.

Cover with plastic wrap and let marinate in the refrigerator for 2-3 hours.

Preheat the oven to 325°F. Let the pork come to room temperature before roasting.

Roast the pork skin-side up, in a roasting pan fitted with a rack for about 3 hours or until the meat is fork-tender (the internal temperature should be 180°F).

Let rest for 10-15 minutes, then remove twine and slice.

*This is the most tender, juicy, flavorful pork dish I have ever made–and at only $4.99/lb, it feeds a crowd inexpensively!

BALSAMIC ROASTED PEARS & RED ONIONS

Serves 10 to 12

4 Bosc pears, cut into eighths (skin on)
2 large red onions, halved lengthwise and thinly sliced
1 tablespoon Balsamic vinegar
3 tablespoons olive oil
Salt and pepper to taste
Fresh thyme sprigs

Preheat the oven to 400°F. Line two sheet trays with aluminum foil.

Toss the pears and onions in the Balsamic vinegar and olive oil until well coated, and season with salt and pepper.

Spread the mixture on the sheet trays and scatter 2-3 thyme springs (per pan) over the pears and onions.

Roast for 30 minutes or until tender. Let cool slightly before serving alongside the pork.


click for recipe & more…
Your two cents...

If you don't have a Google login, please select Name/URL from the "Comment as" list below

Wednesday, October 12, 2011

Q&A with Jill Donenfeld (+ A New Cookbook!)

It's tough to describe my friend Jill Donenfeld in just a few words. (Though impressive does come to mind...) By age 22, the personal chef and entrepreneur had already started her own business (The Culinistas) and written a cookbook (Mankafy Sakofo: Delicious Meals from Madagascar). Donenfeld founded The Culinistas in 2006 in New York City with the goal of bringing healthy, home cooked, customizable meals into the homes of busy professionals. The concept was a hit. Now, five years later, Donenfeld has expanded The Culinistas to Los Angeles and Chicago, and is coming out with her second cookbook: Party Like a Culinista (Lake Isle Press). Co-authored with fellow culinista Josie Gordon, the new book is all about parties: how to throw them, what to serve, and how to enjoy yourself in the process. Full of healthy and delicious recipes (like the Potato Kalamata Pizza below) and all sorts of tips on how to keep things stress-free, this is an invaluable read for anyone who loves to entertain–or is too intimidated to try. An avid foodie and intrepid world traveler, Donenfeld divides her time between NYC and LA, with regular inspiration trips abroad. I caught up with her last week and we chatted about her cooking, her new book, and the best foodie finds from her summer travels.


You started your personal chef service The Culinistas back in 2006, when you were just out of college...what inspired you to launch this business?

My family. I grew up eating with my parents and brothers around the dinner table every night. I didn't realize it was a luxury until I moved to NYC at 18 and experienced families living a much more scattered and disparate lifestyle than mine. A few families for whom I babysat asked me to come cook for them and that was the foundation for the company.

When did you first start cooking? What are some of your favorite things to cook?

My first memory cooking is of course with my mom. Cookies. But it was in high school that I got really into it. I used to make brownies a LOT. That usually resulted in my whole crew coming over to the house and hanging around the kitchen for hours on the weekend... ah, heaven.

Of course, you can't make brownies for dinner (at least not every night). I like to cook simply: big stir fries, pasta salads, quinoa salads. I love grilling shrimp and salmon. I use a lot of fresh herbs and spices I smuggle back from various travels. I have a stock pile of cardamom right now that I brought back from Tamil Nadu so I am working my way through that.

You are quite the world traveler, which I know provides inspiration for your cooking. This summer alone you were in Paris, India, and all over the U.S. What were some of your favorite foodie finds?

I was in India during their mango season and had the pleasure of indulging in many varieties, which was just mind-blowing. One day we lined up six types and sliced into them all for a taste test. I also got pretty into coconut oil while there - for cooking and for your skin and hair.

In Paris, I found fresh goat cheese at the Marché at Raspail on Sundays. By fresh I mean like loose, ricotta-textured goat cheese. That was breakfast pretty much every morning. And I was loving MINUTY rosé. But not for breakfast - at least not everyday.

The lobster on the East Coast was legit this summer and I was a maniac, going to Five Island in Maine and Luke's in Manhattan. And it seems like romaine hearts became widely available recently. I've been incorporating those sweet leaves into salads, and serving them as scoopers for appetizer-y dips and spreads and egg salad.

Your new cookbook Party Like a Culinista comes out this weekend (Oct. 16) and specializes in healthy, fun party foods. Tell us a little about it.

I wrote it with Josie Gordon, who's worked with The CULINISTAS since it's inception. The book is full of easIER, healthIER recipes, divided into short menus packed with little tips and tricks.


You're a party-planning pro, both on the catering and hostessing end. Any tips you want to share with us on how to have a stress-free party?

I always try to see things from the guest's point of view–they are there to have fun. And they will have fun if you have fun. So get into it! Also, having wine and a snack ready for the early birds is good so that you can finish up cooking–that can be a big help. Homemade popcorn is always my go to.

Now for the question I love to ask everyone: If you had to throw an impromptu dinner for eight tonight, what would you make?

I have a whole chapter about that! But since I'm answering these questions from gorgeous, sunny Sag Harbor I'll say: Cucumber and herbs salad (lots of herbs. Use herbs like lettuce!). Grilled clams and grilled corn with tarragon aioli. Fried zucchini and eggplant with citrus zest. Or just grill everything.

For the pre-dinner nibble, roast a few heads of garlic, pick up two baguettes, two soft cheeses, and serve with castelvatrano olives.

Dessert: raspberry whipped cream with any sweet thing you have in the house: cookies, brownies, ice cream, blueberries...whatever.

POTATO KALAMATA PIZZA

Serves 8

1 pound whole wheat pizza dough (see Note)
1 pound fingerling potatoes
3 tablespoons extra virgin olive oil
1/2 teaspoon fine grain sea salt
1 sprig fresh rosemary
3/4 cup kalamata or black olives, pitted
1 tablespoon fine extra virgin olive oil, for drizzling
2 tablespoons chopped fresh flat-leaf parsley

Preheat the oven to 400°F. Roll the pizza dough into circle about 14 inches in diameter with a rolling pin and place on a parchment-lined cookie sheet.

Slice the potatoes 1/4 inch thick using a mandoline. Toss the potatoes with 2 tablespoons olive oil and the salt. Spread them out on a rimmed baking sheet and top with the rosemary sprig. Roast for 45 minutes, stirring halfway through.

In a food processor, combine the olives with the remaining 1 tablespoon olive oil to make a quick tapenade. Pulse until mostly smooth.

Spread the tapenade evenly over the pizza dough. Layer on the potatoes. Discard the rosemary.

Reduce oven heat to 350°F and bake the pizza until the crust is browned, 10 to 12 minutes. Sprinkle with chopped parsley and drizzle with fine olive oil.

NOTES:

Whole wheat pizza dough can be purchased in many grocery stores. You can also check with your local pizzeria—they may be willing to sell uncooked dough. If you can’t find whole wheat in a pinch, the next best thing is white pizza dough made with organic ingredients.

Though we don't include cheese on our pie, some people might like some shaved Parmesan or pecorino. Add them as soon as the pie comes out of the oven.

*Recipe reprinted with permission from Party Like a Culinista by Jill Donenfeld and Josie Gordon (Lake Isle Press).


click for recipe & more…

Add a comment!
Your two cents...

If you don't have a Google login, please select Name/URL from the "Comment as" list below

Sunday, October 2, 2011

Perhaps the World Ends Here...


I woke up this morning to piles of dishes, empty wine bottles, and stacks of crusty pots and pans. The glorious aftermath of a dinner party. We had our first
Moth-inspired storytelling dinner last night, and among the ten of us gathered around the table, the stories were legendary. We heard tales of ghosts, near-arrests, nightmare first dates, and an attempted arranged marriage. Everyone had such a good time–we were still sipping wine and lingering over dessert long after midnight. But more on the dinner party later...

As I finish my second cup of coffee (and munch on a piece of leftover pumpkin gingerbread cake), I wanted to share with you a lovely poem my friend Kathryn York recently sent me. She said this poem had become an anthem of sorts for her the past year, and I think I'll adopt it as well. It so beautifully sums up everything I believe about living life around the table, but could never quite find the words to express. I hope this poem inspires you all as it did me. It makes the piles of dishes seem worthwhile.

Perhaps the World Ends Here
by Joy Harjo

The world begins at a kitchen table. No matter what,
we must eat to live.

The gifts of earth are brought and prepared, set on the
table so it has been since creation, and it will go on.

We chase chickens or dogs away from it. Babies teethe
at the corners. They scrape their knees under it.

It is here that children are given instructions on what
it means to be human. We make men at it,
we make women.

At this table we gossip, recall enemies and the ghosts
of lovers.

Our dreams drink coffee with us as they put their arms
around our children. They laugh with us at our poor
falling-down selves and as we put ourselves back
together once again at the table.

This table has been a house in the rain, an umbrella
in the sun.

Wars have begun and ended at this table. It is a place
to hide in the shadow of terror. A place to celebrate
the terrible victory.

We have given birth on this table, and have prepared
our parents for burial here.

At this table we sing with joy, with sorrow.
We pray of suffering and remorse.
We give thanks.

Perhaps the world will end at the kitchen table,
while we are laughing and crying,
eating of the last sweet bite.


click for recipe & more…

Add a comment!
Your two cents...

If you don't have a Google login, please select Name/URL from the "Comment as" list below

Friday, September 23, 2011

Dinner Party: Roasted Branzini and Brussel Sprouts


I love dinner parties (clearly). And in spite of the fact that I've thrown hundreds in my life, I still get a little nervous having people over if I don't have time to prep in advance. I hate feeling rushed, which is why I try to get as much done ahead of time as possible. For me, entertaining is the most fun when the apartment is clean, the food is more or less prepped, and I can actually sit down and have a drink with guests when they arrive. Of course in reality, things never go quite as smoothly as I plan–I can't tell you how many times I've jumped in the shower and heard the doorbell ring! But if there's one thing I've learned from entertaining, it's this: if you're short on prep time, Keep. It. Simple. Your friends aren't expecting you to recreate The French Laundry in your apartment. If anything, they'll be happy to get a home cooked meal and will love whatever you prepare.

So when Brandon asked me the other day if some friends could come over for dinner, I hesitated, as it was a day where I'd literally be getting home at the same time they'd be arriving. I seriously considered ordering takeout. But then I thought about it a bit more and gave myself a little pep talk. (I'm not Thomas Keller, etc.) And I realized that I could cook a beautiful, simple meal in the same amount of time it would take to wait on a pizza delivery. I came up with a game plan: I'd run by the grocery on my way home, then throw together a little appetizer platter (I already had some cheese, crackers, charcuterie, and olives on hand) for everyone to munch on when they arrived. For the meal, I decided to make roasted branzini (Mediterranean sea bass) stuffed with lemon and thyme, roasted Brussels sprouts, and roasted baby potatoes–the prep is minimal and everything cooks together in a 425 degree oven. Which would give me time to sit and have a leisurely glass of wine with my friends. Perfect!


I find that a lot of people are intimidated by whole fish. They're not sure how to cook them, and how to get the bones out afterwards. Or maybe they're just creeped out by the eyes staring back at them. Nonetheless, roasting whole fish is so easy. You can ask the fishmonger to scale the fish and remove the guts, so all you have to do is stuff the cavity with herbs and thinly sliced lemons, season with salt and pepper, drizzle with olive oil, and pop them in the oven. Buying whole fish is much cheaper than buying fillets ($11.99/lb. for whole branzini versus $24.99/lb. for sea bass fillets), but the best part of all is the flavor. Roasting fish on the bones keeps the flesh moist, and it takes on the taste and aroma of whatever herbs you've stuffed inside the cavity. The bones are a bit tricky, as there always seem to be a few tiny ones mixed in even after deboning–just eat carefully and you should be fine.

In the end (despite my initial fears), the dinner was fun and relaxed. I put out the hors d'oeuvres, poured some wine, and one of my friends helped me assemble the fish and Brussels sprouts. We had everything in the oven in about 10 minutes, and we all headed up to the roof. When we came downstairs 25 minutes later, the apartment smelled heavenly and dinner was done! My challenge to you this weekend is this: go out and buy a whole fish (or two or three). Follow the recipe below–it's completely non-intimidating–and invite some friends over. No more excuses, just try it. You'll be hooked.


ROASTED BRANZINI WITH BRUSSELS SPROUTS

Serves 4

1 pound Brussels sprouts, halved
2 tablespoons olive oil, plus more for drizzling
Sea salt and freshly ground pepper
3 (1 lb.) branzini (or two 1 1/2-lb branzini)
Thyme sprigs
1/2 lemon, thinly sliced

Preheat the oven to 425 degrees F. Cover two sheet trays with aluminum foil or parchment paper.

In a large bowl, toss the Brussels sprouts with 2 tablespoons of the olive oil and season with salt and pepper. Place the Brussels sprouts in the oven.

Meanwhile, pat the fish dry with paper towels, inside and out. Season the cavities with salt and pepper and stuff with thyme sprigs (6 or 7) and lemon slices.

Arrange the fish on the second sheet tray, season with salt and pepper, and drizzle with olive oil. Place the tray in the oven with the Brussels sprouts (on the lower rack) and roast for 20 to 25 minutes or until the flesh is flaky and cooked through, and the Brussels sprouts are lightly browned.

To debone: Using two forks, remove the top skin from the fish and discard. Carefully remove the top fillet to a warm serving platter. Lift out the backbone and ribs, and remove the bottom fillet. Repeat with the remaining fish. Arrange the Brussels sprouts on the platter with the fish. Squeeze with lemon juice and drizzle with olive oil. (Optional: garnish with fresh chopped parsley.)

Serve with roasted potatoes.


click for recipe & more…
Your two cents...

If you don't have a Google login, please select Name/URL from the "Comment as" list below

Friday, September 16, 2011

Rooftop Party: Chicken Feta Sliders with Chimichurri


I love this time of year. Blue skies, cooler weather, but still warm enough to eat outside for a few more weeks. Despite the fact that we live in a fifth-floor walk-up (with occasional funky smells in the stairwell), all is redeemed by our little rooftop terrace. The views are pretty fantastic and when the weather is nice, it's my favorite place to have a glass of rosé and watch the sunset. We've had friends up many times and even without a grill, it's a fun spot to host a cookout.

The routine goes a little something like this: we start with drinks and appetizers outside, then I'll sneak down to the kitchen to grill some burgers (of fish or chicken), roast some sweet potatoes, and maybe steam some green beans or toss a salad. By then, the apartment is usually filled with smoke–we don't have a hood over the stove–so I'll open all the windows and turn on the fans and start waving dish towels. Finally, I'll lay all the food out on the table, everyone makes a plate, and we all head back up to the roof. I know this isn't a traditional "sit around the table" dinner party, but on a beautiful night, it seems a shame not to enjoy our outdoor space.

Given the weekend ahead (sunshine in NYC!), I wanted to share a few recipes to accompany your outdoor fête. I created these sliders for a party this summer as a healthier alternative to red meat. I decided to use ground chicken (though you could use turkey if you wanted), seasoned it with garlic, cumin, and a touch of cayenne, then added some basil, feta, egg, and–the secret ingredient–grated zucchini. The mixture was a little loose, so I added some breadcrumbs, which helped hold it all together nicely. I seasoned the patties with plenty of salt and pepper, grilled them in a hot grill pan, and served them on little brioche buns with avocado slices and my roasted red pepper chimichurri sauce.


Even though I was totally winging this dish for the party, they turned out to be some of the most flavorful, moist sliders I have ever had. Even Brandon, who hates zucchini, loved these. (Nothing like sneaking a few vegetables into your husband's food!) I've made them since, and realized they taste even better when grilled on a panini press (just an FYI for those of you who actually have a panini press). My non-traditional take on chimichurri sauce–packed with herbs, garlic, and roasted red peppers–is the perfect cookout companion. Delicious on the chicken sliders, it's equally good on burgers, steaks, grilled vegetables, and just about anything else you can throw on a grill.

Enjoy these last few fleeting days of Indian summer with good friends and good food this weekend. And if you have a grill, be sure light it up!

CHICKEN FETA SLIDERS

Makes 8 sliders

1 small zucchini
1 pound ground chicken
1 to 2 cloves garlic
1 teaspoon cumin
1/4 teaspoon cayenne
1 tablespoon chopped basil (or mint)
1/3 cup crumbled feta
1/4 cup beaten egg
1/2 cup fine bread crumbs, plus more if needed
8 slider buns

Grate the zucchini with a box grater on the fine setting (or use a handheld cheese grater). Using paper towels or a clean dish towel, squeeze all liquid from the zucchini.

Combine the zucchini with the chicken, garlic, cumin, cayenne, basil, feta, egg, and bread crumbs with a rubber spatula. Season with salt and pepper, and add more bread crumbs if the mixture seems too wet. (It should hold together easily when squeezed.)

Using your hands, shape the mixture into eight small slider-size patties. Season the patties with salt and pepper and grill on a hot, lightly oiled grill pan for about 3 minutes per side, or until cooked through. (Or, if you have a panini press, cook for about 5 minutes total, until cooked through.)

Serve the sliders on toasted buns with sliced avocados, arugula, and chimichurri sauce (recipe below).

ROASTED RED PEPPER CHIMICHURRI SAUCE

Though this is not a traditional chimichurri (which is usually limited to herbs, garlic, olive oil, red wine vinegar, and red pepper flakes), I sampled a similar roasted red pepper version in Buenos Aires several years ago and was hooked. This is my attempt to recreate it, and I think it makes just about everything taste better.

Makes about 1 ¼ cup (serves 4-6)

4 cloves garlic, peeled
1 8-ounce jar roasted red peppers, drained
1/2 red onion, finely chopped
Juice of 1 lemon
3 tablespoons red-wine vinegar
1/2 teaspoon dried hot red pepper flakes
1/2 cup fresh flat-leaf parsley
1/2 cup fresh cilantro
1/2 cup fresh mint
1/2 cup extra virgin olive oil
Salt and pepper, to taste

Combine the garlic, roasted red peppers, onion, lemon juice, red wine vinegar, and red pepper flakes in a food processor and pulse several times until combined. Add the herbs and pulse several more times to combine. With the processor running, add the oil in a slow steady stream until smooth. Season with salt and pepper to taste.

Feel free to add more herbs, more vinegar, more red pepper flakes—this recipe is very adaptable according to your taste buds!

Let sit at room temperature for one hour before serving, for flavors to combine. Also, it keeps well in the refrigerator up to 5 days.


click for recipe & more…
Your two cents...

If you don't have a Google login, please select Name/URL from the "Comment as" list below