Showing posts with label savory. Show all posts

Tuesday, March 6, 2012

My Favorite (End of) Winter Salad


Not that we've had much of a winter this year (I haven't had to wear my fur boots once!), but there are still certain winter foods that I love. Warming soups and stews, hearty pasta dishes, braised pork over creamy polenta, roasted veggies, and homemade chicken pot pies. But alongside these wintry comfort foods, I like to serve a light, colorful, citrusy salad. A sort of palate cleanser, if you will, to cut through the richness of the main dish. In the summer, I practically live off salads, but in the winter, I like them more as a side dish.

This arugula, radicchio, and fennel salad is my favorite wintry combination–I love the bright colors, the pleasant crunch of the fennel, the peppery bite of the arugula, and the slightly bitter taste of the radicchio. I also like the simple lemon vinaigrette (lemon juice + extra virgin olive oil), and the salty finish of the Parmesan. The walnuts and Parmesan are optional, though both add wonderful flavor and depth.

This salad is simple, delicious, and healthy. And it plays well with other ingredients – try swapping out the lemon juice for orange juice and adding some sliced oranges. Add some toasted hazelnuts in lieu of walnuts and crumbled ricotta salata instead of Parmesan. Or for a light dinner, add a grilled chicken breast or a piece of grilled salmon. Be creative! We don't have much more winter left – it's creeping into the 60's this week in NYC! – so enjoy this salad for the weeks to come.

ARUGULA, RADICCHIO, AND FENNEL SALAD WITH LEMON VINAIGRETTE

Serves 4 to 6

4 cups baby arugula
1 small head radicchio, thinly sliced (about 2 cups)
1 fennel bulb, cored and thinly sliced
Juice of 1/2 lemon
1/4 cup extra virgin olive oil
Sea salt and freshly ground pepper
1/4 cup chopped, toasted walnuts (optional)
Freshly grated Parmesan (optional)

Combine the arugula, radicchio, and fennel in a large bowl. In a smaller bowl, whisk together the lemon juice and olive oil in a bowl and season with salt and pepper. Taste the vinaigrette – feel free to add more lemon juice if you want a more acidic vinaigrette.

Toss the vinaigrette with the salad greens until lightly coated. Sprinkle with chopped walnuts and freshly grated Parmesan if desired.

VARIATIONS: This salad is delicious with sliced oranges and toasted hazelnuts (in lieu of walnuts). Try substituting ricotta salata for Parmesan. If you'd like to make this a main dish salad, it is delicious with grilled chicken, shrimp, or salmon. I also love serving this salad as a palate cleanser after a hearty pasta dish or stew.


click for recipe & more…
Your two cents...

If you don't have a Google login, please select Name/URL from the "Comment as" list below

Tuesday, February 28, 2012

Yellow Table Storytelling Dinner #2

This past weekend we hosted our second official storytelling dinner around the yellow table, and what a fun night it was! Our last one was back in the fall, and though we've had a few dinners in between, we hadn't had a proper storytelling night since. If you're new to The Yellow Table, you may be wondering "What is a storytelling dinner?" Well I'm so glad you asked. Our storytelling dinners (inspired by a Moth event I attended last fall) consist of friends (both new and old), sitting around the table, eating good food, drinking wine, and sharing stories. Basically, it's what I hope heaven will be like!
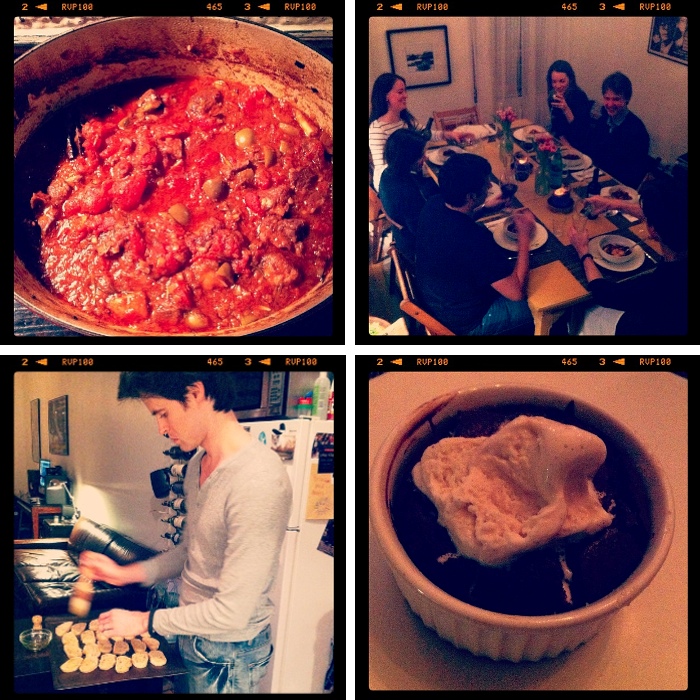


The original storytelling night, our topic was "Firsts," with stories ranging from crazy blind dates to biking accidents and police busts to a creepy ghost-spotting in an abandoned hotel. Everyone had a ball – it was so fun to see a group that only marginally knew each other (and some, not at all), linger over the dinner table well after midnight laughing and talking like old friends. This time, our theme was "Travel" and we heard stories of couch-surfing in Siberia, busking through Italy, and a near lion attack in South Africa. Again, the stories spiraled and we all lingered at the table long past dessert.

I really believe in the power of storytelling to connect and inspire – just think, it's what people sat around and did for thousands of years before there was television or Internet! It's funny, though, how people feel a little uncomfortable with the idea at first. We've all got stories to tell, and though we can post our thoughts and whereabouts on Facebook and Twitter all day long, telling a story with a beginning, middle, and end to a live audience (rather than a virtual one) seems a rather intimidating task. Which is exactly why I think little practice never hurt–especially when everyone ends up having fun in the process!

As for the food, since it was a cool, rainy night, I wanted to make something warm and comforting, preferably a stew that could simmer for hours in my Le Creuset dutch oven while I worked on the other dishes. I finally settled on Melissa Clark's fragrant Braised Pork Shoulder with Tomatoes, Cinnamon, and Olives over Polenta from her newest cookbook Cook This Now. Melissa is pretty much my culinary idol – I love her straightforward, seasonal recipes and her wonderful writing that somehow manages to be both authoritative and chatty all at once. I basically want to go hang out in her kitchen and cook with her after reading any of her recipes. Per usual, this one did not disappoint. The intriguing blend of flavors – sweet canned tomatoes and cinnamon, salty anchovies and olives, dry red wine, and a few sprigs of rosemary – melded together to create a braised pork that was meltingly tender and almost tagine-like in taste.

I served goat cheese crostini with kumquat chutney for starters (since I have all this chutney lying around!), and a nice light arugula, fennel, and orange salad as a palate cleanser after the pork stew. And last, but not least, at the request of my husband – who as the birthday boy got to choose his dessert – I made Bittersweet Chocolate Pudding Cakes inspired by a recipe I found in the New York Times. I made the recipe gluten free and used 60% Bittersweet Valrhona chocolate. The result was decadent. B got a candle in his cake and we ended the night singing happy birthday to him.

I hope you feel inspired to host your own storytelling dinner, and if you do, I'd love to hear about it! My sister hosted one in D.C. and her friends loved it – it would be fun to see the idea spread! But in the meantime, I'm collecting dinner party stories for a future post about your experiences...the good, the bad, and the hysterical. Feel free to comment below or send me an email at annawatsoncarl@gmail.com. Can't wait to hear from you!

February Storytelling Dinner Menu

Goat Cheese Crostini with Kumquat Chutney

Braised Pork Shoulder with Tomatoes, Cinnamon, and Olives with Polenta

Arugula, Fennel, and Oranges with White Balsamic Vinaigrette

Bittersweet Chocolate Pudding Cakes with Vanilla Gelato (recipe below)

BITTERSWEET CHOCOLATE PUDDING CAKES

Serves 4

Adapted from New York Time's Diner's Journal February 12, 2009

1/2 cup unsalted butter, plus more to butter the molds
4 ounces bittersweet chocolate (preferably Valrhona), cut into small pieces
2 eggs
2 egg yolks
1/4 cup sugar, plus more for sprinkling

Preheat the oven to 450°F. Butter four 4-inch ramekins and sprinkle each with a bit of sugar; place them on a sheet tray.

In a small, heavy saucepan, melt the butter over low heat. Add the chocolate and whisk constantly until the chocolate begins to melt. Remove from heat and continue whisking until the chocolate is completely melted. Let cool slightly.

In a medium bowl, whisk together the eggs and egg yolks with the sugar until light and fluffy. Slowly pour the melted chocolate and butter into the eggs, whisking constantly. (You can use electric beaters or a stand mixer if you prefer).

Pour the mixture into the ramekins and bake for about 8 minutes or until the center is beginning to set. The tops will puff up slightly like souffles but the centers will be deliciously soft and gooey. Cut a small hole in the top of each one and add a scoop of vanilla ice cream or gelato. Serve immediately in the ramekins, on small dessert plates. (Be careful, they are hot!!)

MAKE AHEAD: You can make the batter and fill the ramekins several hours ahead. Cover with plastic wrap and refrigerate until ready to use. Bring to room temperature before baking.

Add a comment!
Your two cents...

If you don't have a Google login, please select Name/URL from the "Comment as" list below

Tuesday, February 21, 2012

Buckwheat Galettes with Ham, Cheese, and Egg


Today, my friends, is Fat Tuesday, a.k.a. Pancake Day! I never realized until recently that there was a day designated to eating pancakes, but I suppose it makes sense with Lent starting tomorrow. While living in France, I fell completely in love with crêpes. Paper-thin, the French version of pancakes are delicious for dessert (filled with Nutella or dark chocolate), breakfast (filled with jam), or–if you make a savory batter–lunch or dinner. Traditionally, savory crêpes are called galettes and made with buckwheat flour. With their golden color and delicious nutty flavor, buckwheat galettes are the perfect base for savory fillings like ham, cheese, and egg, smoked salmon and creme fraiche, or my favorite, goat cheese and leeks.

The picture above was taken in Paris at my favorite crêperie, La Crepuscule. I love ordering a piping hot crêpe or galette from the window and taking it to the little park across the street to eat. I love the way the cheese forms crisp tendrils that spill from the top of the galette: pure deliciousness.

These are so easy to make. Just make sure you have either a crêpe pan or a nonstick omelette pan, and allow time for the batter to rest in the fridge before you attempt to cook them. Swirling the pan just right takes a little practice, but don't dispair: you'll get the hang of it after a few tries (and you can always eat your mistakes!). Bon appetit!

BUCKWHEAT GALETTES

Serves 8

2 large eggs
1 cup milk
1/4 cup water
2/3 cup buckwheat flour
2/3 cup all-purpose flour
1/4 teaspoon salt
3 tablespoons butter

Place all the ingredients in a blender and blend until smooth. If you don't have a blender, whisk the eggs, milk, and water together in a bowl until smooth. Add the flours and salt and whisk to combine. Whisk in 2 tablespoons of the melted butter. Strain the batter into another bowl. Cover with plastic wrap and place in the refrigerator for at least an hour (and up to 24) to allow all the air bubbles to settle.

Heat a small crêpe pan (or nonstick skillet) over medium high heat. Swirl 1 teaspoon of butter in the pan and add a small amount of batter in the pan–swirl the pan so that the batter evenly and thinly coats the bottom. Cook for about 30 seconds (until lightly browned) and flip. Cook for another 10-15 seconds and remove to a plate.

Continue cooking the rest of the batter, adding additional butter every third crêpe or so. Stack the crêpes on a sheet tray and keep warm in a 225 degree F oven until ready to serve.

GLUTEN-FREE VERSION: Use 3/4 cup buckwheat flour and 1/4 cup gluten-free all-purpose flour mixture. Follow the rest of the recipe as written.

BUCKWHEAT GALETTES WITH HAM, CHEESE, AND EGG

Serves 4

4 buckwheat galettes (recipe above)
4 thin ham slices
1 cup (4 ounces) shredded Gruyere, Swiss, or Emmenthal cheese
1 tablespoon melted butter
4 eggs
Salt and pepper to taste

Preheat the oven to 35o degrees F. Prepare the galettes according to the recipe above. Lay the galettes on a greased baking sheet. Cover each galette with 1/4 cup of cheese and 1 ham slice.

Heat the butter in nonstick skillet over medium-high heat. Add the eggs and cook for 3 minutes or so, until barely set. Slide one egg on top of the ham and cheese on each each crepe. Season the eggs with a bit of salt and pepper to taste.

Fold the four sides of the crepe over the filling to create a square; the egg yolk should be peeking out the top. (Alternately, fold the crepes in half, over the filling, to make half moons.

Cook in the oven for 8-10 minutes until the cheese has melted and the eggs have cooked through. Serve with a mixed green salad with a simple Dijon vinaigrette.


click for recipe & more…

Add a comment!
Your two cents...

If you don't have a Google login, please select Name/URL from the "Comment as" list below

Sunday, February 12, 2012

Valentine's Day: Dinner for Two


Let's be honest. Valentine's Day seems a little bit forced (OK a lot!). I'm all for romance, but I don't like being told when it should happen. And I certainly don't associate love with red roses, teddy bears, and heart-shaped boxes of chocolates. For me, romance involves creativity – and an element of surprise. To come home on a random Thursday and find a beautiful bouquet of tulips (which happens to be my favorite flower) on the table would make my week. Or finding a little handwritten love note tucked in my purse, or being served a hot cup of coffee in bed, or getting an unexpected text telling me to put on heels and meet my man out for a glass of bubbly. To me, these little things – done at random – keep the romance alive. And I'm so blessed to have a creative husband who loves surprising me. I have to work hard to keep up!

So for this Valentine's Day, I want to do something special for him. I have no interest in going out to dinner on V-Day with all the cheesy, pre-fixe "aphrodisiac menus" and couples who look, well, bored. Instead, I plan to make a cozy dinner diner à deux at the yellow table. There is nothing more romantic to me than a table set – with fresh flowers and lots of candles – for two. It completely transforms the ambiance of the apartment. Brandon doesn't cook at all, which is fine by me, because I've already got the menu planned!


If you're looking for something special to do for your honey on Tuesday, why not cook him or her dinner? The menu below is delicious, simple, and–obligatory chocolate dessert aside–light and healthy. I tried to pick vibrant colors and flavors, but that wouldn't be overly filling. Because the last thing you want on Valentine's Day is a food coma...trust me!

Menu for 2
(Scroll down for recipes)

• Goat Cheese Crostini with Kumquat Chutney and Rosemary

• Honey Dijon-Glazed Wild Salmon with Frisée, Blood Orange, & Avocado Salad

• Bittersweet Molten Chocolate Cakes with Raspberries and Crème Fraiche

What to drink? Rosé Champagne, of course! (Or crémant, cava, or Prosecco). I just love the pale rosé color–it just seems fitting for Valentine's Day, and you can't get much more celebratory than bubbles!


Don't be intimidated by this menu – it truly is quite simple. Much of it can be prepped in advance, and the dessert can be made the day before and reheated before serving. (Though it definitely tastes best right out of the oven!)

For the crostini, toast some little flatbread rounds (or any type of bread, really) and spread them with goat cheese, a dollop of kumquat chutney (or marmelade), and a sprinkle of chopped rosemary. Five minute appetizer, easy.

For the main course, simply brush some wild salmon with a honey-Dijon-soy glaze and roast it in the oven for about 12 minutes. Meanwhile, toss some frisée (a slightly bitter, curly lettuce) with oranges (I used Cara Cara and blood oranges), avocado, and a citrus vinaigrette.

And for the dessert, these are my favorite little bittersweet chocolate cakes. I know the whole molten chocolate craze has passed, but you really can't get much better than a dark chocolate cake with an ooey-gooey chocolate center. I mean, come on!! Who can say no to that?!


The great thing about these (besides being insanely good) is that you can either a) make the batter in advance, spoon them into souffle dishes, and bake them while you're finishing dinner (this will give you that molten chocolate center) or b) bake them earlier in the day, or even the day before, and just reheat in the microwave for dessert. Option a) tastes better but option b) is easier and still tastes great. So you decide depending on how much time you have.

But honestly, with a homemade dinner, sparkling wine, and candlelight, you kind of can't go wrong – this Tuesday or any day of the week. Happy Valentine's Day everyone!

GOAT CHEESE CROSTINI WITH KUMQUAT CHUTNEY AND ROSEMARY

Serves 2

I made my own kumquat chutney and will post that recipe another day. But on V-day, save yourself some time and just buy a jar of good chutney, bitter orange marmelade, or even some fig jam.

4 crostini (can be any type of bread)
1 tablespoon olive oil
4 tablespoons goat cheese
4 teaspoons jarred chutney (or bitter orange marmelade)
1 teaspoon chopped rosemary

Preheat the oven to 425°F.

Brush the crostini on both sides with olive oil. Toast for a couple of minutes until light brown. Flip the crostini and top each with a tablespoon of goat cheese. Bake for 3 to 4 minutes or so until the goat cheese begins to soften and the crostini edges are golden brown.

Remove from the oven and let cool slightly. Top each crostini with a teaspoon of chutney and sprinkle with a bit of chopped rosemary.

HONEY-DIJON GLAZED WILD SALMON WITH CITRUS FRISEE SALAD

Serves 2

Honey-Dijon Glazed Salmon
2 (4- to 5-ounce) pieces of wild salmon
Salt and pepper, to taste
1/4 teaspoon cayenne
1 teaspoon Dijon mustard
1 tablespoon soy sauce
1 tablespoon honey
1/2 lemon

Citrus Frisee Salad
2 cups friseé, rinsed and dried
1/2 Cara Cara orange, peeled and sliced
1/2 blood orange, peeled and sliced
1/2 avocado, sliced
1 tablespoon fresh squeezed orange juice
1 tablespoon white Balsamic vinegar
2 tablespoons extra virgin olive oil
Salt and pepper to taste

Preheat the oven to 400°F.

Arrange the salmon fillets on an an aluminum foil-covered baking sheet, skin-side down. Season with salt and pepper. In a small bowl, whisk together the cayenne, mustard, soy sauce, and honey. Brush the top of the salmon filets with the glaze.

Cut two thin slices of lemon and place one on each piece of salmon. (Reserve the extra lemon.) Bake for 12 minutes or until just cooked through.

Meanwhile, make the salad. Toss the frisé, orange slices, and avocado slices. In a small bowl, whisk together the orange juice, vinegar, and olive oil; season with salt and pepper. Set aside.

Remove the salmon from the oven and squeeze with the juice from the remaining wedge of lemon. Toss the salad with the vinaigrette and serve each place with a piece of salmon and some salad.

BITTERSWEET MOLTEN CHOCOLATE CAKES

Serves 2

2 ounces bittersweet chocolate
3 tablespoons + 1 teaspoon butter
1 egg + 1 egg yolk
1/2 cup powdered sugar
2 1/2 tablespoons all-purpose flour
1 tablespoon Kahlua (optional)

Preheat the oven to 450°F and butter two 3/4-cup souffle dishes. (NOTE: You can also make these in muffin tins–just butter 4 muffin cups and bake for slightly less time, about 8 to 9 minutes.)

In a small saucepan, melt the chocolate and butter over low heat, stirring constantly. Remove from the heat and cool slightly.

In a medium better, whisk together the egg and egg yolk. Add the sugar, then the chocolate mixture and flour, whisking until smooth. (Whisk in the Kahlua, if desired). Divide the batter into two dishes. (If you are making them in advance, just cover with plastic wrap and refrigerate until you are ready to bake them).

Bake for about 10 to 11 minutes (a few minutes longer if the batter was refrigerated) until the tops of the cakes have puffed up slightly and the center is still runny. Run a knife around the edges and quickly turn the cakes onto two plates. Dust with powdered sugar and serve with creme fraiche (or vanilla ice cream) and raspberries. Serve immediately so you get the chocolate gooeyness!


click for recipe & more…

Add a comment!
Your two cents...

If you don't have a Google login, please select Name/URL from the "Comment as" list below

Wednesday, February 8, 2012

Crispy Pork Schnitzel with Mixed Greens


I remember the first time I tried schnitzel. It was in Heidelberg, Germany, on a sunny day in May, 2001. I was studying abroad in Paris at the time, and was visiting a German friend for the weekend. Her parents took us to a lovely restaurant for lunch and I remember sitting outside on the terrace, eating a thin, crisply fried piece of veal served with a lemon wedge and a green salad. Her parents ordered a bottle of wonderful German white wine, and even though I was barely 21, I felt terribly grown up.

It was eight years before I tried schnitzel again. I was living in New York, and a colleague told me that her husband had just started a new food truck called
Schnitzel & Things
. Of course, I was intrigued. The memory of that golden fried cutlet had stuck with me all those years and I couldn't wait to try it again.

Once again, I was entranced. Only this time, instead of sitting on a sunny terrace, I stood outside a truck in Carroll Gardens, Brooklyn, and ate off a plastic plate. But it was so delicious I didn't care. I got to sample multiple types of schnitzel: pork, chicken, and cod, plus all sorts of delicious side dishes, like Austrian potato salad, cucumber salad, and red cabbage slaw. I loved Schnitzel & Things so much that I wrote about them for Tasting Table.


A couple years passed and I finally decided it was time to attempt my own schnitzel at home. How hard could it possibly be? You just pound some meat, dip it in egg, dip it in bread crumbs, and fry it. Easy, right? As it turns out, it is WAY easy. And tastes so incredibly good that it seems like you should have slaved away for hours. I've made it now a half dozen times or so, and have done a little experimentation to get the maximum flavor. I'm not a big veal fan in general, so I stick with pork, and thanks to a tip I read in Bon Appetit, I marinate the cutlets in red wine vinegar before frying them. I also use Panko – the larger, Japanese-style breadcrumbs – to give the schnitzel an extra crunch, and I add thyme and lemon zest for flavor.

Served with a lemon wedge and a simple green salad (and, if you really wanted to be authentic, a warm potato salad), this dish is simple, elegant, and unbelievably good. It's comfort food at it's best, preferably in the winter or spring. Plus, considering all the pounding required, it's a great stress reliever. So pour yourself a glass of Gruner Veltliner and get out that meat tenderizer. You'll feel like a new person in no time.

PORK SCHNITZEL WITH MIXED GREENS

Serves 4

2 (5-ounce) boneless pork chops
1 cup red wine vinegar
2 eggs, beaten
3/4 cup panko breadcrumbs
2 teaspoons lemon zest
2 teaspoons thyme leaves
Sea salt and freshly ground pepper, to taste
2 tablespoons vegetable oil
2 tablespoons olive oil

4 to 5 cups of mixed baby greens
Juice from 1/2 lemon
3 to 4 tablespoons extra virgin olive oil
Lemon wedges to serve

Using a sharp knife, cut each pork chop in half lengthwise. Place the four pieces of pork in Ziploc bag (or a bowl) and cover with the red wine vinegar. Seal the bag (or cover the bowl with plastic wrap) and let marinate in the refrigerator for 1 to 2 hours. (In a pinch, you can marinate it for 30 minutes).

Remove the pork from the red wine vinegar and pat dry with paper towels; discard the vinegar.

Place the pork slices between two sheets of plastic wrap of wax paper and gently pound to 1/4-inch thickness, using the flat side of a meat tenderizer.

Place the eggs in a shallow bowl. In a separate shallow bowl, combine the bread crumbs with the lemon zest and thyme leaves; season with salt and pepper.

One at a time, dip the pork cutlets in the egg, then dip into the bread crumb mixture. Place the breaded pork cutlets on a plate and place in the refrigerator for 10 minutes to let the crumb mixture adhere to the meat.

Heat the oil in a large skillet over medium-high heat for about 2 minutes. Gently add two cutlets to the pan (be careful of the hot oil!!) and let cook for about 2 to 3 minutes per side, until golden brown. Remove the cutlets to a paper-towel lined plate and finish cooking the remaining two cutlets.

Place the salad greens in a large bowl and toss with the lemon juice and the olive oil. Season with salt and pepper to taste. (Taste the salad and feel free to add more lemon juice or olive oil, according to your tastes.)

SERVE the schnitzel hot, garnished with a lemon wedge and mixed greens. This is delicious with a blonde beer or a crisp Austrian white wine like a Pinot Gris or Gruner Veltliner.


click for recipe & more…

Add a comment!
Your two cents...

If you don't have a Google login, please select Name/URL from the "Comment as" list below

Wednesday, February 1, 2012

Healthy Living: An Energy-Boosting Salad for Winter


If there's one thing I've realized as I've gotten older it's this: food has a lot to do with my energy level. Obviously, sleep does, too, and a host of other factors, but what I eat is a big part of the equation. For years, my low-energy solution was a coffee and some sort of sugary baked good (more than likely a chocolate chip cookie). The only problem was, after the sugar rush, I immediately felt miserable as my energy–and mood–crashed.

Recently, as we've been trying to eat more healthfully, I've been paying attention to blood sugar levels. Instead of eating three big meals a day, I'm eating smaller meals, packed with vegetables and fruits and proteins. And my snacks in between–rather than cookies or pastries–usually consist of roasted almonds or sprouted toast with avocado or a piece of fruit with some almond butter. I'm realizing that the more steadily I eat, the more energy I have. And most importantly of all, the less sugar I eat, the better I feel. Period. As a former sweets ADDICT, it's amazing that I can admit this. But I really love the way I feel without it, so bring on the nuts, fruits, and veggies!

One of my favorite things as a cook is to throw together a meal based on what's inside my fridge. (I know, I know...for some people, that's your worst nightmare!) I like the challenge and actually, some of my best dishes have been inspired this way. I went scavenging in my fridge the other day, and found a bag of baby spinach, some roasted chicken breasts (cooked the day before), some leftover quinoa, and some chickpeas. And given that citrus fruits are amazing right now–especially my favorite, Cara Cara oranges–I threw in a couple of oranges for good measure. I tossed it all together, along with a tangy vinaigrette made with white Balsamic vinegar, and the result was a salad as beautiful as it was flavorful. And best of all, I felt like a million bucks afterward. I'll take feeling this good over a cookie any day.

SPINACH SALAD WITH QUINOA, CHICKEN, CHICKPEAS AND ORANGES

Serves 4 to 6

2 oranges (I especially love Cara Cara)*
6 ounces baby spinach (about 6 cups)
3/4 cup cooked quinoa, cooled
1/2 cup chick peas, drained and rinsed
2 chicken breasts (roasted or grilled), thinly sliced
2 tablespoons white Balsamic vinegar
1/4 cup extra virgin olive oil
Salt and pepper to taste

Using a sharp knife, cut off the ends of each orange so they can sit flat on a cutting board. With smooth, downward strokes, cut the skin off the orange in sections, so you are removing the white pith and can see the orange flesh beneath. Once the skin is removed, pick up an orange and hold it over a large bowl. Carefully cut each section out of the orange in between the membranes, so you're just getting the fruit and none of the pith or membrane. Let each slice drop in the bowl (along with the juices); repeat with the other orange. Discard the peels and the membranes.

Add the spinach, quinoa, chick peas, and chicken to the oranges; toss gently to combine.

In a small bowl, whisk together the white Balsamic vinegar and olive oil until smooth; season with salt and pepper to taste.

Drizzle the vinaigrette over the salad and toss to combine. Season the salad with additional salt and pepper if you'd like.

SERVING SUGGESTION: This salad is delicious with avocado slices, thinly sliced red onions, or crumbled ricotta salata or feta. Or serve with avocado toast: smashed avocado mixed with lemon juice, sea salt, and red pepper flakes on toasted whole grain bread.


click for recipe & more…
Your two cents...

If you don't have a Google login, please select Name/URL from the "Comment as" list below

Friday, January 27, 2012

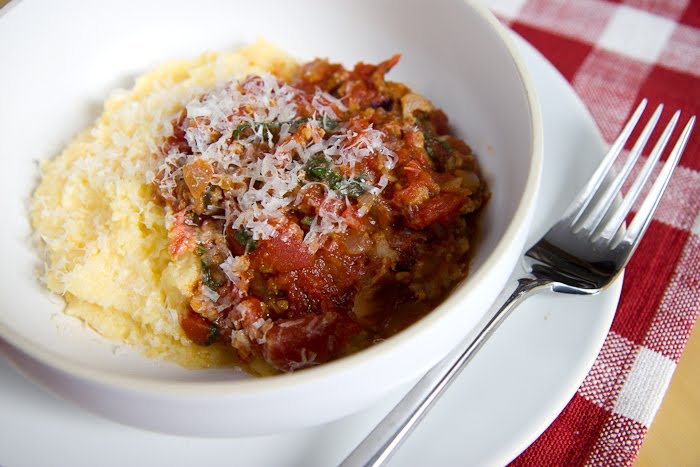
Creamy Parmesan Polenta with Sausage Ragu


Polenta is one of those cozy, wintry foods that just spell pure comfort to me. Maybe it’s because they remind me of the grits of my childhood, or maybe it’s because they pair so easily with hearty sauces–like wild mushroom or braised rabbit–or a rustic sausage-and-tomato ragu. Polenta in restaurants can easily be a butter- and cheese-laden affair, but in its truest form, it’s just cornmeal, water, and salt. I like adding some Parmesan and extra-virgin olive oil, but you don’t need to overdo it, the flavor is great on its own.

I made this meal last weekend, on a particularly cold Saturday, and channeled the Italian grandmother I never had. Snug and warm in our cozy apartment, with the polenta and the sauce simmering away on the stovetop, and a glass of red wine in hand, everything seemed right with the world. When the cooking was done, I lit some candles, set the table, turned on some jazz, and enjoyed a night in with my man. On a winter's night, there's nowhere I'd rather be.

Oh, one last thing. This dish needs some green and it’s particularly good with either sauteed
Swiss Chard
or Broccoli Rabe with Pine Nuts and Golden Raisins. You can’t go wrong with either. This also makes a fabulous dinner party dish. Make the sauce the day before (the flavors will be even better), then make the polenta and greens just before the party. Your friends will swoon. Enjoy!

CREAMY PARMESAN POLENTA

Serves 4

4 cups water
1 teaspoon sea salt
1 cup polenta (not quick-cooking) or yellow corneal (5 ounces)
1 tablespoon extra virgin olive oil
1/3 cup grated Parmesan, plus extra for grating on top

Bring the water and salt to a boil in a medium saucepan. Once the mixture is boiling, slowing add the polenta in a steady stream, whisking constantly. Whisk for 2 minutes then reduce heat. Cover and simmer for about 30 minutes, whisking every 10 minutes or so. The mixture should be thick and creamy, sort of like grits (if you're from the South you know what I mean!). Remove from the heat and whisk in the olive oil and Parmesan. Taste and add a little salt if you need to. Serve immediately.

*If you have leftover polenta and try to reheat it the next day, you will notice that it is very stiff–almost congealed. You can either a) cut it into little wedges and fry them up for some delicious polenta fritters OR b) put the cold polenta in a pot and a little boiling water (start with 1/4 cup and add more if you need to). Whisk the mixture together over medium heat until it reaches the desired consistency.

SAUSAGE RAGU

Serves 4

2 all-natural fresh Italian sausages (I bought mine at the Whole Foods meat counter)
1 small red onion, diced
3 cloves garlic, minced
1 (28-ounce) can San Marzano whole peeled tomatoes
1 1/2 tablespoons Balsamic vinegar
1/4 cup finely chopped basil
Salt and pepper to taste

Remove the sausages from their casings (just make a slit on one end and sort of squeeze the meat out). Cook the sausage in a large pot over medium heat, breaking it up with a wooden spoon so it resembles ground beef. Cook for 10 minutes or so until cooked through and no pink remains. Remove the sausage from the pot with a slotted spoon onto a paper-toweled lined plate. Set aside. Pour out all but a tablespoon of sausage grease from the pot.

Add the onion to the pot and saute for 3 to 4 minutes, stirring frequently. Add the garlic, stirring for a minute or so until it is softened and fragrant (do not let brown). Add the tomatoes, crushing with the back of a spoon. (WARNING: this can be messy, as the tomatoes tend to squirt, so wear an apron! For a cleaner preparation, pour the tomatoes into a bowl in advance and crush the whole tomatoes with your hands. Then pour the mixture, liquid and all, into the pot.)

Let the mixture come to a boil; reduce the heat and let simmer, covered, for 20-25 minutes. Check periodically and if it seems dry, add some water.

Stir in the sausage,Balsamic vinegar, and basil and let cook for a minute or two over low heat. Remove from the heat, season with salt and pepper. This is delicious with polenta or any type of pasta.


click for recipe & more…

Add a comment!
Your two cents...

If you don't have a Google login, please select Name/URL from the "Comment as" list below

Saturday, January 14, 2012

Part II: Flatbread Pizzas with Broccoli Rabe Pesto


As you can tell, I’m still on a broccoli rabe kick. Though it’s available year-round, winter is when this bitter, leafy green vegetable tastes best–and when I crave it the most. Usually I just sauté it in some garlic and olive oil, but recently I decided to try making pesto out of it. I love fresh basil pesto in the summer–its bright green color, intense garlicky-herb-Parmesan flavor, and its versatility. You can put it on pizza, drizzle on a salad, stir into soup, or toss with pasta. But given basil’s not in season, I thought broccoli rabe would be a perfect substitute.

As long as you have a blender, food processor, or even an immersion blender, this recipe is a piece of cake. Blanch the rabe (quickly boil until bright green, plunge into ice water to stop the cooking) then throw it in a blender with the usual pesto ingredients: garlic, pine nuts, Parmesan, and olive oil. I added a few red pepper flakes and some fresh lemon juice for an added kick, and of course salt and pepper (which, I found you need to use quite a lot of). You can play around with this recipe if you like–try swapping the pine nuts for walnuts or pistachios, or adding more lemon or red pepper. Or you can make a vegan version by eliminating the Parmesan (though you'll have to play around with the proportions...I've heard you can add nutritional yeast as a substitute).

Once you have your pesto made (which only takes 15 minutes or so), you can keep it in the fridge to use in all sorts of dishes. Try dolloping it on crostini with Parmesan shavings for a rustic appetizer. Or you can make these fantastic flatbread pizzas (recipe below), topped with sausage and feta cheese.


Or, add the broccoli rabe pesto to your favorite pasta: boil the pasta according to the package instructions, drain, and save about 1/2 cup of the cooking water. Depending on how many people you are feeding, add 1/4 cup or so of the pesto to the pasta, along with some of the cooking water, and toss together–you'll have an instant sauce! I love adding in some sausage to the rabe pesto pasta or if I want a vegetarian dish, I'll just top with some freshly grated Parmesan, roasted grape tomatoes, and toasted pine nuts. Not only is this so easy and delicious, it's a great way to sneak some extra vegetables into your diet...which is always a good thing!

BROCCOLI RABE PESTO

Makes about 2 cups

1 bunch broccoli rabe, woody ends removed
2 garlic cloves, minced
1/2 cup pine nuts
1/2 cup ground Parmesan (feel free to use more if you like)
1/4 teaspoon red pepper flakes
Juice of 1/2 lemon
1/2 to 3/4 cup extra-virgin olive oil
Sea salt and freshly ground pepper to taste

Bring a large pot of salted water to boil. Prepare a large bowl of ice water and place it next to the pot.

Working in batches, boil the broccoli rabe for 3 to 4 minutes or until bright green and softened. Plunge instantly into the ice water to stop the cooking; drain and squeeze dry.

Roughly chop the rabe and add to a blender or food processor (if using an immersion blender, just put all ingredients in a large bowl). Add the garlic, pine nuts, Parmesan, red pepper flakes, and lemon juice and pulse several times to combine. With the motor running, slowly add the olive oil until it reaches the desired consistency. (It should be sort of like a thick sauce). Season generously with salt and pepper–I found I needed over 1 tsp of salt and about 1/2 tsp pepper. Just be sure to taste and adjust as you go.)

Use immediately or store in an airtight container in the refrigerator–it should last for 3 to 4 days.

FLATBREAD PIZZAS WITH BROCCOLI RABE PESTO, SAUSAGE, AND FETA

Makes 4

4 whole-wheat flatbreads (or naan breads)
Broccoli rabe pesto (recipe above)
2 nitrate-free sausages (either pre-cooked or raw, made from lamb, chicken, duck, or pork)
1/2 cup grape tomatoes, sliced in half (optional)
Crumbled feta (about 1/2 cup)
Olive oil for drizzling

Preheat the oven to 425°F.

Place the flatbreads on a baking sheet. Spread about 3 tablespoons of the pesto on each flatbread, leaving a 1/2-inch border on the edges.

If you are using pre-cooked sausage, slice it and arrange the pieces over the pesto. If you are using raw sausage, cook it for 7-8 minutes on the stove top and add the cooked sausage to the pizza. (If you are vegetarian, eliminate the sausage and substitute for grape tomatoes). Sprinkle each pizza with a couple tablespoons of crumbled feta.

Drizzle each pizza with a bit of olive oil and bake for 10 to 12 minutes or until the crust is brown and the cheese is beginning to melt. Let cool for a few minutes, then slice into pieces and serve.

I love serving this with a wintry salad of arugula, radicchio, endive, and thinly sliced fennel with a citrus vinaigrette.


click for recipe & more…
Your two cents...

If you don't have a Google login, please select Name/URL from the "Comment as" list below

Monday, January 9, 2012

Healthy Living: Broccoli Rabe Part I

Broccoli rabe is one of those vegetables I didn’t try until I was an adult. Actually, there were a long list of those vegetables: kale, Swiss chard, collard greens, cauliflower, fava beans, sugar snap peas, eggplant, red cabbage, fennel, radicchio, endive, arugula, butternut squash, zucchini, wild mushrooms, parsnips, bok choy, radishes...the list goes on and on. It's not like my family didn't eat vegetables growing up (we did!), it's just that we stuck with a steady all-American rotation of green beans, broccoli, peas, carrots, potatoes, yellow squash, corn, and maybe Brussels sprouts or asparagus on special occasions. I'm sure these were probably the vegetables most readily available at grocery stores in the 1980's and '90's, supplemented by whatever my grandparents happened to be growing in their gardens. As a child, I was pretty ambivalent about vegetables. I didn't hate them, but I certainly didn't love them. They were basically just an obstacle between me and dessert: if I ate the vegetable, I got the dessert. So more or less begrudgingly, I ate the vegetables.


Everything changed in my twenties. Whereas vegetables had previously been an annoyance or an afterthought, as I started cooking more, they gradually became the centerpiece of my diet. Living in France (in Paris, Provence, and Burgundy) over a period of several years definitely changed the way I viewed vegetables. I started shopping at the markets, buying my fresh produce daily instead of weekly–letting the seasons and the colors inspire me. In Provence, I made tians–colorful layered vegetable dishes with eggplants, potatoes, zucchini, tomatoes and fresh herbs (and lots of garlic and olive oil) and beautiful salads of baby greens with steamed haricots verts and heirloom tomatoes with hazelnut vinaigrette. I stuffed zucchini flowers with fresh goat cheese and made hearty winter soups with potatos and leeks.

I learned how to roast vegetables in Burgundy, transforming formerly bland items like cauliflower or sweet potatoes into deeply flavored, caramelized treats. I began experimenting with a host of vegetables I'd never tried before (see: list above) and soon enough, plants were crowding out the meat on my plate. It's not just the colors and flavors and variety of vegetables I've grown to appreciate–it's the way my 31-year old body feels after eating them that I especially love. I feel lighter, healthier, and more energized when I eat a mostly vegetable diet. (But don't worry, I'm not going totally vegan on you all...my husband would never allow that!)


Which brings me back to broccoli rabe. This dark leafy vegetable looks sort of like a lovechild between broccoli and kale, and has a distinctly bitter taste (which I happen to love). It's also packed with antioxidants like Vitamin A and C, and loaded with fiber, calcium, and potassium. I first tried broccoli rabe in Italy sautéed in garlic, olive oil, and a few red pepper flakes, finished with just a squeeze of lemon. So simple and so delicious. Back home I've cooked this dish so many times, though recently I made it Sicilian style, with toasted pine nuts and golden raisins. I love the contrast of the bitter greens with the sweet golden raisins and buttery toasted pine nuts. Sometimes I add a splash of Balsamic vinegar at the end for a little extra complexity. Though you can sauté broccoli rabe raw, I like to blanch it first (a quick boil followed by a dunk ice water) to cut down on its bitterness. Just make sure to drain it well and pat dry before throwing it in the sauté pan.

This broccoli rabe makes a delicious side dish for grilled sausage (or meatballs) with tomato sauce and polenta. For a lighter meal, it's fantastic with grilled salmon, or you can go entirely vegetarian and pair it with roasted squash (butternut, delicata, or spaghetti) and perhaps some farro with wild mushrooms.

Coming up next: Broccoli Rabe Pesto + two recipes

BROCCOLI RABE WITH PINE NUTS AND GOLDEN RAISINS

Serves 4

1 head broccoli rabe, tough ends removed
3 tablespoons pine nuts
2 tablespoons olive oil
1 clove garlic, minced
1/8 teaspoon red pepper flakes
3 tablespoons golden raisins
Sea salt and freshly ground pepper

Bring a pot of salted water to a boil. Prepare a large bowl of ice water and set it by the pot. Working in batches, boil the broccoli rabe for a minute or two until bright green. Using tongs, remove the rabe from the pot and place in the ice water to stop the cooking. Once all the rabe is cool, pour the rabe into a colander and set aside.

Toast the pine nuts in a small, nonstick saute pan over medium heat for 3 to 4 minutes, stirring constantly, or until evenly browned (it will smell like popcorn). Take care not to burn them–they cook quickly! Dump the pine nuts into a bowl to stop cooking.

In a large frying pan, heat the olive oil over medium-high heat. Add the garlic and red pepper flakes and cook for one minute or until fragrant (but not brown). Add the broccoli rabe and cook, stirring constantly, for 3 to 4 minutes or until tender-crisp. Add the raisins and the pine nuts and toss to combine. Season with salt and pepper to taste.

If you want, add a dash of Balsamic vinegar or a squeeze of lemon at the end. This is delicious with grilled salmon, pork tenderloin, or meatballs with tomato sauce. Definitely one of my favorite easy vegetable side dishes!


click for recipe & more…

Add a comment!
Your two cents...

If you don't have a Google login, please select Name/URL from the "Comment as" list below

Thursday, January 5, 2012

The Best Cold Remedy: Homemade Chicken Noodle Soup


After our whirlwind holiday travels, I've been excited to get back home and get back to work. I've had big plans for the blog–for healthy new recipes and tips to stick to your New Year's healthy eating goals–as well as all sorts of projects I want to do around the apartment, like clean out the closet, the pantry, the bathroom, and the file cabinet. (OK, in all honesty, Brandon's the one who usually initiates these organization projects, but I'm all for following his lead!) I have lists of stories to pitch, emails to send, books to start reading, and resolutions to begin, like more running and yoga. And then the cold hit.

The day after we got home (Monday), I woke up with a stuffy nose. Which turned into a sneezing, dripping, red-nosed, puffy-eyed head cold. Luckily it hasn't spread to my throat or chest, but it's left me feeling bad enough to pretty much stay in my PJ's, down zinc and vitamin C, chug water, and blow through boxes of tissues. And eat lots of grapefruit and blood oranges.

Though the blog has stayed a bit neglected (I haven't had the energy to cook plus photograph and write) and the clean-out projects have been left undone for the moment, I have been reading. And brainstorming and journaling. The cold has forced me to actually slow down for the first time in a long while, and pay attention to the parts of me–namely, my heart and my soul–that often get pushed into the background as more immediate concerns demand my attention.


It has been amazing to have time to reflect on 2011: on struggles and victories and things I learned, on goals–some reached and others left undone, on friendships deepened, on trips taken, on books read, on dinners shared. And most of all, on the Lord's goodness and faithfulness. Brandon and I took time this week to reflect on our first year of marriage (with all its joys and upheavals), and to talk about through our goals and dreams for 2012.

Though my head is still stuffy and my nose is still raw, I feel so inspired by all that 2012 holds. I feel like this is going to be a year of purpose, of healing, and of dreams fulfilled. And of course, lots more cooking and writing and yellow table dinner parties!

As much as I love getting my apartment cleaned out and re-organized at the beginning of the year, I've loved even more this quiet, reflective time. I haven't stopped cooking, but my cooking has been simple and cleaner–lots of veggies and soups and grains–and I've replaced wine (for the time being) with water and herbal tea and my new favorite drink Kombucha. As I mentioned in my last blog post, we're following a special Lyme diet full of vitamin- and mineral-filled anti-inflammatory foods (veggies, grains, fruits, lean proteins, healthy fats) and little to no sugar, dairy, or white carbohydrates. If it weren't for this cold, I'm sure I'd be feeling incredible by now...


Anyway, my real purpose in writing this blog post is that I wanted to share with you my favorite at-home cold remedy (besides citrus fruits and Kombucha): homemade chicken noodle soup. It is super-easy to make, and there is something so comforting about warm broth filled with veggies, noodles, and shredded chicken. I love adding spinach at the end for extra vitamins and color. I made this soup a few days ago, and have been eating it every day since.

Keep in mind that this soup is intended to be restorative, so it will only be as good as the quality of the ingredients you put in it. Meaning, buying broth or meat from mass-produced chickens (often pumped with hormones and antibiotics) is not going to help you get well. I recommend buying free-range organic chicken stock (or making your own) and roasting organic chicken breasts to shred and put in the soup.

Healthy or not, I would recommend easing into 2012. Take time to think, pray, journal, and reflect. And to make a pot of chicken noodle soup. You will thank yourself.

HOMEMADE CHICKEN NOODLE SOUP WITH SPINACH

Serves 6

2 to 3 tablespoons olive oil
2 carrots, peeled, halved and diced
2 ribs celery, halved and diced
1/2 yellow onion, diced
2 cloves garlic, minced
6 thyme sprigs, leaves removed (discard stems)
Sea salt and freshly ground pepper to taste
2 quarts chicken stock, homemade or store-bought (free-range, organic)
8 ounces dried wide egg noodles
1 1/2 cups shredded, cooked, organic chicken (can be white or dark meat, roasted, boiled, or store-bought rotisserie)
2 cups baby spinach leaves

Heat the olive oil in a large pot over medium heat. Saute the carrots, celery, onion, garlic, and thyme for 5 minutes or so until the vegetables are softened, but not brown. Season with salt and pepper.

Add the chicken stock and bring to a boil. Add the egg noodles; reduce heat to simmer and let cook for 5 minutes or until the noodles have softened a bit. Stir in the chicken and the spinach and simmer for a couple more minutes to cook through. Season generously with salt and pepper to taste.


click for recipe & more…

Add a comment!
Your two cents...

If you don't have a Google login, please select Name/URL from the "Comment as" list below

Friday, December 30, 2011

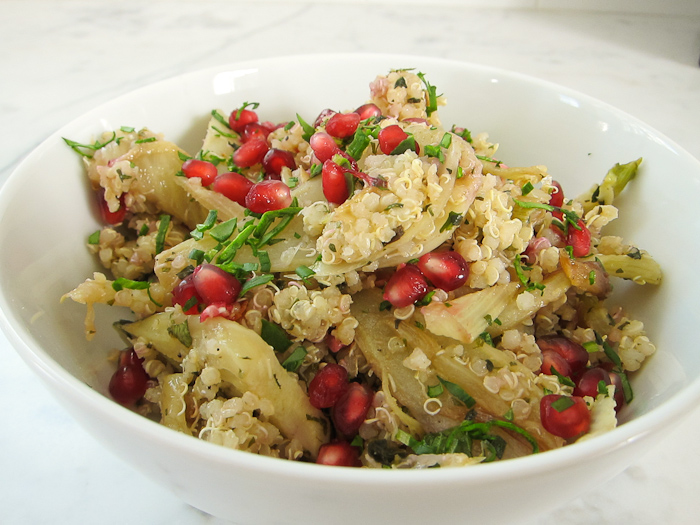
Healthy Living: Quinoa Salad with Fennel & Pomegranate


Hello friends! I hope everyone has enjoyed their holidays thoroughly. If you've noticed I haven't posted for the past week, it's because we've been trekking across the eastern half of the country visiting family. In the past week we've traveled from NYC to Nashville, TN (my family) to Adairville, KY (my extended family) to Kalamazoo, MI (B's family). There's been lots of cooking, eating, movie-watching, shopping for (and opening of) presents, and lounging by the fire. But unfortunately, not much time for blogging!

Regardless, I wanted to share with you all an amazing recipe I tried over the holidays. I cannot take credit for the recipe–it belongs to Yotam Ottolenghi, my new chef crush. I got his cookbook
Plenty
for Christmas, and have completely fallen in love with his incredible Mediterranean-inspired vegetarian dishes, ranging from simple (baby lettuce and herb salad) to wonderfully complex (leek fritters with herbed yogurt sauce). Israeli-born Ottolenghi runs several high-end "to-go" food shops in London that sell the same sorts of fresh salads, roasted vegetables, grains, and soups that fill his cookbooks and his long-running vegetarian column in The Guardian newspaper. (Perhaps he will expand his shops to NYC one day??)

There's a big spread on Ottolenghi and his vibrant vegetable dishes in the January 2012 issue of Bon Appetit that includes this gorgeous quinoa salad. I made it for dinner the other night, with some roasted salmon and steamed green beans, and it was such a welcome respite from all the heavy holiday fare. I love the combination of nutty quinoa with sweet caramelized fennel, fresh herbs, and jewel-like pomegranate seeds. And considering the not-exactly-small ingredient list, it's actually pretty simple to make.

I'm not big on New Year's resolutions, but one of my themes for 2012 is health. Though it's certainly not all in my control, I am on a mission to help Brandon kick his Lyme and babesia with a healthy diet, and starting in January we are going to be cutting back on lots of foods that cause inflammation, like dairy, wheat, sugar, red meat, caffeine, and alcohol. It's definitely going to be a tough adjustment for a gal like me whose basic food groups include bread, cheese, wine, chocolate, and coffee BUT if there's any chance of improving the way B feels by eating a cleaner, leaner diet, then I'm all for it. I am excited to experiment with new vegetables and grains this year, with new herbs and spices, and to eat as simply, healthfully, and deliciously as possible. (And don't worry, I am not giving up ALL coffee and wine and chocolate–that would be cruel and unusual!) Stay tuned in January for more adventures in healthy eating...

Happy New Year!


QUINOA SALAD WITH CARAMELIZED FENNEL AND POMEGRANATE SEEDS

Adapted from Yotam Ottolenghi's recipe in Bon Appetit

Serves 6

1/4 cup extra virgin olive oil
4 small fennel bulbs, cut lengthwise into 1/4"-inch thick slices
Sea salt and freshly ground pepper
2 tablespoons fresh lemon juice
1 1/2 teaspoons cumin
1 teaspoon sugar
1 cup quinoa rinsed
1 lemon
1/2 cup chopped fresh cilantro
1/2 cup chopped fresh mint
1/4 cup pomegranate seeds (from 1/2 small pomegranate)*

Heat 3 tablespoons of the oil in a large skillet over medium high heat. Add the fennel; season wit salt and pepper. Cook, stirring occasionally, until the fennel is tender and lightly golden, about 10 to 12 minutes. Stir in the lemon juice, cumin, and sugar; cook for 1 minute. Season with salt and pepper. Set aside.

Meanwhile, bring the quinoa and 3 cups of water to a boil in a medium saucepan. Cover, reduce heat to low, and simmer until quinoa is cooked, about 10 minutes. Drain; return to pan. Cover; let sit for 15 minutes. Fluff with a fork, transfer to a large bowl.

Using a small sharp knife, cut all peel and white pith from the lemon. Cut between the membranes to release the segments; discard membranes and roughly chop. Add lemon with any juices and the remaining tablespoon of oil to the quinoa; stir. Add the fennel mixture and herbs and toss gently to combine. Season with salt and pepper to taste. Transfer salad to a large platter and sprinkle with pomegranate seeds.

*The easiest way to remove pomegranate seeds is to cut the pomegranate in half crosswise (rather than from stem to stem). Hold one half of the pomegranate over a bowl, cut-side down and smack it on the back with a wooden spoon until the seeds start falling out. Continue to smack the back of the pomegranate, lightly squeezing the sides of the fruit to release more seeds. Discard any bits of white membrane that fall in the bowl.


click for recipe & more…

Add a comment!
Your two cents...

If you don't have a Google login, please select Name/URL from the "Comment as" list below

Tuesday, December 27, 2011

Healthy Living: Hearty Sprouted Lentil Stew with Kale


This is my go-to healthy and hearty recipe for a cold, winter's night. It's simple to prepare, it's packed with vitamins and minerals from the vegetables and–thanks to the sprouted lentils–full of protein, enzymes, and micro-nutrients. It's also vegan and gluten-free. For a creamier soup, feel free to puree half or all of it with an immersion blender (or a food processor) after cooking. It's delicious either way, and tastes even better reheated the next day.

HEARTY SPROUTED LENTIL STEW WITH KALE

Serves 6

2 to 3 tablespoons olive oil
1 small white or yellow onion, diced
2 carrots, peeled, halved, and diced
2 ribs celery, halved and diced
2 garlic cloves, minced
1 teaspoon ground cumin
1/2 teaspoon ground coriander
1/4 teaspoon red pepper flakes (optional)
Sea salt and freshly ground pepper to taste
1 10-ounce package sprouted green lentils
1 10-ounce can diced tomatoes
1 quart vegetable stock
1 bunch Lacinto (Tuscan) kale, tough stems removed and cut into bite-size pieces

Heat the olive oil in a large pot over medium-high heat. Add the onion, carrots, and celery and saute for 5 minutes or so until softened, but not brown. Stir in the garlic and spices, and season with salt and pepper. Let cook for 1 minute or so until the garlic is fragrant (but not brown).

Add the lentils, tomatoes (and juices), and vegetable stock and bring the mixture to a boil, stirring occasionally. Reduce the heat to a simmer and let cook for 20 to 30 minutes or until thickened; remove from heat. If you like, you can use a stick blender to puree the soup to your desired consistency. Or feel free to leave it as is.

Stir in the kale and cook over low heat for a minute or two until wilted. Taste, and season generously with salt and pepper. Serve in shallow bowls with crusty bread.
Your two cents...

If you don't have a Google login, please select Name/URL from the "Comment as" list below

Friday, December 16, 2011

Tarte Flambée (and the joys of catering in NYC...)

When a friend of mine recently asked if I'd make some food for our church's Christmas party, I immediately said yes. It was ladies-only, so I figured it would be an intimate affair, maybe 25-30 people max. A couple of easy hors d'oeuvres, a few desserts, no biggie. A couple of days before the event, I found out that over 50 people had RSVP'd. OK, still doable, but suddenly I had to start thinking like a caterer. I didn't have loads of time to cook on the day of the event, so I planned a menu of simple appetizers that I could either make in advance or throw together last minute.


Living in a fifth floor walk-up apartment makes catering quite a workout. First there's the grocery shopping and the lugging of bags up all those stairs. Then there's the prep in my kitchen and the re-packing of all the food–plus any kitchen tool, pot, pan, or cutting board that I think I might need at the venue. And then–my favorite part–there's the challenge of getting a cab. I can't tell you how many times I've hobbled down the block, bags hanging off every single appendage, trying desperately to flag down a cab (which all seem to be off-duty at that particular moment!). Once in the cab I can breathe a huge sigh of relief until I arrive at my destination–and then the lugging begins all over again.

This week was particularly hilarious, as the cabby dropped me off a block and a half from my destination. When I told him that the building I needed was actually on the other side of Sixth Avenue, he screamed at me for not giving him proper directions and ordered me out of the cab. I sighed, paid, and grabbed my 8 bags, 3 sheet trays, and large cutting board, and dragged myself–slowly–back across Sixth Ave. This, I reminded myself, is why I rarely cater anymore. It's not the planning, shopping, or cooking that gets to me–it's the schlepping!

Once in the kitchen, of course, all was well. I unpacked, got the ovens cranking, and started chopping, stuffing, wrapping, and baking. I had made my
Tuscan White Bean Dip
in advance, and I sliced up a bunch of crudités for dipping: red and yellow peppers, fennel, carrots, endives, and sugar snap peas. I made my classic Bacon-Wrapped Dates, assembled a cheese tray with some tapenade and crackers, and sliced up some Old-Fashioned Gingerbread with a bowl of lemon curd for drizzling. Last, but not least, I made my all-time favorite wintry appetizer: Tarte Flambé, an Alsacian flatbread of sorts, with onions, creme fraiche, bacon, and grated Gruyere cheese.

Not only is this combination of flavors absolutely irresistible, but it's so easy to make: there's no pre-cooking the bacon or onions–everything's just sliced, arranged on the dough, and baked in hot oven for 15-20 minutes. (Of course you can make your own dough, but for time's sake I usually buy pre-made.) It's equally delicious as an hors d'oeuvres (sliced into small squares) or for dinner, served with a big green salad. It's also versatile: you can make it with pizza dough or puff pastry, use white or red onions, bacon or pancetta, and add a sprinkling of herbs (I love rosemary). The other night I made four tartes and there was not one piece leftover. Glad I snuck a couple bites in the kitchen...

A NOT QUITE TRADITIONAL TARTE FLAMBEE

Serves 8 as an appetizer (or 3-4 for dinner)

One ball bread or pizza dough (homemade or store-bought) or one sheet frozen puff-pastry, thawed
1/4 cup creme fraiche
1 small onion (red or white), thinly sliced
1/4 cup finely diced bacon or pancetta
1/2 cup coarsely grated Gruyere
1 tablespoon chopped fresh rosemary
Salt and pepper

Preheat the oven to 425°F. Lightly grease a sheet tray or line with parchment paper.

On a floured surface, gently roll out the pizza dough into a rectangular shape, about 1/2-inch thick. (If you are using puff pastry, no need to roll it out.)

Place the dough on the prepared sheet tray and spread the creme fraiche on the dough, leaving about an inch border around the edges. Arrange the onions over the creme fraiche, then sprinkle with bacon, Gruyere, and rosemary. Season with salt and pepper.

Bake until crisp and golden brown, about 20 minutes. Let cool for 5 minutes or so before slicing. Cut into small squares for appetizers, or larger ones if serving for dinner.

*This is delicious with a crisp white wine from Alsace, like a Pinot Gris, or a dry sparkling wine. I love this with a Loire Valley or Alsacian cremant.


click for recipe & more…
Your two cents...

If you don't have a Google login, please select Name/URL from the "Comment as" list below

Tuesday, December 6, 2011

Instant Cocktail Party: Bacon-Wrapped Dates


These salty-sweet snacks are absolute musts for any party. 1) Because they're delicious. 2) Because they're quite possibly the easiest appetizer in the world to make. Roasted salted almonds are stuffed into sticky-sweet dates, wrapped in bacon, and baked until crisp and brown. What's not to love??

For a holiday party on the fly, make some crostini (cut a baguette into thin slices, brush with olive oil and sprinkle with sea salt, and bake at 375°F for about 8 minutes or until golden and crisp) and serve with good quality jarred olive tapenade, a few nice cheeses (I like a combination of a soft goat cheese, an aged blue, a creamy cow's milk, and a hard cheese like aged Gouda), and my
Tuscan white bean dip
with some crudités–radishes, carrots, thinly sliced fennel, and raw haricots verts. With this spread of tasty nibbles–plus your bacon-wrapped dates–your friends will think you're a party-planning pro. Just don't forget the bubbly!

BACON-WRAPPED DATES WITH ALMONDS

Serves 8 to 10

Approx. 30 almonds
Approx. 30 seedless dates
1 pound bacon, each slice cut into thirds

Preheat the oven to 375°F.

Cut the dates open, remove the seeds, and slip the almonds into the center of each. Wrap each date in 1/3 slice of bacon, tucking the loose ends under the date. Arrange the dates in rows on a baking sheet.

Bake for 15 minutes or until golden brown and crisp. Place on a paper-towel-lined-plate to soak up some of the grease; let cool slightly before serving.

VARIATION: Substitute blue cheese for the almonds, or try prunes instead of dates.


click for recipe & more…
Your two cents...

If you don't have a Google login, please select Name/URL from the "Comment as" list below

Sunday, December 4, 2011

Healthy Living: Two Delicious Party Dips


'Tis the season for holiday parties, and despite the trays of pigs-in-a-blanket and bowls of cheesy spinach dip you'll encounter, there's no need to fear. The key to feeling good this holiday season (and to avoid packing on the pounds) is simple: eat your vegetables! If you're eating a balanced diet with plenty of veggies–and making sure to get in some exercise–then you can enjoy your holiday treats guilt-free. Of course moderation is key. (I just wrote a piece on
healthy holiday eating
in the Huffington Post if you're interested in reading more!)

Personally, when I'm throwing a Christmas party I like to throw in some healthy options. I especially love making flavorful dips with veggies, beans, and herbs like Tuscan White Bean and Lemony Fava Bean with Mint. They are easy to whip together in a blender or food processor, and can be made completely in advance–which makes serving a breeze. I like putting out a few bowls of homemade dips (other favorites are Fig-Olive Tapenade, Roasted Red Pepper Hummus, and Roasted Eggplant Dip) and serving them with an assortment of flatbreads, pita chips, and crackers.

In the coming weeks, I'll be featuring several of my favorite holiday nibbles–some healthy, some not-so-much (bacon-wrapped dates!), but all ultra-flavorful and simple to prepare. Because–as I've said before and I'll continue to say–why throw a party if you can't enjoy it?! So pop open some (budget) bubbly and get out that blender...you'll have two fabulous dips ready in no time at all!

TUSCAN WHITE BEAN DIP

Serves 8 to 10

2 tablespoons olive oil
1 small yellow onion, finely chopped
3 cloves garlic, minced
2 (15-ounce) cans cannellini beans
1 cup vegetable (or chicken) broth
2 teaspoons fresh thyme leaves*
1/2 teaspoon red pepper flakes
1/4 cup freshly grated Parmesan
Salt and pepper, to taste
Extra virgin olive oil for garnish
Chopped sun-dried tomatoes for garnish (optional)

Heat the olive oil in a large skillet over medium-high heat. Sauté the onion and garlic for 3 to 4 minutes, stirring frequently, until softened and fragrant (do not let the garlic brown). Add the beans and the stock and bring to a boil. Let simmer until thickened, about 5 to 10 minutes. Add the thyme and red pepper flakes.

Pour the mixture (carefully!) into a blender or food processor. Add the Parmesan and pulse several times to until smooth. Season with salt and pepper. Let cool to room temperature before serving.

Garnish with a drizzle of olive oil and some chopped sun-dried tomatoes (optional) and serve with whole wheat pita chips, whole grain flatbread, or grainy crackers.

*In the summertime, I like to substitute 1/4 fresh basil for the thyme.

LEMONY FAVA BEAN DIP WITH MINT

Serves 8 to 10

2 1/2 cups frozen fava beans, thawed*
2 cloves garlic, peeled and smashed
1 teaspoon lemon zest
Juice of 1/2 lemon
1/2 teaspoon red pepper flakes
3 tablespoons extra virgin olive oil
1/4 cup chopped fresh mint
Salt and pepper to taste

Bring a medium saucepan of salted water to a boil. Add the fava beans and garlic cloves and let simmer for 4 to 5 minutes or until tender. Meanwhile, prepare a bowl of ice water.

Save 1/2 cup of the cooking water, then drain the beans and garlic. Place the beans in the ice water to stop cooking. Remove and discard the white outer skins from the fava beans, saving the bright green beans inside.

Place the peeled fava beans and garlic in a blender or food processor. Add the lemon zest, lemon juice, red pepper flakes, olive oil, and mint and pulse to combine. The mixture shouldn't be completely smooth–it's nice to leave some texture. If it's too thick, add in a bit of the reserved cooking liquid. Season with salt and pepper to taste. (Also feel free to adjust the flavorings to suit your palate–if you like more lemon or more spice from the red pepper flakes, feel free to add more of either!).

Serve with whole wheat pita chips, whole grain flatbread, or grainy crackers.

*In the spring and summertime, by all means make this with fresh fava beans! There will be more peeling involved, but it will be even more flavorful. If you can't find frozen fava beans in your grocery store (I usually buy mine at a Middle Eastern store) feel free to substitute frozen peas or even peeled edamame. The taste will be slightly different, but still delicious.


click for recipe & more…

Add a comment!
Your two cents...

If you don't have a Google login, please select Name/URL from the "Comment as" list below

Monday, November 28, 2011

Quick & Healthy Leftover Turkey Chili

I hope everyone had a marvelous Thanksgiving! Several of you wrote me and told me you brined a turkey for the first time...congrats!! That's really exciting. I ended up brining my turkey again this year (thankfully without any of the disasters of last year) and it was so deliciously moist and flavorful. I am officially a brining convert.

(By the way, this post is about chili, I promise–but we have to relive Thanksgiving first! Bear with me...)


The yellow table was packed to capacity (it fits 12, barely) again this year, and we had a ball. Somehow we only have 11 plates, 11 glasses, etc. so we had to sort of improvise with the twelfth setting. We also only have six matching chairs, so the rest were sort of a hodge-podge of spare folding chairs, drum stools, and anything else that resembles a seat. But despite our lack of sophistication, I'm still glowing a bit. I'm weird like that...every time I throw a dinner party–despite hours of prep and piles of dishes–I'm walking on clouds for days. I just love cooking for friends, and nothing gives me more joy than seeing the faces of good friends eating and laughing around the table.

I kept it low-key this year, just making the turkey and a few sides (butternut squash with red onions, spinach, and dried cranberries, farro with wild mushrooms, and roasted Brussels sprouts with lemon and Parmesan) and leaving everything else for friends to bring. That made my life easier AND it allowed for the culinary talent of our friends to shine through. We had fantastic cranberry lemon thyme cocktails to start (thank you Seth) and a lovely hors d'oeuvres spread of big green olives and carmelized nuts (thanks Kristen), Tuscan white bean tapenade with crudites and a slew of cheeses (thanks Vicki & Gabe), and amazing spinach cheese balls (thanks Katie!). Along with dinner, we had a beautiful loaf of zucchini corn bread (thanks Rachel & Tiago), plus cranberry sauce and mashed sweet potatoes (thanks to Vicki's mom!). And for dessert: pumpkin pie and gelato (thanks Esther & Chidi) and the most gorgeous apple cranberry pie I've ever seen (thanks Rachel!). And a few pumpkin spice macarons from BisousCiao (I couldn't resist).


In the midst of much laughter and story-telling, we did take time to go around and share what we were thankful for, which was considerable. It was great to take time to reflect on the past year and realize just how blessed we are. I feel so grateful to have such a wonderful NYC "family" with whom to celebrate life, around the table.

OK, OK enough about Thanksgiving...now for the promised chili recipe. After several meals of leftovers, I decided it was time to use up the rest of the turkey in a big pot of three-bean chili. I sort of made up the recipe as I went, and I loved the end result. The San Marzano tomatoes make all the difference–they provide the vibrant red color and intense sun-ripened tomato flavor. I personally don't like a fiery hot chili, but if you want more heat you can add in some cayenne or some more chili powder if you want. The recipe below (minus the optional cayenne) is just fine for me, heat-wise. I love this chili, not only because it's the perfect way to use up your leftover turkey and feed a crowd, but because it's so versatile! If you don't have roast turkey lying around (say in January), you can substitute roast chicken or use ground turkey, or you can just eliminate the turkey all together for a delicious vegan three-bean chili. It's also super-quick to make (less than 30 minutes), inexpensive, high in protein and fiber, and low in fat. Not bad!

I highly recommend making a big pot of this and watching an old-school Christmas movie. We watched National Lampoon's Christmas Vacation and laughed hysterically. A perfect ending to a wonderful Thanksgiving weekend.

THREE-BEAN TURKEY CHILI

Serves 6

2 to 3 tablespoons vegetable oil
1 large yellow (or white) onion, finely chopped
4 cloves garlic, minced
2 tablespoons chili powder
1 tablespoon cumin
1 teaspoon dried oregano
1/2 teaspoon cayenne (optional)
1 (28-ounce) can San Marzano peeled tomatoes
1 (15-ounce) can pinto beans
1 (15-ounce) can cannellini beans
1 (15-ounce) can kidney beans
2 1/2 cups water
Salt and pepper to taste
1 1/2 to 2 cups shredded (or cubed) roasted turkey
1/3 cup chopped fresh cilantro

Heat the vegetable oil in pot over medium high heat. Saute the onion 4 to 5 minutes until translucent. Add the garlic, chili powder, cumin, oregano, and cayenne and saute an additional 2 minutes, stirring well to combine. Add the tomatoes and the juices, crushing the whole tomatoes gently with a wooden spoon.

Drain the beans into a strainer and rinse. Add the beans and the water and bring to a boil. Season with 1 teaspoon salt and 1/2 teaspoon pepper (feel free to adjust those proportions according to your tastes). Reduce the heat and let simmer for 15 to 20 minutes or until thickened.

Remove from the heat, stir in the turkey and let sit, covered, for several minutes to heat through. Stir in the cilantro and season with additional salt and pepper if you like.

SERVING SUGGESTIONS:
• Garnish with diced avocados, sour cream, shredded cheddar, or crushed tortilla chips (or any combination of these four toppings).
• If you happen to be making this at a non-Thanksgiving time of year (i.e. you don't have gobs of roast turkey sitting around) you can substitute ground turkey. Just add in about 1 pound of raw ground turkey to the recipe after the onion, garlic, and spices. Saute until it turns white (about 3-4 minutes) then proceed with the recipe as written.
• You can substitute the roasted turkey for roasted chicken.
• Feel free to eliminate the turkey all together for a vegan 3-bean chili (equally delicious!).


click for recipe & more…

Add a comment!
Your two cents...

If you don't have a Google login, please select Name/URL from the "Comment as" list below

Tuesday, November 22, 2011

Thanksgiving Guide 2011


Thanksgiving needn't be a stressful time of year. In fact, hosting Thanksgiving can be a lot of fun. This year, rather than obsessing over the food and the table decor, I've tried to reflect more on the
meaning
of Thanksgiving. To be thankful for what I have, and for the people I love. After all, Thanksgiving is just one day, but we have so much to be thankful for every day. Keeping that perspective takes a lot of the pressure off of trying to create a perfect meal (which, by the way, does not exist outside magazines!). All that aside, planning is a key component of hosting any event. Below, I've laid out a series of Thanksgiving day recipes and ideas–mostly healthy, mostly simple, and most of which can be made (at least partially) in advance. Here's to a fun, relaxed, and joyful Thanksgiving!


Herb Roasted Turkey with Apple Cider Brine
Sick of having a dry turkey? Brining your turkey–soaking it overnight in a saline solution before roasting–definitely creates the moistest, most flavorful turkey you can imagine. Full disclosure: it does take a bit of work, but the end result is fantastic. Give it a try!


Winter Squash Salad with Kale & Pomegranate Seeds
This salad is a perfect canvas to experiment with different types of winter squash. I used acorn and Delicata, but you could really use any type–butternut or Kabocha would also be nice. The gorgeous colors make it an ideal side dish for the holidays.


Farro with Wild Mushrooms
This is a healthy adaptation of my favorite Thanksgiving Day dish growing up: my mom's Brown Rice. I took out the stick of butter and the cans of soup, and substituted farro for the rice and fresh mushrooms for canned. The end result? Still intensely flavorful–without feeling so heavy.


Brussels Sprouts & Red Cabbage Slaw
Super healthy and easy to prepare, Brussels sprouts are a must for me on Thanksgiving day. Studded with dried cranberries and pine nuts, this slaw is delicious and takes only 20 minutes to prepare.


Simple Roasted Cauliflower
If you're not a cauliflower fan (as I used to claim I wasn't), try roasting it. Tossed with a little olive oil, salt, and pepper and blasted in a hot oven, this normally bland vegetable is utterly transformed.


Roasted Sweet Potatoes with Red Onions & Arugula
This is one of my all-time favorite ways to eat sweet potatoes. I love the amazing combination of flavors: sweet potatoes and roasted red onions with rosemary, salty Parmesan, and peppery arugula.


click for recipe & more…
Your two cents...

If you don't have a Google login, please select Name/URL from the "Comment as" list below

Simple Roasted Cauliflower


If you're not a cauliflower fan (as I used to claim I wasn't), try roasting it. Tossed with a little olive oil, salt, and pepper and blasted in a hot oven, cauliflower is utterly transformed. The normally bland, white, cruciferous vegetable (most commonly seen on crudité trays with ranch dip) turns into a golden, salty, addictive snack, with a slightly crispy exterior and meltingly soft interior. I love it simply roasted, or with the additions listed below.


SIMPLE ROASTED CAULIFLOWER

Serves 8

2 heads cauliflower, stalks removed and broken into bite-size florets
1/4 cup olive oil
Salt and pepper to taste

Preheat the oven to 425°F and line two sheet trays with aluminum foil (this makes for easier clean-up).

Toss the cauliflower and olive oil in a large bowl and spread evenly onto two sheet trays. Season with salt and pepper to taste. Roast for 25 to 30 minutes, or until golden brown (and beginning to turn dark on the edges). Switch the trays once during cooking.

Let cool slightly before serving.

VARIATIONS:
• Substitute the cauliflower for broccoli.
• After cooking, toss with some fresh lemon juice and some grated Parmesan.
• For a Mediterranean variation, toss the roasted cauliflower with capers, chopped Kalamata olives, and chopped parsley.
• Sauté a minced garlic clove and 2 anchovies in a tablespoon of olive oil until the garlic is fragrant and the anchovies have melted. Drizzle this mixture over the roasted cauliflower.


click for recipe & more…
Your two cents...

If you don't have a Google login, please select Name/URL from the "Comment as" list below

Monday, November 21, 2011

Turkey Talk: To Brine or Not to Brine


A few weeks before Thanksgiving last year, my in-laws threw us a lovely post-wedding reception near their home in Richland, Michigan. Because we were spending Thanksgiving in NYC with friends, my mother-in-law Jan insisted on cooking a Thanksgiving feast for us while we were there. I'd heard for years about her legendary turkey from Brandon, and it more than lived up to his praises: it was ultra-moist (a feat in and of itself) and so flavorful. When I asked her what her secret was, her one-word response surprised me: brining.

Though I had heard of brining, I had certainly never tried it myself, and I wasn't exactly sure what it entailed. Basically, brining involves soaking the bird for a day or two in a salt-sugar-water-herb mixture. Scientifically speaking, this soaking process breaks down the proteins in the meat tissues, allowing the turkey to absorb water and flavorings (and thus producing a much plumper, moister bird). Though you can make their own brine mixture, Jan swears by World Market's $5.99 turkey brine mixture. The stuff is amazing–you just add it to boiling water (and in her case, apple cider, maple syrup, and spiced rum) and stir until the salt and sugar melt.

You have to cool the mixture for a few hours, then you submerge the turkey in the brining liquid. 'And how in the world do you do that?' I can hear you asking. You can either place the turkey and the liquid in some unscented garbage bags (I highly recommend double or even triple-bagging it) or a sealable brining bag, or if you don't have the space in your fridge, you can use a a big cooler. Then just let the mixture chill for 12 to 24 hours. It does take some planning ahead, but I figured with an end result that good, I had to give this recipe a try.

Jan gave me a couple bags of the brining mix to take home, and I was inspired to brine my own turkey for Thanksgiving a few weeks later. We were having 12 people over, so I bought a 14-pound fresh turkey and two days before Thanksgiving, started the bringing process. Everything was going really well until I realized I didn't have a deep enough container to fit the brining bag with the turkey and brining liquid. I ended up using my deepest roasting pan, which was fine except for the fact that the liquid-filled bag was bulging over the sides. I made sure it was sealed well and carefully slid the whole thing into my refrigerator, praying that there would be no leaks for the next 24 hours.

Everything was fine until it came time to remove the turkey from the brining liquid. I gingerly carried the roasting pan with its bulging liquid contents over to the sink. I slowly unsealed the bag, intending to dump all the liquid into the sink before removing the turkey. I never had that opportunity. As soon as I opened the bag it collapsed, creating a flood of brining liquid–all over me, the counters, the floors, down into the burners on the stove, into the oven, and down in every crack and crevice of the kitchen. It was the biggest sticky mess you could imagine (I had put maple syrup and apple cider in the brine). I had to laugh–here I was trying to create the perfect turkey and I had created a Lucille Ball-type disaster. I wished I had an Ethel to call at that moment!

Though it took me several hours to clean my kitchen, fortunately the turkey was salvaged–I just rinsed it off, patted it dry, and proceeded to roast it as planned. And amazingly, the flavor and the moistness were as good (or even better) than I could have imagined. Brining really does make a tremendous difference. Though I'm still convinced that my mother-in-law's turkey is the best in the world, I'm on the fence as to whether I will brine this year. In a small kitchen, with a small sink and a small refrigerator, it is quite a challenge. And the memory of the last year's brine bath still haunts me! But there's no arguing that the turkey was delicious. Fortunately I still have another couple of days to decide.

The brine recipe below is based on my mother-in-law's and the turkey recipe is adapted from Alton Brown's Good Eats.

THE WORLD'S BEST THANKSGIVING TURKEY

Serves 10 to 12

1 (12 to 14 pound) fresh or frozen turkey

Brine Mixture:

1 bag (2 cups) World Market Turkey Brine (sea salt, sugar, dried cranberries, garlic, sage, apple, orange peel, juniper berries, black peppercorns, thyme, and rosemary)
1 gallon water
1 gallon apple cider
1 cup maple syrup

Turkey Seasonings:

1 pear, sliced
1/2 red onion, sliced
4 sprigs fresh rosemary
4 sprigs fresh thyme
4 cloves garlic, peeled
4 tablespoons softened butter
Salt and pepper

If you are using a frozen turkey, make sure to thaw it completely in the refrigerator (for about 2 to 3 days) before starting the brine. Remove the innards (set aside if you want to use them for gravy later).

In a large pot, combine the brine mixture and the water and bring to a boil. Stir until the sugar and salt in the brine mixture has dissolved. Remove from the heat, cool to room temperature, then refrigerate until thoroughly chilled.

Place the thawed turkey breast-side down in a 5-gallon container or brining bag (or large unscented garbage bags). Carefully pour the chilled brining mixture over the turkey, along with a gallon of chilled apple cider and a cup of maple syrup. The turkey should be completely submerged in the liquid (you may need to weight it down to assure the turkey stays submerged).

Make sure the bag (or container) is well sealed and place it in the refrigerator for 12 to 24 hours, turning the bird once during the brining process.

Remove the bird from the brine (taking care not to dump the brining liquid on the floor like I did!!) and rinse inside and out with cold water and pat dry. It's ready for roasting!

Preheat the oven to 500°F. Remove all oven racks except the lowest one. Place the turkey on a roasting rack inside a roasting pan. Place the pear, red onion, rosemary, thyme, and garlic in the cavity of the bird. Tuck the wings beneath the turkey and tie the legs together (this helps it to roast more evenly). Using your hands, coat the entire turkey with the softened butter and season with salt and pepper.

Roast the turkey at 500°F for 30 minutes. Insert a probe thermometer into the thickest part of the breast (I use the electronic kind that sits out on the counter while the bird roasts) and reduce the oven temperature to 350°F. Roast for about 2 hours or until the internal temperature reaches 161°F. Let the turkey rest, loosely covered with foil, for 15 minutes before carving.


click for recipe & more…

Add a comment!
Your two cents...

If you don't have a Google login, please select Name/URL from the "Comment as" list below